EN45EN 44
D - BEGINNING OPERATION
To adjust this tolerance level, follow the
procedure below
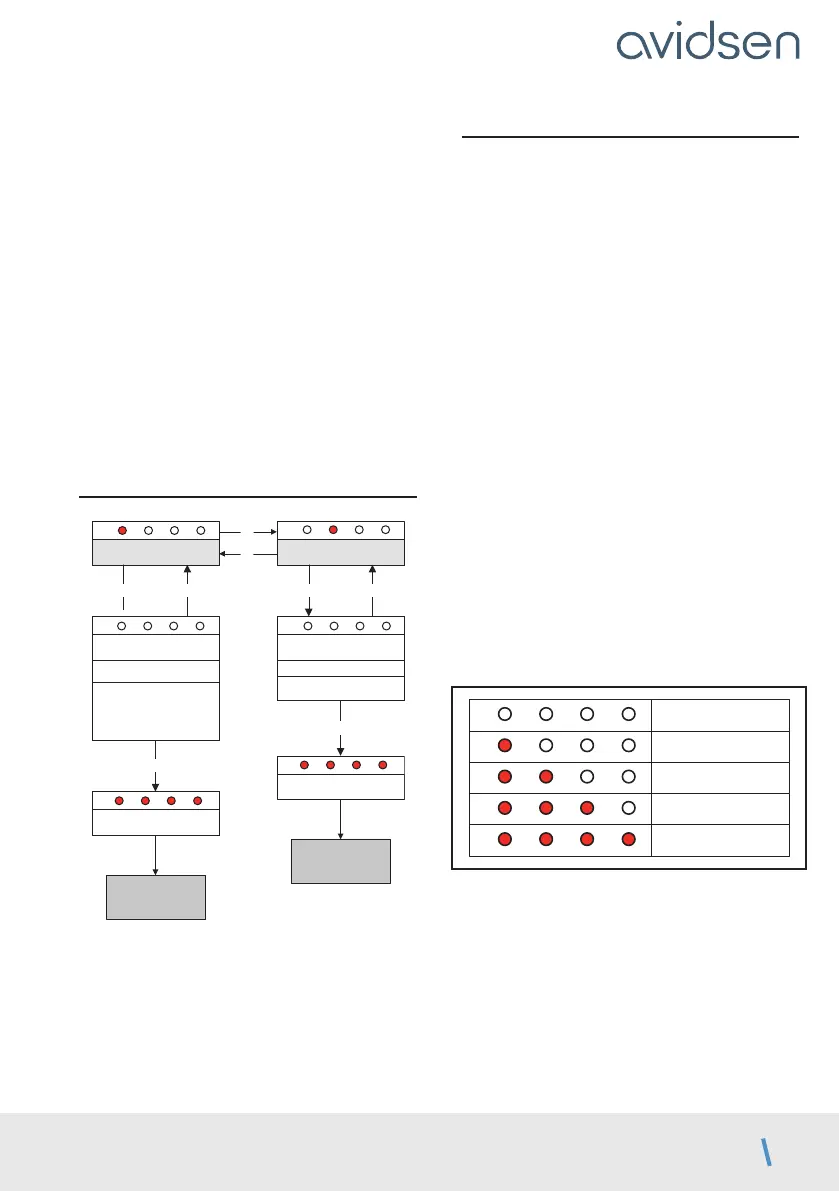
• Press PROG for 3 seconds. L0 will flash once
and L1 will switch on.
• Press “PROG” for 3 seconds. L0 will flash twice.
• Press “+” three times and L3 will turn on instead
of L1.
• Press “OK”, and the number of LEDs lit will then
show the value set.
• Use the “–” and “+” buttons to change this value.
The higher the value, the higher the tolerance
level (“lower risk of obstacle detection at the
stop”).
• Press OK to confirm this value. All the LEDs will
turn on and off to confirm the operation.
Self-learning is required if this setting is
changed.
3.3. - Advanced settings menu (MENU 3)
Décalage fermeture
OK PROG
Réglage temps
+ : augmente le temps
– : diminue le temps
OK
MENU 0
0 : 2.5 sec (par defaut)
1 : 3 sec
2 : 3.5 sec
3 : 4 sec
4 : 4.5 sec
Temps préclignotement
OK PROG
Temps préclignotement
OK
MENU 0
– et + pour régler la valeur
0 : 1 sec (par défaut)
1 : 3 sec
–
+
L1 L2 L3 L4
L1 L2 L3 L4 L1 L2 L3 L4
L1 L2 L3 L4
Enregistre réglage
L1 L2 L3 L4
Enregistre réglage
L1 L2 L3 L4
3.3.1. Panel movement time difference
In general, on closing, one gate panel closes over
the other. This panel is controlled by the motor
connected to output M1 of the electronic card. To
ensure that the panels close in the correct order,
the system arranges for the panel of motor M2 to
come to a stop 2.5 seconds before the panel of
motor M1. If the gate is solid and exposed to the
wind, panel M2 may be stopped by the wind and
panel M1 may be helped by the wind on closing. In
this case, panel M1 may catch up to panel M2 and
the panels may close in the wrong order.
If this occurs, the time interval between the panel
movements during closure may be increased.
To adjust this time interval, follow the
procedure below
• Press PROG for 3 seconds. L0 will flash once
and L1 will switch on.
• Press “PROG” for 3 seconds. L0 will flash twice.
• Press PROG for 3 seconds. L0 will flash 3 times.
• Press “OK”, and the number of LEDs lit will then
show the value set.
• Use the “+” and “-” buttons to change this value
(see table below).
• Press OK to confirm this value. All the LEDs will
turn on and off to confirm the operation.
L1 L2 L3 L4
2.5 s (par défaut)
L1 L2 L3 L4
3 s
L1 L2 L3 L4
3.5 s
L1 L2 L3 L4
4 s
L1 L2 L3 L4
4.5 s
Note: During opening, there is also a time
interval between the panel movements, but
this time interval is fixed and is equal to 2.5
seconds.