Installation Procedure
27
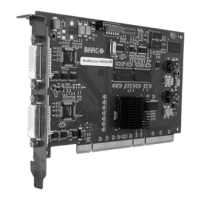
Figure 10
11. Reconnect any cables you have disconnected and plug in the
computer’s power cord.
12. Turn on the display(s) and then your computer.
Turning on your system
WARNING: Wear a grounded, protective ESD strap when handling
or during installation of the display controller. Electrostatic
charges can damage the display controller.
If you have properly installed your graphics card, the Windows
start-up messages will appear once the boot procedure is
finished.
Note: Your Barco display(s) will be running in a basic video
mode at a default refresh rate. Higher resolutions and refresh
rates, such as 1536x2048@60Hz, are not available at this stage of
the installation. Once you have installed the B
ARCO CORONIS 5MP
Display System drivers and software, the Barco monitor Plug and
Play software should automatically set the resolution for the
displays.
13. Install the drivers, QAWeb software and documentation for
your B
ARCO CORONIS 5MP Display System by following the
IO-Panel for the BarcoMed Coronis, BarcoMed Nio, and
BarcoMed 5MP2FH family of display controllers
X
Head 1 – DVI-D Connection
Y
Head 2 – DVI-D Connection