Disassembly / Assembly
3 - 22 Infusomat® Space 6.0
EN
3.8 Housing Bottom Part
Designation Order No.
Loudspeaker SP . . . . . . . . . . . . . . . . . . . . . . . . . . . . . . . 3452 0937
Housing bottom part ISP . . . . . . . . . . . . . . . . . . . . . . . 3452 1305
Rating plate ISP . . . . . . . . . . . . . . . . . . . . . . . . . . . . . . . On request
Snap-in hook SP with leaf spring
(see „Service Parts and Screw Kit“ ➨ pg. 3 - 7)
Screws and cover caps
(see „Service Parts and Screw Kit“ ➨ pg. 3 - 7)
Please pay attention to the corresponding notes during assembly
and installation (see „Housing Bottom Part“ ➨ pg. 3 - 45).
Disassembly
1. Remove the drop sensor connector (not depicted)
from the
housing bottom part (Fig.: 3 - 21 / Item 3).
The drop sensor connector is integrated in the processor PCB.
2. Pierce four cover caps (Fig.: 3 - 21 / Item 5) with a small
screwdriver and pry the
cover caps out.
3. Unscrew three screws (Fig.: 3 - 21 / Item 6) and one screw
(Fig.: 3 - 21 / Item 4).
4. Take off the housing bottom part.
5. Pull the loudspeaker connector off (Fig.: 3 - 21 / Item 2) the
processor PCB and remove the loudspeaker.
6. Pull the snap-in hook (Fig.: 3 - 21 / Item 1) out of the housing
bottom part.
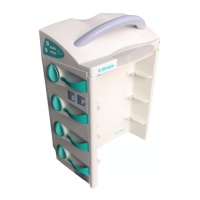
Fig.: 3 - 21
Legend of fig. 3 - 21:
Item Designation
1 Snap-in hook
2 Loudspeaker
3 Housing bottom part
4 Screw DELTA PT 30x12 WN 5452 A2 TORX plus 10IP
5 Cover cap
6 Screw DELTA PT 30x8 WN 5452 A2 TORX plus 10IP

 Loading...