Kangaroo™ Console | 14
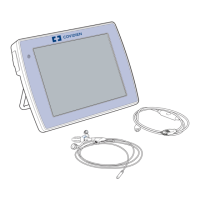
8. Connect interface cable to console.
After entering patient information, the console will request a feeding tube to
beattached.
Start by connecting the larger end of the interface cable to the console.
9. Connect interface cable to feeding tube.
A screen on the console will request that a feeding tube be attached. Connect the
smaller end of the interface cable to the feeding tube. Once the feeding tube and
interface cable are connected to the console, a live feed from the camera will display
on the screen.
CAUTION
Allow enough slack so that there is no stress on the tube or console. Strain on the
tube or console could cause droppage, breakage, or discomfort to thepatient.
CAUTION
If applying lubricant, do not put
lubricant on or near the camera-side
of the feeding tube. The camera vision
may become blocked orblurred.
6. Position patient and estimate feeding tube length.
Position patient in accordance with facility protocol for feeding tubeplacement.
To estimate insertion depth, use the tube to measure the distance from the tip of the
patient’s nose to the earlobe and from the earlobe to the xiphoid process for gastric
placement. Add approximately 10 (ten) inches (25 cm) for intestinal placement.
Spontaneous transpyloric passage of the tip often occurs within 24 to 48 hours.
7. Activate Hydromer coating.
Use water to activate the Hydromer coating on the Kangaroo feeding tube with IRIS
technology. Submerge tip for about 5 seconds to activate the Hydromer coating.
Avoid applying additional
lubricant to tip
Section III: Setting Up and Using the Kangaroo Feeding Tube with IRIS Technology for Placement
cm marks