Kangaroo™ Console | 16
16. Confirm placement.
Confirm feeding tube position per institutional protocol. Supportive
confirmation includes auscultation of the upper left quadrant during
injection of air using a syringe and aspiration of gastric contents. If stylet
is used, placement confirmation may be confirmed with a stylet secured
within the tube. These tubes are equipped with a radiopaque material for
facilitating radiological (X-ray or fluoroscopic) confirmation.
If there is uncertainty of the tube’s distal location after institutional
placement verification methods have been performed, confirmation by
X-ray should beconsidered.
Stylet must be removed before commencement of enteral nutrition
delivery.Safely dispose of all supplies according to the policy of your
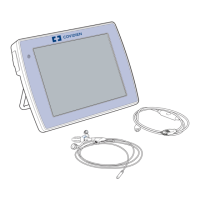
facility. The interface cable is re-usable, do not dispose.
CAUTION
Disconnect the feeding tube from the interface cable prior to feedings.
17. View captured images.
In the main menu, tap the folder menu icon. The folder menu will appear,
displaying patient folders. Patient folders are named using their name,
date of birth, and ID number. Thepatient folder holds all images captured
during theprocedure.
Double tap the desired patient folder to view a list of images
storedwithin.
Double tapping on one of the images will display it on the screen.
18. Export images to USB.
Images can be exported to a USB flash drive and opened on
anothercomputer.
Plug the USB flash drive into the port on the side of the console.
Then, tap the box on the left of the image(s) to be exported. Tapping the
box at the left of the folder selects allimages.
Tap the USB icon.
A pop-up screen will ask which USB port the USB flash drive is plugged
into. Confirm the appropriate drive and press the check mark.
If only one USB is connected, the console will highlight that option.
For privacy purposes, a password has been created by an administrator.
The password will be required in order to view the images on computer.
Note: Passwords are in full upper-case. When using a computer, be sure
to use all upper-case letters.
After the files are exported, disconnect the USB flash drive.
Use WinZip™* or 7-Zip to open the files. It is considered best practice to
decrypt and open the files as soon as possible so that a password is no
longer required.
13. Capture images.
The system offers two ways to capture
an image: using the interface cable or
theconsole.
To capture an image using the
interfacecable:
• Press the button on the interface cable
once to freeze the image during procedure
– Once the image is frozen, it can be
saved or discarded.
• To save the image, click the button on the interface
cable once. An hourglass will appear on the screen
while the system is saving the image.
– To discard the image, click the button on the
interface cable twice. Once the image has
been discarded, the live feed will reappear on
theconsole.
To capture an image using the console:
• Tapping on the camera icon on the display screen to
freeze the image.
– Once the image is frozen, it can be saved or
discarded.
• Tapping the screen once while the image is frozen
will cause the Cancel and Complete icons
toappear.
– Tap on the Done/Complete icon to save the image.
An hourglass will appear on the screen while the
system is saving the image.
• Tap on the Cancel icon to discard the image. Once the image has been discarded,
the live feed will reappear on the console.
14. Ending procedure.
When the procedure is complete and the feeding tube has been placed properly, tap
the green check mark.
A window will pop up requesting confirmation that the procedure is complete. If so,
tap the green check mark again.
Disconnect the interface cable from the feeding tube and cover the electronicport.
Should the operator forget to end the procedure the system will automatically shut
down after 120 minutes of the tube being powered on.
15. MR Information Card.
The MR information card provided within the instructions supplied with the Kangaroo
feeding tube with IRIS technology is to be filled out and removed. The card is to be
carried by the patient.
CAUTION
Passwords are case-sensitive. Use upper-case letters when entering the password on the computer.
Verify USB devices used with this equipment are free of software viruses and other malicious software.
Section III: Setting Up and Using the Kangaroo Feeding Tube with IRIS Technology for Placement
or
11:11:11 PATIENT-N AME -UP -TO-TH IRT Y-CH ARA CTE RS 11-11- 2011 PA TIEN T-ID -XXX X
11:11:11 PATIENT-N AME -UP -TO-TH IRT Y-CH ARA CTE RS 11-11- 2011 PA TIEN T-ID -XXX X