79
Appendix A Channel extension (addition)
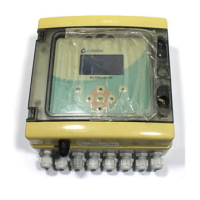
The MULTIMETER 44 is a modular instrument that can be configured with 1, 2 or 3
channels. To an instrument with 1 or 2 channels can be added more measuring boards.
A.1 Board installation
1. Open the transparent door and remove it from instrument.
2. Unscrew the 4 screws (Figure 34) to remove the frontal part of the instrument.
3. Disconnect sensors, relays, power supply, etc.
4. Unscrew the 4 screws “B” (Figure 34) to remove the rear cover of the instrument.
5. Remove the sticker of the back cover and put the sticker of the new channel.
6. Insert the connectors of the new board to the basic plate and press (Figure 34).
7. Assemble in inverse order:
• Put the rear cover.
• Connect sensors, relays, etc.
• Mount the frontal part of the instrument.
• Put the transparent door.
8. Connect to main supply and activate the connected channel, see 4.4.2 Configuration
modification, page 22.
After installing a new measuring board, the following points have to be checked:
• The housing of the instrument has to be screwed firmly to the wall (or rack in case of
panel instruments).
• The housing has to be in good conditions without scratch and no damage that can be
seen.
• The bottom MP5 connector for RS-232 has to be covered with the supplier protection
or to be connected.
DANGER
Only qualified personnel should conduct the installation tasks described in this section of the
manual.
Do not replace any component unless power has been switched off or the area is known to be
non-hazardous.
NOTICE
After installing a new measuring board it must be activated at the instrument configuration.