Neptune 5000
© Copyright Datem Limited 2014
53
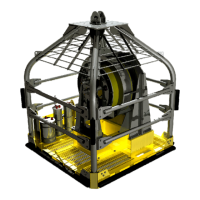
Assembly
This drawing provides a representation of the main parts that make up the
assembly, and the way in which they fit together. Neither the inverter nor
filter contains any field serviceable parts. Therefore any problems identified as
being associated with these items, can only be rectified by complete
replacement of the relevant part.
Pod Removal
It is important to keep the contents of the pod dry; hence any major work
conducted on the pod should take place in a dry workshop. Great care should
be taken when working with this pod, as there are electronic modules and
cabling attached to the underside of the top-cap.
If the pod is to be opened simply to check inverter settings or any other such
operation, the pod can be left clamped to the frame, and the top-cap removed
for access. Any more serious problems such as replacement of the inverter or
filter require full removal of the pod to a dry workshop. To remove the pod
from the frame:
1. Firstly ensure the power is removed from the system, and appropriate
action is taken to prevent accidental energisation,
2. Remove all the cables from the pod’s connectors,
3. Remove the nuts from the vessel clamps and remove the clamps from
the vessel,
4. Move the pod in from the side, so that the top cap can be lifted clear,
5. Check that all the top-cap bolts are present and tight,
6. With an appropriate hoist positioned in from the side of the frame,
attach a suitable lift strap and hoist the pod up and lift it out of the
frame.
Rod Refitting
Refitting the pod is simply the reverse process of removal, but special care
should be taken with ensuring that the threads on the clamp are in good
condition, and that anti-seize grease is applied to the threads of the clamp to
avoid galling.
Inverter Pod Top-Cap Removal
To remove the top-cap assembly:
1. Firstly ensure the power is removed from the system, and appropriate
action is taken to prevent accidental energisation,