(\.)
0
~
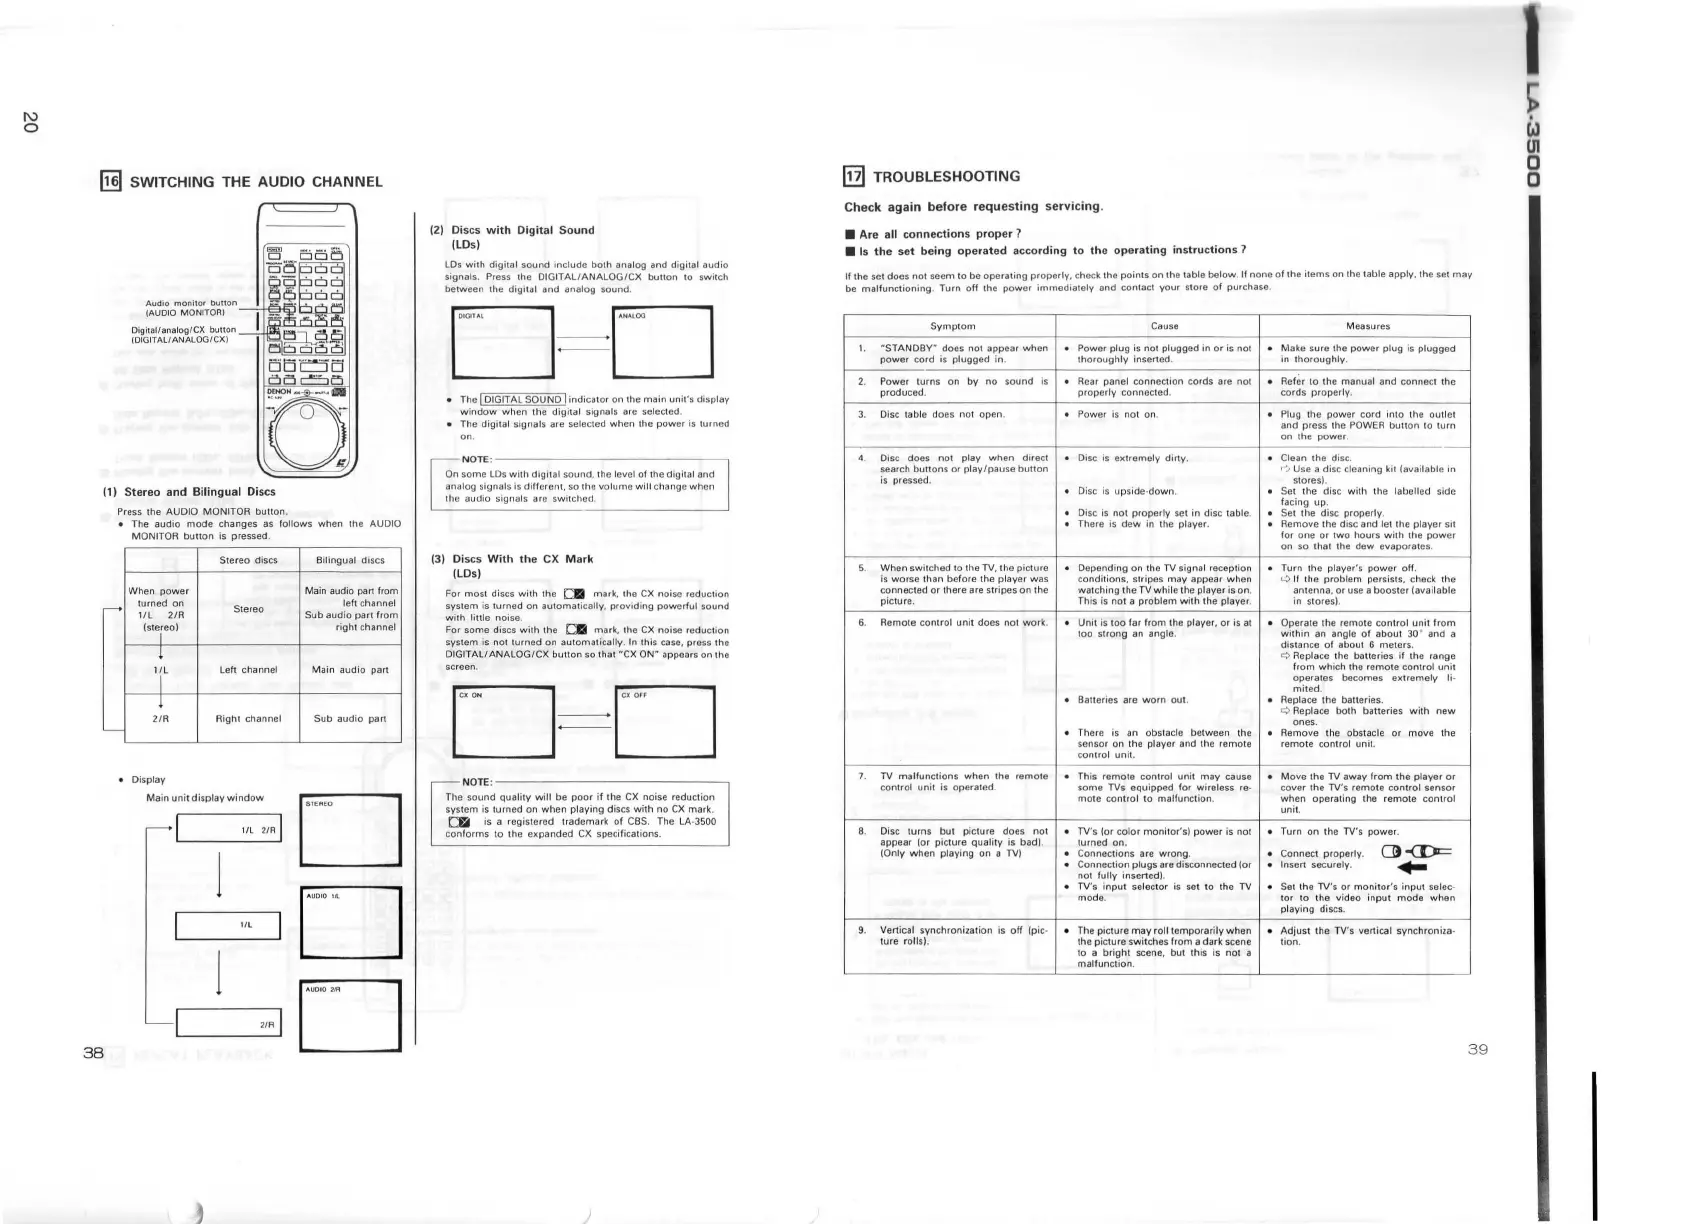
SWITCHING THE AUDIO CHANNEL
Audio
monitor
button
(AUDIO MONITOR)
Digi1al/anatog/CX button
(D!GITAL
/ANALOG/CX)
(1)
Stereo
and
Bilingual Discs
Press the AUDIO MONITOR button.
• The
audio
mode
changes as fo
llows
when
the AUDIO
MONITOR
buuon
is pressed.
Stereo discs
When
power
,---+
turned
on
1/L
2/R
Stereo
(stereo)
I
I
l/L
Left channel
I
j
2/A
Right channel
• Display
Ma
in
unit
display
window
1
/L
2/A I
l/
L
2/R I
38
Bilingual discs
Main audio pan from
left channel
Sub
audio
part
from
right
channe
l
Main
audio
part
Sub
audio
pan
D
D
D
(2) Discs
with
Digital
Sound
(LDs)
LD
s
with
digital
sound
include
both
ana log and digital
audio
signals. Press th e DI
GITALIANALOG/CX
button
to
swi1ch
between the
digi
tal
and
analog
sound
.
D - D
• The I DIGITAL SOU ND l
indicator
on th e
main
unit's
display
window
when
the
digita
l signa ls are
se
lected.
•
The
digital
signals are
se
lected
when
the
power
is turned
NOTE
:--------------~
On s
ome
LDs
wi
th digi1al
sound
, the level
of
the digital and
analog signal s is
different,
so the
volume
will
chang e
when
th e
audio
signals are
swi
tched.
(3)
Di
scs
With
the
CX
Mark
(LDs)
For
most
discs
with
the
C9
mark, the CX noise r
eduction
sys1em is ru rne d
on
automatically,
providing
powerful
sound
with
litt
le
noise
.
For
some
discs
with
the
Cll
mark, the CX noise r
eduction
system is not
turned
on
automalically
.
In
this case, press th e
DIG
ITAL/ANAL
OG/CX
button
so that
..
CX
ON~
appears on 1
he
screen.
D =D
NOTE
:~-------------
~
The
sound
quality
will
be
poor
if the
CX
noise reduction
system
is
turned on
when
playing
discs wi1h
no
CX
mark.
CD is a registered
irademark
of
CBS.
The LA -3500
conforms
to t
he
expanded
CX specifications.
Im
TROUBLESHOOTING
Check
again
before
requesting
servicing
.
• Are all
conne
ct
ions
proper
7
•
Is
the
set
being
operated
according to
the
operating
instructions 7
If the
se
t does
nol
seem
to
be
operating
properly,
check the
poin
1s on the table
below
. II
none
of
the
items
on
lh
e table apply.
lh
e set
may
be
malfunctioning
.
Turn
off
the
power
immediately
and contact
your
store of purchase.
Symptom
1.
~sTANDBr
does
not
appear
when
power
cord
is
plugged
in
.
2.
Power
turns
on
by
no
sound
is
produced
.
3. Disc table does not open .
4 . Disc
does
n
ot
play
when
direct
search
bunons
or
play/pause
buuon
is pressed.
5.
When
switched
to the
TV,
the picture
is
worse
than befo re the
player
was
connected
or
there are stripes
on
the
picture.
6.
Remote
control
un
it
does
not
work
.
7.
TV
malfunclions
when
lhe
remote
control
unit
is opera ted.
B.
Oise turns bu t picture
does
not
appear
!or
picture
quality
is bad).
(Only
when
playing
on
a TV)
9.
Vertical
synchronizalion
is
off
!pic-
tur
e rolls).
Cause Measures
Power
plug
is not
plugged
in
or
is not •
Make
sure the
power
plug
is
plugged
thoroughly
inserted . in
thoroughly
.
•
Rea1
panel connection cords are
not
• Refer
to
the
manual
and connect the
properly
connec
1ed .
cords
properly
.
•
Power
is
not
on. Plug th e
power
cord
into
the out let
and press th e POWER
button
to turn
on
the
power
.
Disc is
extreme
ly
dirty
. • Clean the disc.
~
...
Use a
dis
c cleaning kit (availabl e in
s
tore
s)
.
• Disc is
upside
·
down
. Set the disc
with
the label led side
fa
ci
ng
up
.
• Oise is
not
properly
se
t in disc table. • Set the disc
properly
.
•
The
re
is
dew
in the player. Remove the disc and let the player sit
for
one
or
two
hour
s wi1h the
power
on so that the
dew
evaporates.
• Depending on the
TV
signal reception
co
nditions
,
st
ripes may appear
when
watching
the
TV
wh
ile the player is on.
This
is
not
a
problem
with
the
player
.
•
Unit
is
too
far
from
the player,
or
is
at
too s
trong
an angle.
• Ba11eries
are
worn
out
.
• There is an
obstacle between the
sensor on the
player and the
remote
contro
l unit.
• This
remote
con1rol
unit
may
cause
some
TVs
equipped
for
wireless re·
mole
cont
rol to malfunction.
• TV's
!or
color
monitor's)
power
is
not
turned on.
•
Co
nne
c
tion
s are
wrong
.
• Connection
plugs
are disconnected
!or
not
fully
inserted).
• TV
's
input
se
l
ec
t
or
is set to the
TV
mode.
• The picture
may
ro
ll
temporarily
when
the pic1ure switches
from
a
dark
scene
10 a
bright
scene, but this is
not
a
malfunction.
Turn
the player's
pow
er
off
.
t..;>
II
the
problem
persists, check the
antenna,
or
use a b
oos
ter !available
in
s1ores).
•
Operate the remote co
ntr
ol
unit
fr
om
within
an angle
or
about
30 ° and a
distance
of
about 6
meters
.
c::>
Replace the baueries
if
the range
from
which
the
remote
control
unit
opera
tes becomes
exlremely
Ii·
mited
.
• Replace the batleries.
t::>
Replace both batteries
with
new
ones.
• Remove the obstacle
or
move
the
remote
conlrol
unit.
•
Move
the TV away
from
the
player
or
cover
the TV's
remote
cont
rol sensor
when
operating the
remote
control
unit.
•
Turn
on
the TV's
power
.
• Connect
properly
.
CJt
-(I)i::=
• Insert securely.
"4-
•
Se
1 the TV's
or
monitor's
input
selec·
tor to the
video
input
mode
when
playing
discs.
•
Ad
just the
TV
's vertical synchroniza·
tion
.
39
~
w
U1
0
0


 To Next Page