【2-4】
WHEELS/TIRES
● Repeat the straight edge procedure on the other side of the
vehicle, now the front wheels are parallel to each other and to
the center line of the vehicle.
● Go on to the Toe-in Inspection procedure.
Toe-in Inspection
● Support the vehicle on a stand or the jack so that the front
wheels are off the ground.
● Apply a heavy coat of the chalk near the center of the front tires.
● Using a needle nose scriber, mark a thin mark near the center of
the chalk coating while turning the wheel.
● Keeping the front wheels off the ground, set the handlebar
straight ahead.
●At the level of the axle height, measure the distance between the
scribed lines for both front and rear of the front tires.
● Subtract the measurement of the front from the measurement of
the rear to get the toe-in.
If the toe-in is not in the specified range, go on to the Toe-in
adjustment procedure. Toe-in of Front Wheels Standard:
Standard 0~2 mm
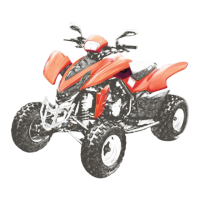
Toe-in Adjustment
● Loosen the locknuts [A] [B] and turn the adjusting sleeves [C]
the same number of turns on both sides to achieve the specified
toe-in.
● Check the toe-in.
● Tighten:
Torque - Tie-Rod Adjusting Sleeve Locknuts: 33 N-m (3.4
kgf-m, 45 ft-lb)
● Test ride the vehicle.
NOTE
○ The nut [A] on the tie-rod has left-hand threads. Turn the nut
clockwise for loosening.
○ The toe-in will be near the specified value, if the tie-rod
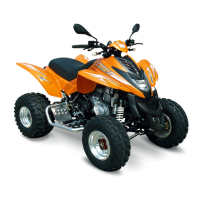
length [D] is 385 mm on each tie-rod.
CAUTION:
Adjust the tie-rod length so that the visible thread length [E]
is even on both ends of the tie-rod. Uneven length could
cause tie-rod damage.
A
B
C