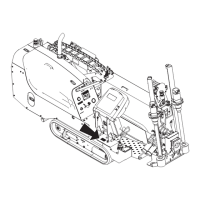
JT100/JT100 All Terrain Operator’s Manual Conduct a Bore - 125
Swab the Hole
Swab the Hole
1. Move carriage forward until carriage touches front
frame.
2. Move carriage to rear of drill frame with drilling
fluid and inner rotation on.
3. Move carriage forward until pipe joint is properly
positioned in clamps (see “Clamp Pipe” on
page 120) to leave gap between end of bore and
drill head (shown).
Enable Automated Pipeloader System
IMPORTANT: Swab hole after each pipe is drilled to remove cuttings and keep the hole clear (AT Mode
only). Some conditions may require more frequent swabbing.
Add Pipe Remove Pipe
1. Make sure pipe box is properly positioned.
2. With carriage in center of drill frame, open
front wrench and retract shuttles for add pipe
function to work.
3. Press top/front of add pipe/manual/remove
pipe switch.
4. Green control cycle light will come on, grippers
will open, pipe will be lowered, and then green
control cycle light will flash.
1. Make sure pipe box is properly positioned.
2. With carriage in center of drill frame, open
front wrench and retract shuttles for add pipe
function to work.
3. Press bottom/rear of add pipe/manual/remove
pipe switch.
4. Green control cycle light will come on, grippers
will open, pipe will be lowered and lifted off
shuttles, and then green control cycle light will
flash.
IMPORTANT: If you leave the seat during an add or remove pipe cycle, switch to manual control and
finish pipe cycle. Then switch back to add pipe or remove pipe. If you leave the seat between add or
remove pipe cycles, re-enabling system is not needed.
 Loading...