W2940305 Rev 07 8/2019 Dover Fueling Solutions 35
Seal Pins
Calibration
Door B
Calibration
Door A
WIP
Calibration Door A
Calibration Door B
Seal Pins
WIP
Xflo Fuel MeteriMeter Fuel Meter
Seal Wires
4.6.3 Calibration Procedure
Step 1 Dispense product into the certified calibration container to wet the container and
then empty it back into the tank, allowing it to drain for 10 seconds. If dispensing
DEF, properly dispose of the DEF from the can (see WARNINGS in front of
manual.)
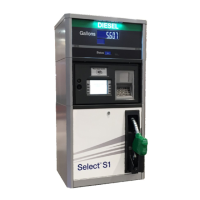
Step 2 Identify the calibration door for the meter in need of calibration. Reference Figure
4-4 for the location of the calibration doors.
NOTE: An easy way to identify which meter corresponds to which hose is to start at
the discharge outlet casting of the desired hose and trace the discharge line
back to the meter. On super-high capacity models, two meters feed one hose.
At the discharge outlet casting, two discharge lines branch off from the
casting. Trace each line back to its meter to determine the two meters tied to
that hose. Each meter must be calibrated separately. When the calibration
door of one meter is opened, it automatically closes the solenoid valve to the
other meter so each meter can be calibrated independently.
Figure 4-4 Meter Modules
Step 3 Remove the seal wire and pin to allow access to the calibration door.
Step 4 Open the calibration door of the meter to be calibrated. (Only one door can be
opened at a time during the calibration process.)
Step 5 Fill the calibration container (5 gallons or 20 liters) to exactly the “0” mark on the
sight glass (read the bottom of the meniscus). Disregard any volumes shown on
the dispenser display.
NOTE: With Super-High Capacity models that will get verified with a larger test
container (i.e. 50 or 100 gallons), it is important to try and duplicate the same
filling characteristics with the smaller calibration container that will be used
when filling the larger test container (as much as possible at full flow and
avoid many nozzle snaps to reach the “0” mark). Otherwise, the dispenser
may be outside the acceptance tolerance when verifying with the larger test
container.
Step 6 Return the nozzle to the nozzle boot and close the calibration door (this now
redefines the calibration factor in the pulser).
Step 7 Empty the container back into the tank and let it drain for 10 seconds. If dispensing
DEF, properly dispose of the DEF from the can (see WARNINGS in front of
manual.)