Installation
Eaton ePDU G3 Operation Manual P-164000277—Rev 1 www.eaton.com/ePDU 14
Installation Overview
NOTE 1 Power cords for the devices that you connect to the ePDU are not
included.
NOTE 2 Depe
nding on your choice of installation method, some parts may not be
used.
NOTE 3 Use on
ly the supplied screws for installation. Hand tighten the screws. Do
not overtighten to avoid stripping the screws.
NOTE 4 The mounting button screws are thread forming. When tightening or
removing a thread forming screw initially, the fit may be tighter than usual.
NOTE 5 If a
square-hole rack is used, cage nuts must be installed.
Use great care in handling the ePDU during installation. Avoid unnecessary contact between the
ePDU and the rack.
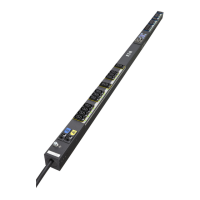
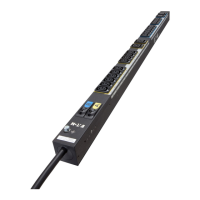
ePDU
The ePDU G3 is designed to be mounted without the use of tools. Mounting buttons are pre-installed on the
rear of the ePDU at the factory. If you wish to use a different moun
ting option, such as the clip foot or side
mounting, tools may be required as follows:
l
Phillips cross-head screwdriver
l
Flat-blade screwdriver
l
0 mm (11/32”) wrench
l
M6 screws and M6 cage nuts
l
M6 cage nut insertion tool
l
T- 2 5 TO R X
®
driver
Configurations
You can install one or two ePDUs vertically on each side of the rack (see Figure 7).
90° mounting
Figure 7. Vertical ePDU Configurations
 Loading...