M
Mark ButlerAug 29, 2025
What does 'COVER OPEN CLOSE COVER' mean on my Epson printer?
- TTina RoblesAug 30, 2025
The message 'COVER OPEN CLOSE COVER' indicates that the front cover is open. Close the front cover to continue.
What does 'COVER OPEN CLOSE COVER' mean on my Epson printer?
The message 'COVER OPEN CLOSE COVER' indicates that the front cover is open. Close the front cover to continue.
What to do if my Epson STYLUS PRO 9400 Printer displays 'INK CARTRIDGE ERROR REPLACE CARTRIDGE'?
This message indicates a CSIC error has occurred. Remove the ink cartridge and then reinstall it. If the message reappears, replace the ink cartridge with a new one.
What to do if my Epson printer says 'PAPER SKEW LOAD PAPER PROPERLY'?
This message indicates that the paper is not loaded straight and needs to be aligned. Release the paper lever, set the paper properly, and then set the paper lever to the secured position.
How to resolve 'PAPER CUT ERROR REMOVE UNCUT PAPER' on my Epson STYLUS PRO 9400?
This error occurs when paper is not cut correctly with Roll Auto Cut On selected. Release the paper lever, remove the uncut paper, and then set the paper lever to the secured position.
What does 'LEVER RELEASED LOWER THE PAPER SET LEVER' mean on my Epson STYLUS PRO 9400 Printer?
This message indicates that the paper lever is in the released position. Move the paper lever to the secured position.
What does 'LEVER RELEASED LOAD PAPER' mean on my Epson STYLUS PRO 9400 Printer?
The message 'LEVER RELEASED LOAD PAPER' indicates that the paper is not loaded. Load the paper into the printer.
How to fix 'INK LEVER LOWER THE LEFT INK LEVER' on my Epson Printer?
This message indicates that the ink lever on the left ink compartment is raised. Lower the ink lever on the left ink compartment.
| Country of origin | Japan |
|---|---|
| Sound pressure level (printing) | 50 dB |
| Color | Yes |
| Maximum resolution | 1440 x 720 DPI |
| Number of print cartridges | 4 |
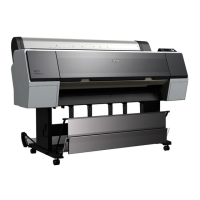
| Maximum print size | A0 (841 x 1189 mm) |
| Compatible operating systems | Mac OS X, OS 9 Microsoft Windows 2000 / XP |
| Power consumption (standby) | 6 W |
| Power consumption (typical) | 50 W |
| USB connector | USB Type-A |
| USB 2.0 ports quantity | 1 |
| Pallet width | 1200 mm |
| Pallet height | 1000 mm |
| Quantity per pack | 1 pc(s) |
| Pallet length (UK) | 1890 mm |
| Quantity per pallet | 2 pc(s) |
| Package depth | 1880 mm |
| Package width | 820 mm |
| Package height | 870 mm |
| Package weight | 125000 g |
| Dimensions (WxDxH) | 1702 x 678 x 1196 mm |
|---|
Signals a precaution that, if ignored, could result in serious or fatal personal injury.
Signals a precaution that, if ignored, could result in damage to equipment.
Describes the manual's structure, listing six chapters and an appendix.
Explains symbols used to provide additional information or warn of danger.
Provides a general overview and specifications of the product, including features.
Details technical specifications like print method, resolution, paper handling, and speed.
Illustrates the printer's exterior and identifies key parts and connectors.
Explains the printer's control panel, including buttons, display, and LEDs.
Lists the printer's main controller components: CPU, RAM, and interfaces.
Describes the available interface options: USB, IEEE1394, and optional interfaces.
Details available optional units and consumables like ink cartridges and maintenance tanks.
Introduces the chapter's content on print mechanism and operating principles.
Explains the major electrical parts of the printer's print mechanism.
Describes the operation of the C594 MAIN Board and its components.
Details the power supply circuit board and its control signals.
Explains the purpose and principle of colorimetric calibration for color accuracy.
Provides basic procedures for efficient printer troubleshooting.
Explains error messages displayed on the LCD panel and their remedies.
Addresses print quality issues like dot missing and bands, offering solutions.
Provides remedies for service call errors that require professional intervention.
Introduces disassembly procedures and general precautions.
Details the step-by-step procedures for disassembling printer components.
Introduces the adjustment program and procedures after repair or part replacement.
Covers mechanical adjustments like sensor calibration and belt tension.
Explains fundamental adjustments like RTC/ID settings and serial number input.
Details advanced adjustments like Auto Bi-D and destination settings.
Describes how to check print quality results like nozzle status and alignment.
Explains how to reset various counters related to component life.
Guides on how to update the printer's firmware.
Details the procedure for setting the printer model after Main Board replacement.
Provides information on how to maintain the printer for optimum operating condition.
Details periodic maintenance items and product life estimates for components.
Lists essential items to check during printer servicing.
Explains the lubrication points and procedures for printer maintenance.
Lists and describes the connectors on the main and sub boards.
Provides circuit diagrams for various printer boards.
Includes exploded diagrams of printer parts for assembly/disassembly reference.