EasyManuals Logo

Epson WorkForce 1100 User Manual

Epson WorkForce 1100
163 pages
To Next Page IconTo Next Page
To Previous Page IconTo Previous Page
Page #145 background imageLoading...
Page #145 background image
WorkForce 1100/Epson Stylus Office T1110/B1100/T1100/Epson ME Office 1100 Revision C
Adjustment Adjustment without Using Adjustment Program 145
Confidential
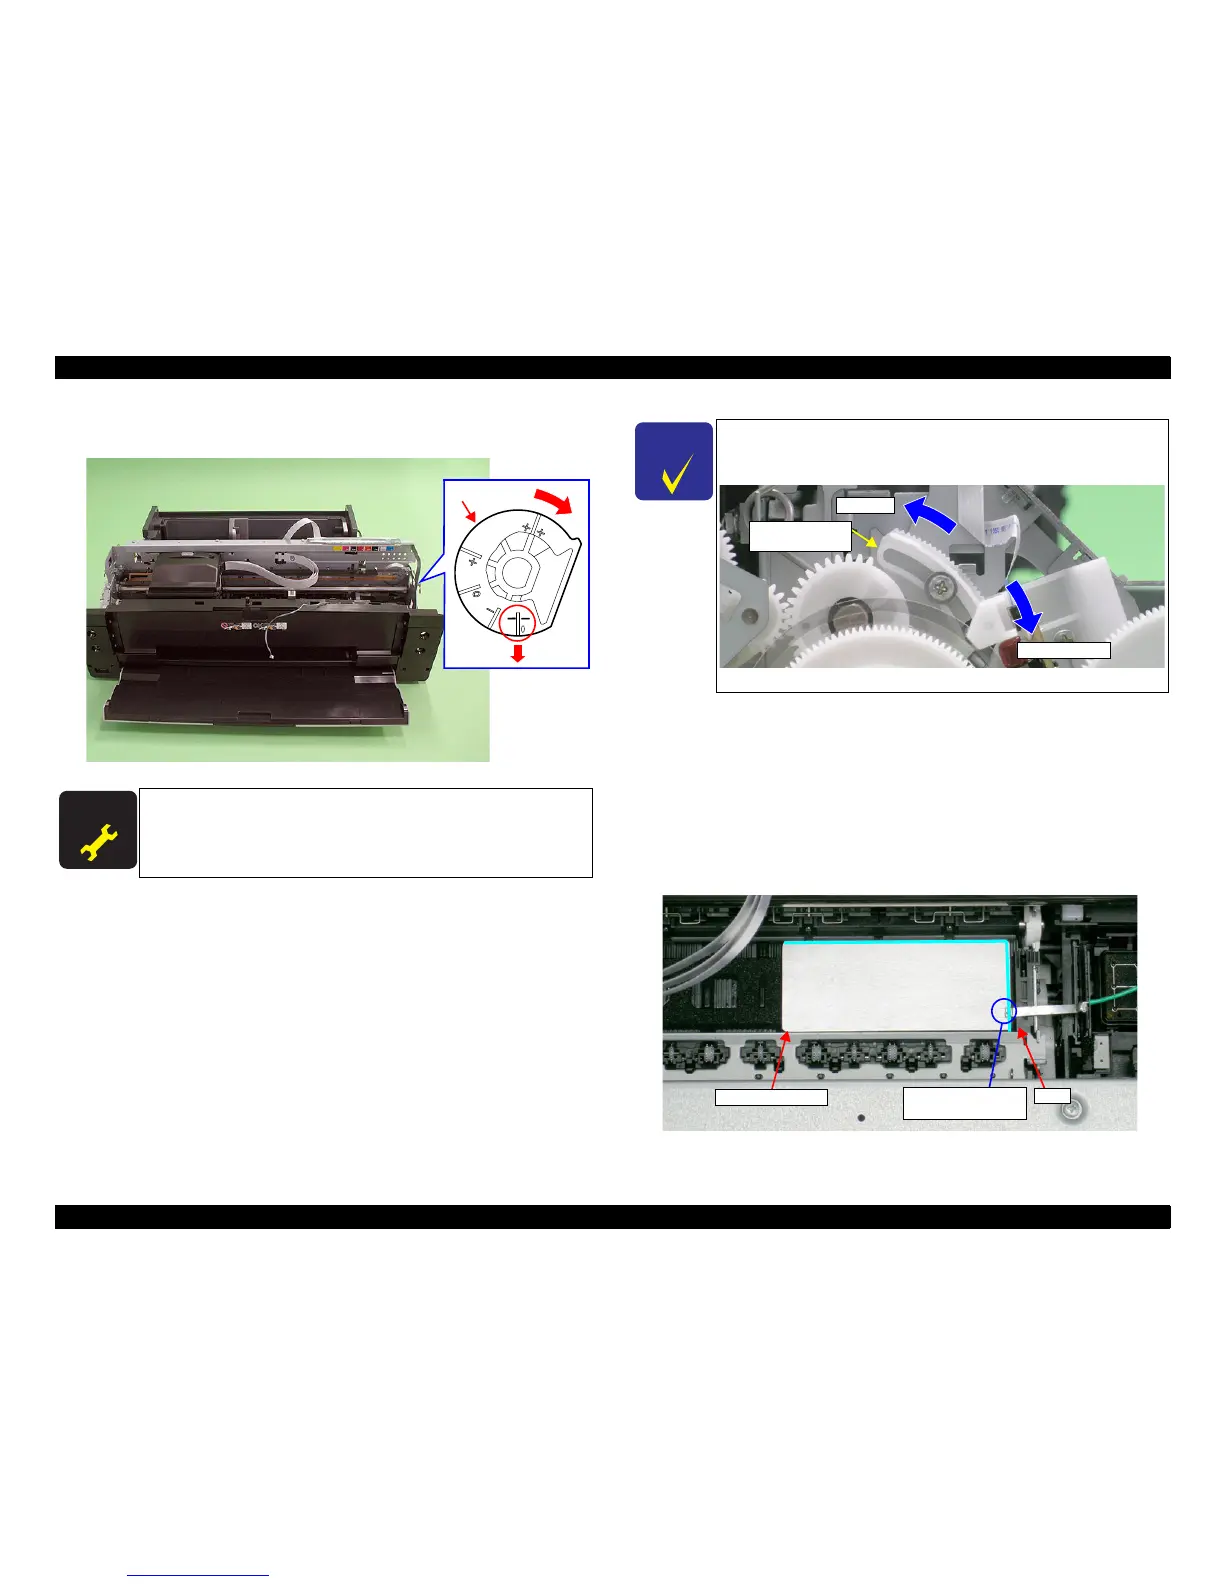
8. To set the PG position to the “--” position, turn the PG Cam on the right end of the
Carriage Shaft clockwise so that the point marked “--” faces down.
Figure 5-15. Markings of the PG Cam
9. Lower the Gear of the Parallelism Adjust Bushing on the left side of the frame
stepwise, and confirm continuity. When continuity is confirmed, define the
position where the Gear was raised one step up from the continuity position
(where continuity is lost) as the left side PG position. Move the Parallelism Adjust
Bushing at least twice to confirm that the continuity position and the non-
continuity position are the same.
10. To set the PG position to “0” or more, turn the PG Cams on both ends of the
Carriage Shaft CCW so that the point marked “0” (or “+” or “++”) faces down.
11. With its conductor connection portion up, set the Adjustment Gauge in the
specified position (on the right side of the Front Paper Guide).
Setting Position
Rear direction: Align the rear end of the Gauge with the Driven Roller Shaft
of the Upper Paper Guide.
Right direction: Release the right end of the Gauge from the Tab on the Front
Paper Guide in Figure 5-17.
Figure 5-17. Setting the Adjustment Gauge
A D J U S T M E N T
R E Q U I R E D
PG Standard Value
PG – – (Minus Minus) :1.05mm~1.25mm
PG – (Minus) :1.2mm~1.4mm
Adjustment Resolution :0.06mm
PG Cam
C H E C K
P O I N T
The following figure shows the states of the Adjust Parallel Bushing
of the left side of the frame and the PG. This also applies to the
Adjust Parallel Bushing on the right side of the frame.
Figure 5-16. Relationship between Parallelism Adjust Bushing and PG
Narrower PG
Wider PG
Parallelism
Adjust Bushing
Setting Position
Conductor
Connection Point
Tab

Table of Contents

Other manuals for Epson WorkForce 1100

Questions and Answers:

Question and Answer IconNeed help?

Do you have a question about the Epson WorkForce 1100 and is the answer not in the manual?

Epson WorkForce 1100 Specifications

General IconGeneral
ColorYes
Duplex printingNo
Printing colorsBlack, Cyan, Magenta, Yellow
Maximum duty cycle- pages per month
Number of print cartridges5
Maximum resolution5760 x 1440 DPI
Print speed (black, normal quality, A4/US Letter)- ppm
Printing noise level35 dB
Total input capacity100 sheets
Total output capacity- sheets
Total number of input trays1
Envelopes sizes10, C6, DL
Paper tray media typesBond paper, Envelopes, Glossy paper, Photo paper, Plain paper
Non-ISO print media sizesLegal
ISO A-series sizes (A0...A9)A3, A4, A6
Borderless printing media sizes4x6, 5x7, A4, Letter
Maximum ISO A-series paper sizeA3
Standard interfacesUSB 2.0
USB 2.0 ports quantityUSB 2.0 ports have a data transmission speed of 480 Mbps, and are backwards compatible with USB 1.1 ports. You can connect all kinds of peripheral devices to them.
Bundled softwareWeb to Page and Epson Easy Photo Print
AC input voltage120 V
AC input frequency50 - 60 Hz
Power consumption (standby)1.3 W
Power consumption (printing)26 W
CertificationUL60950, CSA C22.2 No. 60950, EMI FCC Part 15 subpart B B, CAN / CSA – CEI / IEC CISPR 22 B
Market positioningBusiness
Sustainability certificatesENERGY STAR
Compatible operating systemsWindows 7, Windows Vista, Windows XP, Windows XP Professional x64, Windows 2000 Mac OS X 10.3.9, 10.4.11, 10.5.x and 10.6.x.
Print technologyInkjet
Weight and Dimensions IconWeight and Dimensions
Depth797.6 mm
Width617.2 mm
Height416.6 mm

Related product manuals