40
MR16 Owner’s Manual (Basic operations)
9) While holding down the [RECORD] key, press the
[PLAY] key to start recording.
The recorder records the keyboard while
playing back track 1 (guitar).
10) When recording completes, press the [STOP] key
to stop the recorder.
<Note>:
We recommend to press the
[
REC SELECT
] key for tracks 9/10 to unarm
tracks 9/10.
Starting recording
11) Press the [REWIND] key while holding down the
[STOP] key to locate the recorder to the
beginning of the song.
12) Press the [PLAY] key to start playback.
You can adjust the monitor level using the track
faders, as well as the [MASTER] fader and
[PHONES VOL] control.
Playing back the recorded track
<Note>:
If you are not satisfied with the re-
sult, use the undo/redo function to cancel
the recording and try again.
Undoing recording (undo/redo)
If you press the [UNDO/REDO] key after finishing
recording, you can return to the condition before
the recording started (UNDO operation). Therefore,
you can try recording again.
If you press the [UNDO/REDO] key again (after
UNDO), the undo operation is canceled and you
can return to the condition when the recording
finished (REDO operation).
<Notes>:
The undo/redo function is available for
all kind of recordings, however, if you carry out
any of the following operations after making re-
cording, you cannot undo the recording.
• Carrying out new recording.
• Carrying out track or part editing.
• Turning off the power.
• Selecting another song or editing the song name.
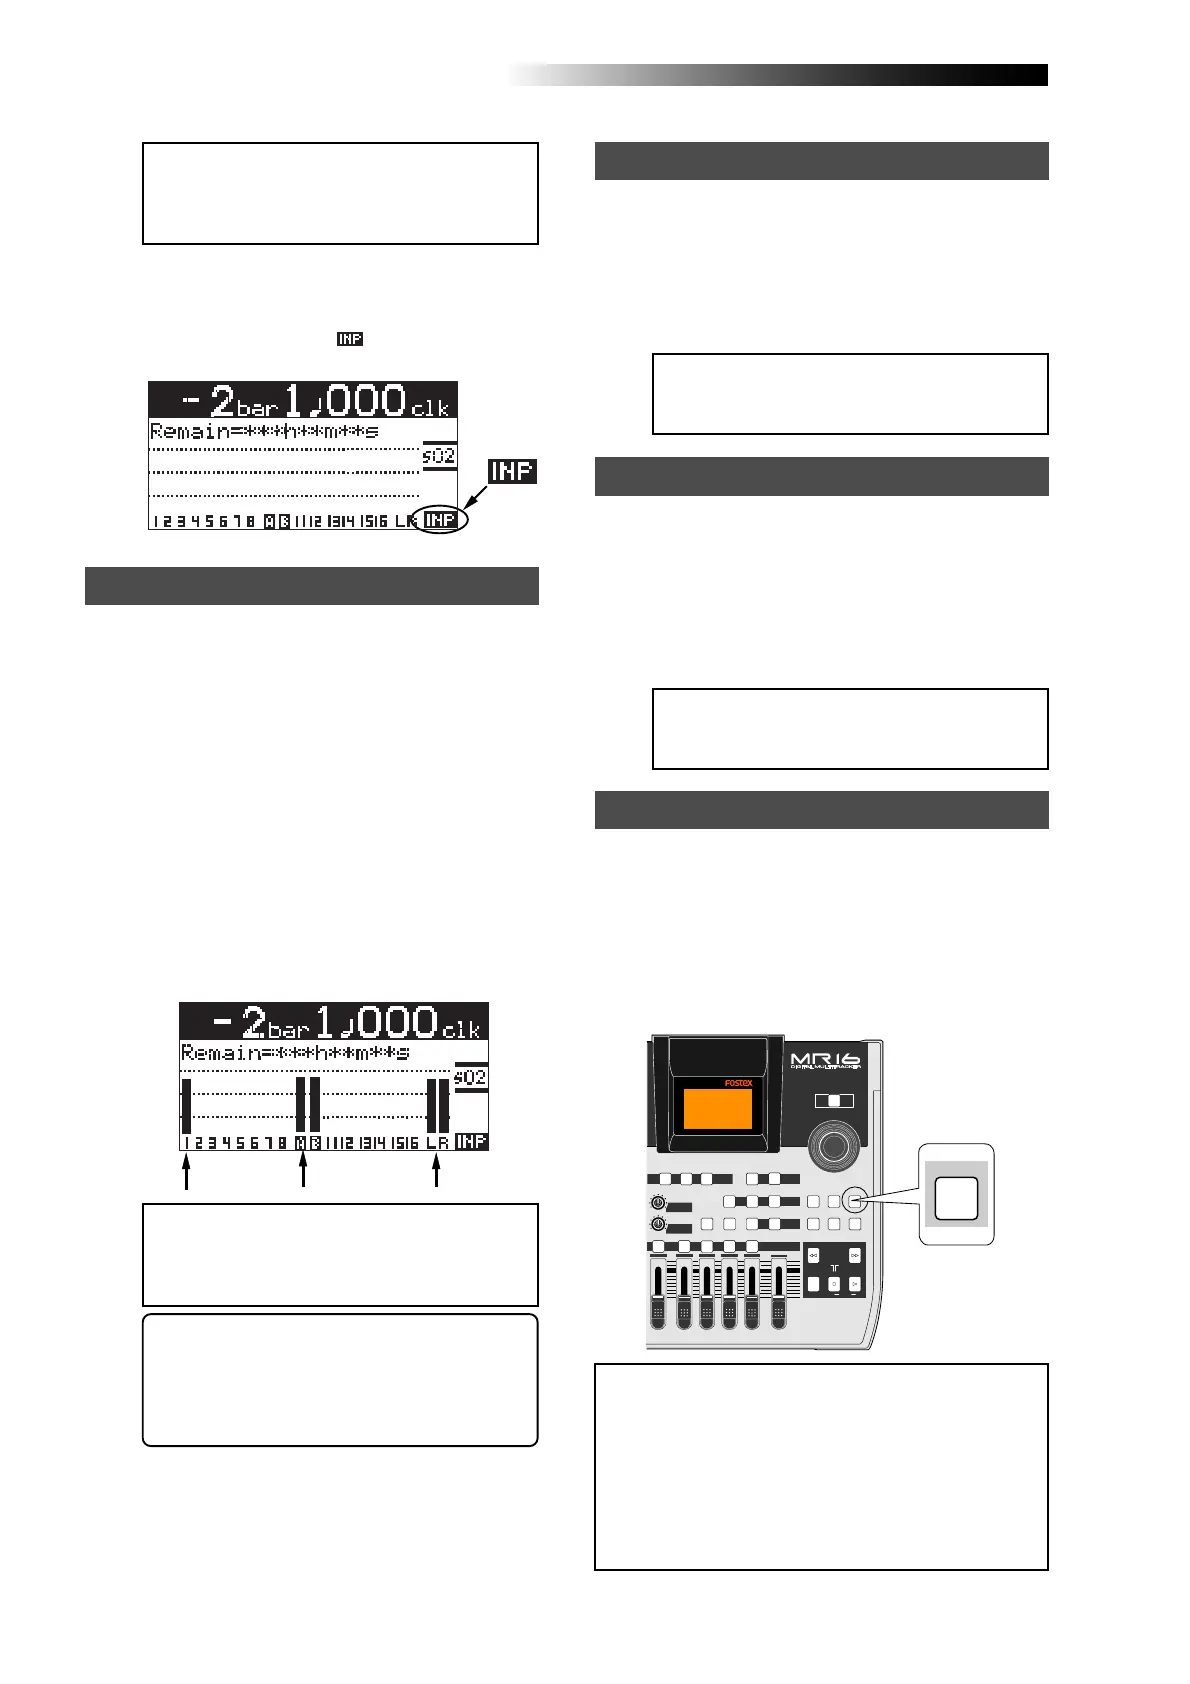
[UNDO/REDO] key
<Note>:
Track 1 and 9/10 faders are used
to adjust the monitor level. To adjust the
recording levels, use the [
TRIM
] controls of
the [
INPUT A
] and [
INPUT B
] channels.
<Note>:
Adjust each [
TRIM
] control properly
so that the corresponding PEAK indicator
does not light at the loudest part of the key-
board sound.
<Tip>: When receiving a line level signal, set
the [TRIM] control to left ("LINE") to get the
appropriate level. When receiving a micro-
phone signal, set the [TRIM] control to right
("MIC") to get the appropriate level.
5) Press the [RECORD] key once (the key indicator
starts flashing).
The armed tracks 9/10 now enter the input
monitor mode, while "
" is shown on the
home screen.
Adjusting the recording levels while listening to track 1
6) Press the [PLAY] key to play back the song from
the beginning.
Though tracks 9/10 are in the input monitor
mode, you can hear the track 1 signal by
rotating the [PHONES VOL] control clockwise
(while the meter for track 1 shows the
playback level).
7) While playing the keyboard, adjust the recording
levels using the [TRIM] controls of the [INPUT A]
and [INPUT B] channels.
Adjust the levels appropriately so that the PEAK
indicators for these input channels do not light.
The home screen shows the playback level of
track 1 and the input levels of tracks 9 and 10,
as well as the stereo L and R output levels.
8) After adjusting the recording levels properly,
press the [REWIND] key while holding down the
[STOP] key to locate the recorder to the
beginning of the song.
POWER
8
010
LR
MAX
MIN
MASTER
REC SELECT
RECORD STOP PLAY
REWIND F FWD
UNDO/REDO
STORE
LOCATE REC END
LOCATE ABS ZERO
A-B PLAY
BOUNCE
MASTERING
BRIGHT
15/16 > STEREO WAV FILE
NATURAL
POWERFUL
B / OUTA / INPLAY MODEAUTO PUNCH
LOCATE
EFFECT
DELAYPLATEHALL
BOUNCE MODE
CONTRAST
TIMEBASE SELECT
RHYTHM GUIDE DIRECT LOCATE
EFFECT SEND
PAN
9/10 11/12 13/14 15/16
YZ9 +-_0VWX8 DELETE
MENU / ENTER
UNDO/REDO