VMP-IOMM-2018-2
Fulton Ltd
Page 63
TROUBLESHOOTING - 6
Note: One of the most common causes of ame failure is dirt/sediment in the oil lter, oil lines, solenoid valves
or nozzle, caused by a new delivery of oil. If the oil tank level is allowed to fall near to the bottom of the tank it is
highly probable that sediment on the bottom of the tank will be disturbed and mixed in with the new oil delivery,
especially if the delivery rate is too fast.
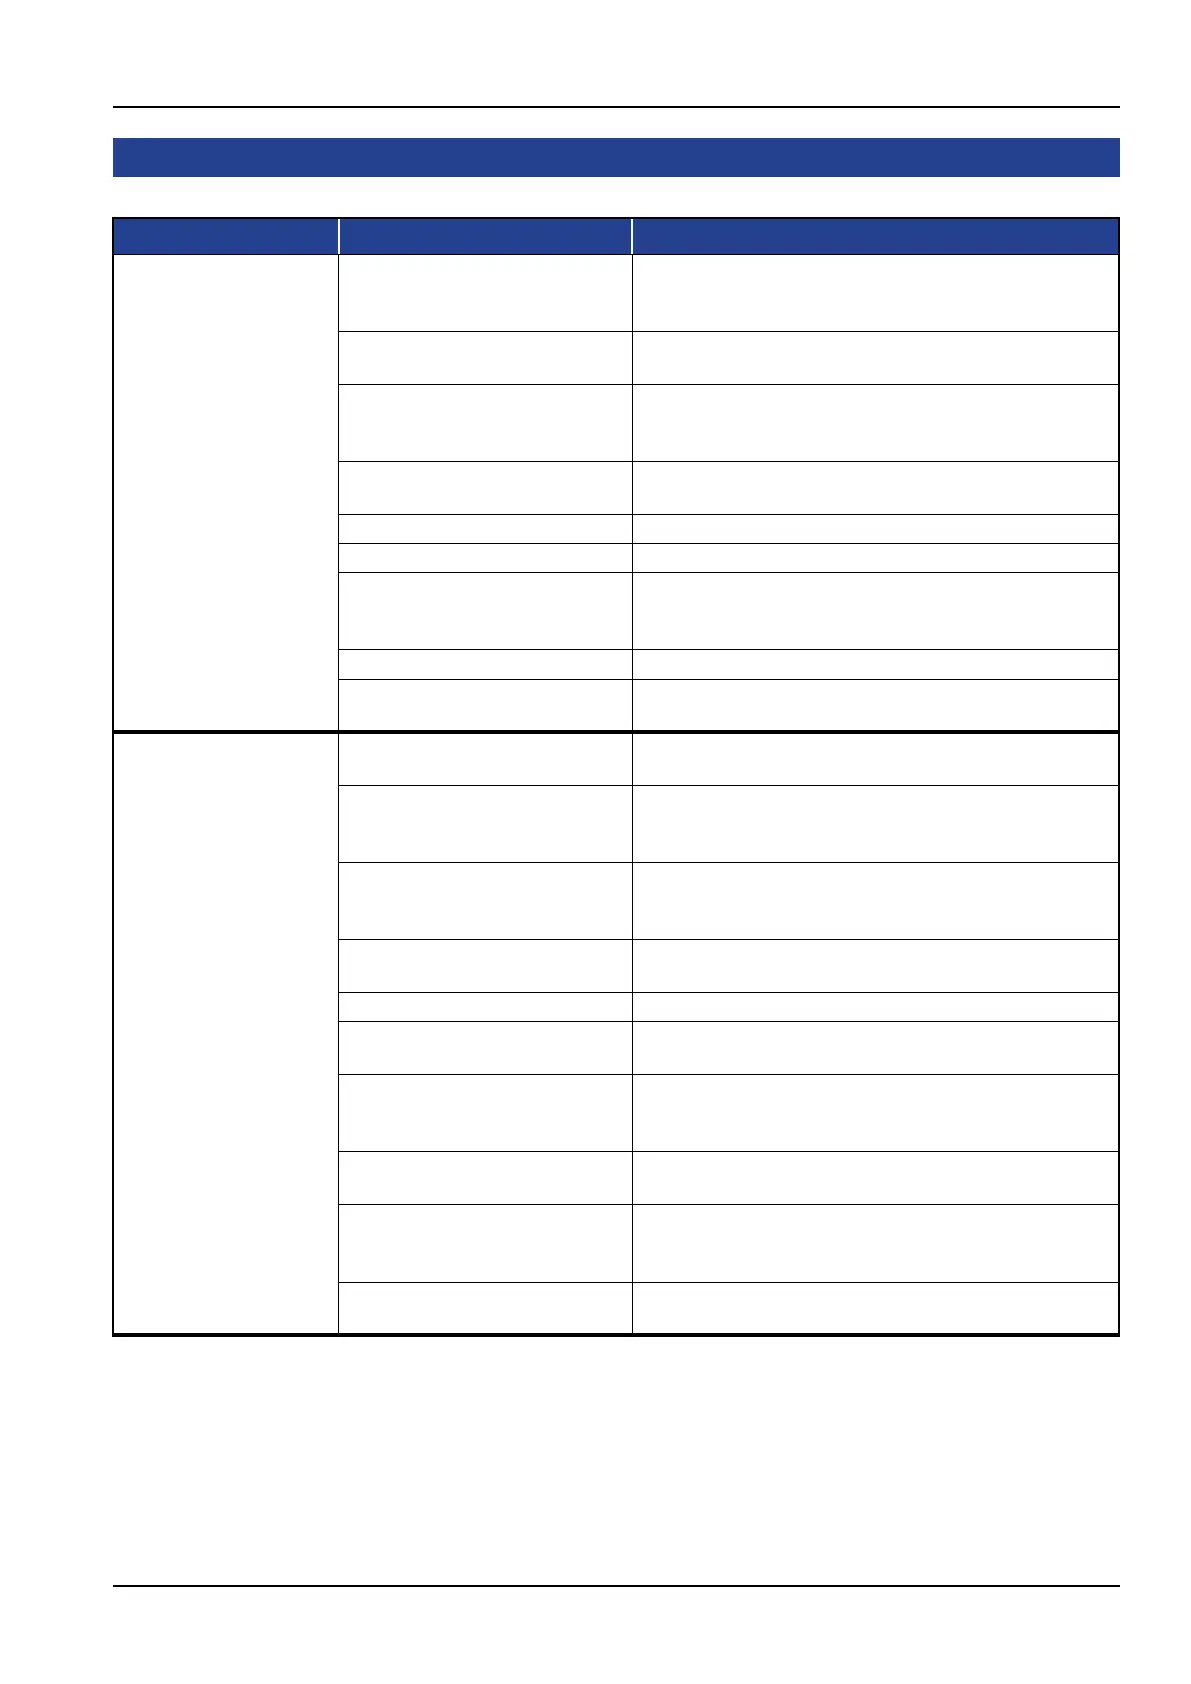
6.2 TROUBLESHOOTING OIL BOILER
CONTINUED ON NEXT PAGE
Problem Cause Remedy
1. Ignition Failure 1. Oil Tank Empty Relltheoiltank.Aslightdelayinthere-primingofthe
fuel pump may cause the burner programmer to require
resetting before the boiler operates satisfactorily.
2. Power Supply Check fuse or Circuit breaker. Reset or replace as
required.
3. Ignition Electrodes Check electrodes for carbon build-up, clean if required.
Check settings adjust if required. Check for cracks in
porcelain, if found, replace.
4. Transformer Check voltage between transformer leads at terminal block
to be sure transformer is live.
5. UV Detector Check for ignition interference.
6. Loose wire connection Check connections to all components.
7. Burner Control Check voltage between pilot terminal and neutral and
ignition terminal and neutral. Check must be made before
control locks out on safety. If no power, replace control.
8. Oil nozzle clogging Check oil nozzle(s), clean or replace as necessary.
9. Faulty Oil Pump Check to see if oil is being pumped to the boiler nozzle.
Repair or replace as necessary.
2. Flame Failure
(see note)
1. Power Supply Check fuse or Circuit breaker. Reset or replace as
required.
2. Ignition Electrodes Check electrodes for carbon build-up, clean if required.
Check settings adjust if required. Check for cracks in
porcelain, if found, replace.
3. Main Air Adjustment Checkairadjustment.Airmaybeblowingameawayfrom
theUVdetector.Openprimaryairuntilrebrushesthe
furnace wall.
4. UV Scanner Check for dirt on scanner, clean as required. Check for
proper location of detector.
5. Contact open on Adjust to proper setting air safety switch.
6. Scanner wiring reversed at
panel
Change to correct terminals.
7. Oil Supply Check oil level in supply tank, ensure it is not below intake
line. Fill tank with oil. Check for clogged nozzle. Clean or
replace.Checkoillterandreplaceifnecessary.
8. Oil Valve Check the voltage between oil valve neutral at terminal
block to be sure oil valve is getting power.
9. Oil Pump Checkforcloggedstrainerorlter.Removeand
clean. Check for slipping or broken coupling. Tighten or
replace. Check for seized pump shaft. Replace.
10. Loss of Oil Prime Check all lines for possible air leak in intake line and
tighten. Check the intake line is not restricted. Replace.