Actuatingthe -buttonallowsyoutoeditthecurrentprofile,seechapter4.2.1.Ifyouedittheprofile
it must be saved with a different file name.
Then, the active profile highlighted in blue can be transferred into the setting sequence window by de-
pressingthe -buttonorbydraganddrop.Thesettingsequencedeterminesthesequencein
which the blind rivet locations are processed on the component. The setting sequence must be strictly
followed by the user of the processing tool, so that incorrect analyses due to wrongly allocated profiles
are excluded.
When beginning to generate a profile lists file, profile list 1 is always active at first. This is indicated in the
header area of the setting sequence window under profile list number. The active profile list is the one
that,aftertransferringtheprofilelisttotheprocessingtool,assumesthecomponent-specificcontrolofthe
setting process monitoring.
Selecting further profile lists is carried out by clicking the profile list number in the header area of the
setting sequence window. As soon as at least one profile of the respective profile list has been allocated,
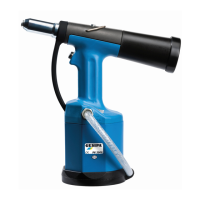
that list can be activated by clicking the respective active button. With the buttons on the left of the table
for setting sequence, the setting sequence can be configured as shown in illustration 14.
Current profile in setting sequence up
Current profile in setting sequence down
Undo last change of setting sequence
Delete all entries in the setting sequence
Delete current profile in the setting sequence
Illustration 14: Configuration options of the setting sequence