Installation
3A8626C 21
8. Pull out a section of hose and allow it to retract to
test the tension adjustment.
9. If additional tension is required, repeat steps 3
through 8.
10. When then tension is at the required level, tighten
screws A and B.
Decrease Spring Tension
(Spring is too tight, hose retracts too fast.)
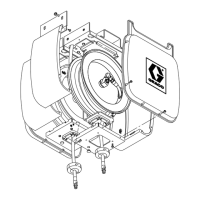
NOTE: The reference letters in the following instructions
refer to F
IG. 16 and FIG. 17.
1. Loosen screw (A) three to five turns. Do not
completely remove the screw.
2. Use a hex wrench to loosen the two screws (B). Do
not completely remove the screws.
3. Insert a 3/8 in. square drive breaker bar into
opening (C) on the spring adjustment plate (D).
4. While holding the breaker bar securely, completely
remove the two screws (B).
5. While firmly grasping the breaker bar with both
hands, turn the spring adjustment plate
counter-clockwise one turn at a time to decrease
(loosen) the spring tension.
6. Replace and finger-tighten both screws (B).
7. Remove the breaker bar.
8. Pull out a section of hose and allow it to retract to
test the tension adjustment.
9. If additional tension is required, repeat steps 3
through 8.
10. When then tension is at the required level, tighten
screws A and B.