8500C/8500C+ System Maintenance Manual B-1
Appendix B. 8500C Heater Modification
This modification is to be performed on 8500C units shipped prior to 1992.
a. (Reference Figure 5-17) Remove ten screws (32) and four screws (33), and remove
bezel(4).
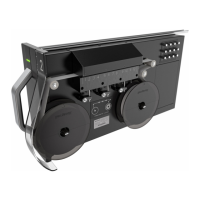
b. Fold back printer/disk drive assembly so that it stands straight up on its side with keypad
panel (1) lying flat on table, as shown in Figure 5-16.
c. (Reference Figure 5-19 Sheet 2 of 2) Locate 3-pin mta connector J3/P3 on heater/EL
control board A4. Move wire from pin 2 over to pin 3. Take care when pushing the wire
down into the connector that the wire insulation is cut through to make actual contact with
the connector.
d. Close unit, again watching for pinched connector wires.
e. Install bezel (4) on keypad panel (1) and secure with ten 4-40 x 3/16 php. blk. screws (32)
and four 4-40 x 1/4 pan. php. blk. screws (33).
 Loading...