Installing Hardware Options
HP ProLiant ML370 Generation 3 Server Setup and Installation Guide 3-65
HP CONFIDENTIAL
Writer: Jennifer Hayward File Name: d-ch03 Installing Hardware Options.doc
Codename: Dizzy Devil Part Number: 281992-002 Last Saved On: 12/3/02 12:45 PM
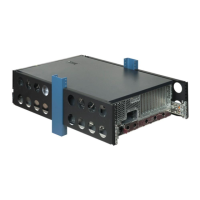
4. Repeat step 2 to install the third hot-plug fan into the available slot in the fan
cage along the center wall.
Figure 3-55: Installing a redundant hot-plug fan into the
center wall
5. Install other hardware options as needed.
6. Power up the server and observe the internal system health LED on the front
panel and the LEDs on all installed fans to be sure they are green.
NOTE: If the front panel internal system health LED is not green after you install hot-plug
fans, reseat the hot-plug fan or refer to Appendix D, “Troubleshooting,” for diagnosis.
7. Reinstall the access panel.
Replacing Hot-Plug Fans
IMPORTANT: To perform hot-plug fan replacement, remove and replace one fan at a time. If
the system detects two fan failures in the same zone, the server shuts down to avoid thermal
damage.
When the optional fan cage and all three redundant fans are installed, individual fans
can be hot-swapped at any time.
 Loading...