HTM-1505R/HTM-1505CS
26
4. 7 Operation for Wireless Remote Controller
The operational explanation for infrared remote controller
RCT-20A is mentioned below:
RCT-20A can also be used for Model HTM-1505R.
(1) Cautions for using remote controller
<D "REM**" Indication on Screen
When remote control opemtion is not performed, do not set the
remote controller in active status (with "REM**" displayed in
the upper leH of the screen) for a long period of time.
It becomes the cause of burning of CRT.
Tum off"REM**" indication with END key after completion of
operation.
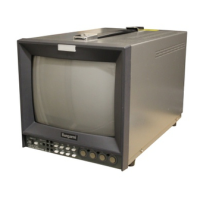
@ Direction of Remote Controller
Train the remote .controller to the monitor so that the sensor
window of the monitor turns within a range of30° from the axis
between the sensor window and the transmitter of the remote
controller rightward and lellward.
The nmge of infrared signal is 7111 on the axis.
If it does not operate within this range, there is a possibility that
the battc1y is dead. Change for a new batte1y.
Sensor window
Eltective distance
Upto7m
o~6'c:::i
l'.5CJCJCJ
c:io
□
c:::':J
a a El a
·Et
□
t""la
o 6 c'.:I o
~~~~,
l_§a6
□
RCT-20A
Fig. 4-6 Transmission and reception
of wireless remote controller
(2) Initialization of remote control operation
Perfonn the following set-up before starting remote control operation.
<D Setting a remote ID number
When there are two or more monitors, set ID numbers in accordance with
the following procedure:
ID number "0 I" has been set to each monitor at the time of shipment
Tum on each monitor one at a time so that two or more monitors do not
operate simultaneously, and then set ID number (0 I to 99) to each monitor.
a) Checking the present remote ID
Pressing CALL key indicates the present ID number ("0 I" at the time
of shipment) at the lower left of the monitor screen a~ shown in the
following Fig.:
CALL
~
01
b) Setting the remote control mode
Input the monitor ID number by means of MONITOR SELECT
key of the remote .controller, and set the monitor to be operated into
the remote control mode.
"REMO0 I" appears at the upper left of the screen at this time.
As shown in the following Fig .. press ID number sequentially from
high order to low order.
0
fi
1
~
Monitor ID number
c) Changing the ID
• Press MENU key twice to indicate MENU 2, and choose "Item 6"
by means of" Y" key.
MENU
fi
,.
~
MENU2 <MOOE>
VER:07. 1
1. CENT. MARKER
ON
2. MARKER COLOR
■
3. ASPECT
16:9
4. SCAN
UNDER
4-> SET UP
(ff
REMOTE NO.
01
DEGAUSS TM. 1
NEXT - (MENU)
SELECT - (ENT)
EXIT-•(ESC)
Press_ ENT key, change the number by means of A Y keys, and
finalize by means of ENT key.
f (.A) MENU2 <MODE> VER:07. 1
fi
1. CENT. MARKER ON
.._______ .__J, MARKER COLOR
■
v:---~SPECT 16:9
4. SCAN:-:c-.,__ UNDER
ENT 5. SET_~~ .. ~,F
6. REMOTE NO.
7. DEGAUSS TM.
NEXT - (MENU)
SELECT - (ENT) EX I T- (ESC)
• Thus the setting of!D number is finished.
Then, set up DEGAUSS timer in the following Item.