15
Assemble units as described herein only. To do otherwise
may result in instability. All screws, nuts and bolts must be
tightened securely and must be checked periodically after
assembly. Failure to assemble properly, or to secure parts
may result in assembly failure and personal injury.
Tributaire™ Collection - Lecterns
Assembly Instructions
15
/ -20 x /”
48
Phillips pan
head screw
support
mounting
bracket
15
/ -20 x /”
48
Phillips pan
head screw
support
mounting
bracket
/ -20 x /”
Phillips pan
head screw
support mounting bracket
front
bag hook
15
/ -20 x /”
48
Phillips pan
head screw
support
mounting
bracket
/ -20 x /”
Phillips pan
/ -20 x /”
48
Phillips
pan head
screw
mounting
head
support
mounting
bracket
worktop support
platform
storage
cabinet
/ -20 x /”
Phillips pan
support
mounting
bracket
worktop support
platform
mounting
head
front
bag hook
/ -20 x /”
48
Phillips
pan head
screw
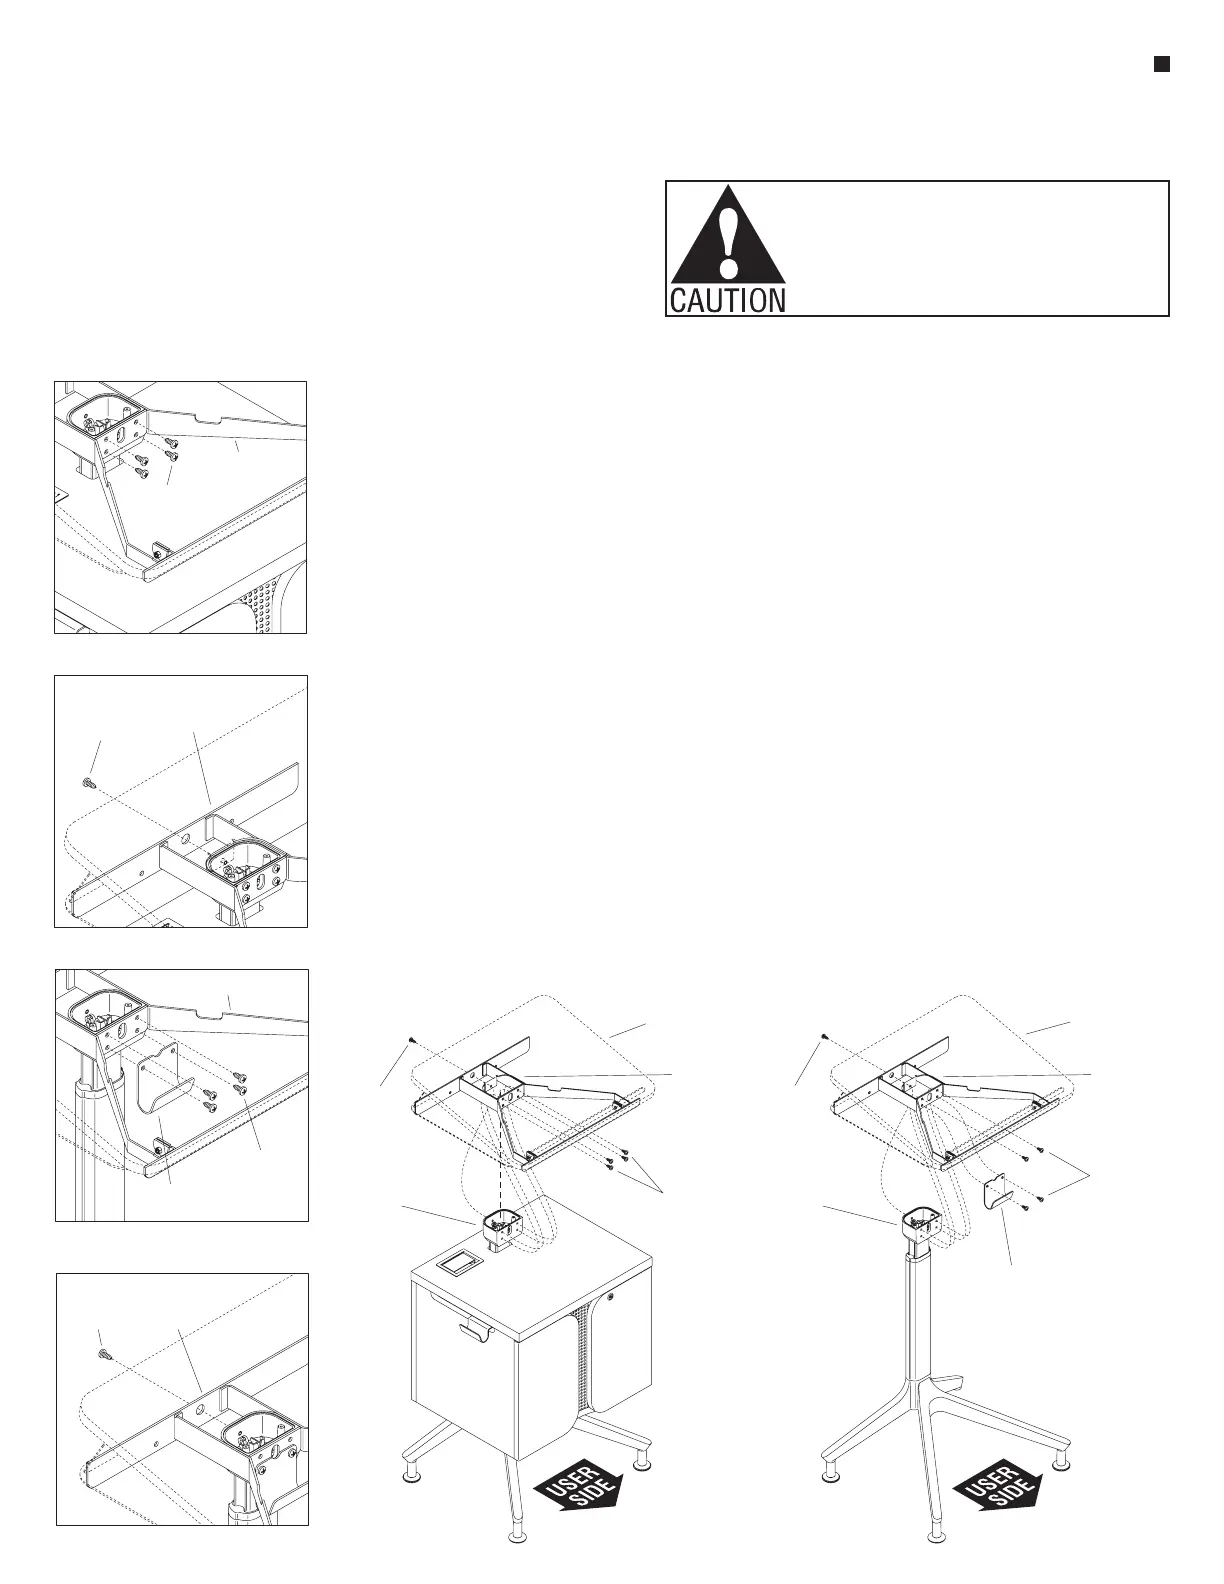
Worktop Support Platform
Overview
Note: If the lectern being assembled
does not require a front bag hook,
proceed to “Worktop Support
Platform Installation (without front
bag hook)” instructions on this
page. If the lectern does not have
storage, and a front bag hook will
be installed, proceed to “Worktop
Support Platform Installation (with
front bag hook)” instructions on this
page.
Worktop Support Platform
Installation (without front bag
hook)
1. Position the worktop support
platform over the top of the storage
cabinet as illustrated. Carefully lower
the platform and align the mounting
holes on the support mounting
bracket with the mounting holes on
the mounting head (Figure 1).
2. At the user side of the lectern, first
secure the support mounting bracket
to the mounting head using four
1
/
4
-20 x
5
/
8
” Phillips pan head screws
(Figure 1 & Detail A).
3. At the back, non-user side of the
lectern, the support mounting bracket
to the secure mounting head using
one
1
/
4
-20 x
5
/
8
” Phillips pan head
screw (Figure 1 & Detail B).
4. If the lectern being assembled is
a pneumatic-adjustable height
unit, proceed to “Cable Actuator
Installation” instructions on
page 16, otherwise proceed to
“Accessories Overview” instructions
starting on page 22.
Worktop Support Platform
Installation (with front bag hook)
5. Position the worktop support
platform over the top of the mounting
head as illustrated. Carefully lower
the platform and align the mounting
holes on the support mounting
bracket with the mounting holes on
the mounting head (Figure 2).
6. At the user side of the lectern, first
align the mounting holes of the
front bag hook with the bottom two
mounting holes on the support
mounting bracket and mounting
head. Secure the bag hook over
the mounting bracket and into the
mounting head using two
1
/
4
-20 x
5
/
8
”
Phillips pan head screws (Figure 2
& Detail C).
7. At the top two mounting holes on the
support mounting bracket above the
front bag hook, secure the mounting
bracket to the mounting head using
two
1
/
4
-20 x
5
/
8
” Phillips pan head
screws (Figure 2 & Detail C).
8. At the back, non-user side of the
lectern, secure the support mounting
bracket to the mounting head using
one
1
/
4
-20 x
5
/
8
” Phillips pan head
screw (Figure 2 & Detail D).
9. If the lectern being assembled is
a pneumatic-adjustable height
unit, proceed to “Cable Actuator
Installation” instructions on
page 16, otherwise proceed to
“Accessories Overview” instructions
starting on page 22.