Maintenance
82
Pos: 36.28.1 /Überschr iften/Überschr iften 2/U-Z/Zinken tau schen (im Reparaturf all) @ 224\mod_1392293057 621_78.docx @ 1816928 @ @ 1
13.9 Replacing the tines (in case of repairs)
Pos: 36.28.2 /BA/W artung/Schwader/Zin ken / Zinkenarme/Zinke n tauschen (im Reparatur fall) ohne Abweisblec h Bild mit Tabelle @ 225\mod_139 2307492506_78.doc x @ 1818595 @ 1 @ 1
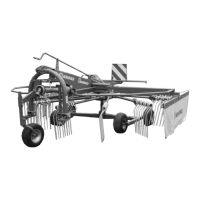
6
5
1
2
3
4
SWN1400036_1
8
7
Fig. 54
1) Hex bolt M12 x 90 - 10.9 2) Detent edged washer SKB 12
3) Disc 12.5x35x8 4) Fastening clamp
5) Surface 6) Locknut M12
7) Tines 8) Tine arm
Adhesive (high-strength) (order No. 938 627 0)
Pos: 36.28.3 /BA/W artung/Schwader/Zin ken / Zinkenarme/Zinke n tauschen (im Reparatur fall) mit/Zinken tausc hen (im Reparaturfal l) mit/ ohne Abweisblec h_Text @ 224\mod_13922 94092678_78.docx @ 1817145 @ 22222222 @ 1
• Remove all tines in front of the broken tine to remove the broken tine.
• Remove the broken tine.
Installing New Tine
• Slide fastening clamp onto the tine.
• Slide tine onto the tine arm.
• Guide hex bolt with detent edged washer and washer from below through the fastening
clamp and the tine arm.
• Apply adhesive (high-strength) on the threading overhang of the screw.
• Install support, washer and locknut, raise tine on the tine end and tighten nut with torque (95
Nm).
Proceed as described above with all tines.
Pos: 36.29 /Layout Module /---------------Seitenumbruch---------------- @ 0\mod_1196175311226_0.docx @ 4165 @ 12222 @ 1

 Loading...