77 / 93Issued: 20.04.2018 Version: Spez KR C4 compact V10
8 Start-up and recommissioning
8 Start-up and recommissioning
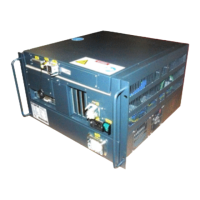
8.1 Installing the robot controller
Description The robot controller can be installed in a 19" rack or as a standalone device.
Preconditions
If the robot controller is to be installed in a 19" rack, the depth must be at
least 700 mm.
Both sides of the robot controller must be accessible to the cooling air.
Procedure 1. Check the robot controller for any damage caused during transportation.
2. Install the robot controller, preferably in the horizontal position. If the robot
controller is installed in the vertical position, both sides must always be ac-
cessible to the cooling air.
8.2 Connecting the connecting cables
Overview A cable set is supplied with the robot system. The basic version consists of:
Motor cable, data cable
Device connection cable
The following cables may be provided for additional applications:
Peripheral cables
Procedure 1. Connect motor connector X20 to the drive box.
2. Connect data cable connector X21 to the control box.
8.3 Plugging in the KUKA smartPAD
Procedure Plug the KUKA smartPAD to X19 on the robot controller.
Connector pin
allocation X19
If the smartPAD is disconnected, the system can no lon-
ger be switched off by means of the EMERGENCY
STOP device on the smartPAD. For this reason, an external EMERGENCY
STOP must be connected to the robot controller.
The user is responsible for ensuring that the smartPAD is immediately re-
moved from the system when it has been disconnected. The smartPAD must
be stored out of sight and reach of personnel working on the industrial robot.
This prevents operational and non-operational EMERGENCY STOP devices
from becoming interchanged.
Failure to observe these precautions may result in death, injuries or damage
to property.
Pin Description
11 TD+
12 TD-
2RD+
3RD-
8 smartPAD plugged in (A) 0 V
9 smartPAD plugged in (B) 24 V
5 24 V PS2
6GND