64 65
ENEN
CHAPTER 3 : SETUP
This chapter covers the basics of bicycle setup and
adjustment. All checks presented here complete
those listed in Chapter 1. Before carrying out any
work on you bicycle, please read the WARNING
section on maintenance on page 49.
A few words on tightening torque
Tightening torque refers to the force applied to
tighten a screw or bolt. The tightening torque of
many parts is indicated on or near the bolt (on the
component itself). If this is not the case, refer to
this manual, or consult you retailer. Use a torque
wrench to avoid applying too much torque, which
could damage or break the part. Beware however
that a screw or bolt that is too loose can also result
in damage and/or breakage.
After using the torque wrench to tighten bolts and
screws, refer to the tests in Chapter 1 and in this
chapter to check that the part concerned is in proper
working order. If there is any dysfunction after
tightening to the specied torque, visit your retailer
for a service.
Handlebar and stem
The handlebar allows you to direct your bicycle;
it is linked to the fork (steerer tube) via the stem.
Handlebar position is important for control and
comfort. Two types of stem are available:
• Ahead (threadless) stem (Figure 11)
• Rotating (Figure 12)
WARNING : A bicycle that does not work
properly could be more difficult to control,
which could cause a fall. Check your bike before
every ride and if you notice any issues, carry out the
necessary repairs or visit your retailer for a service.
WARNING : Inappropriate tightening torque
(too tight or too loose) can damage or break
the part/ component. For proper tightening, use a
torque wrench or consult your retailer.
WARNING : Excessively tight stem bolts
could cause damage or breakage of the
steerer tube. A steerer tube that breaks while riding
could result in a fall.
!
!
!
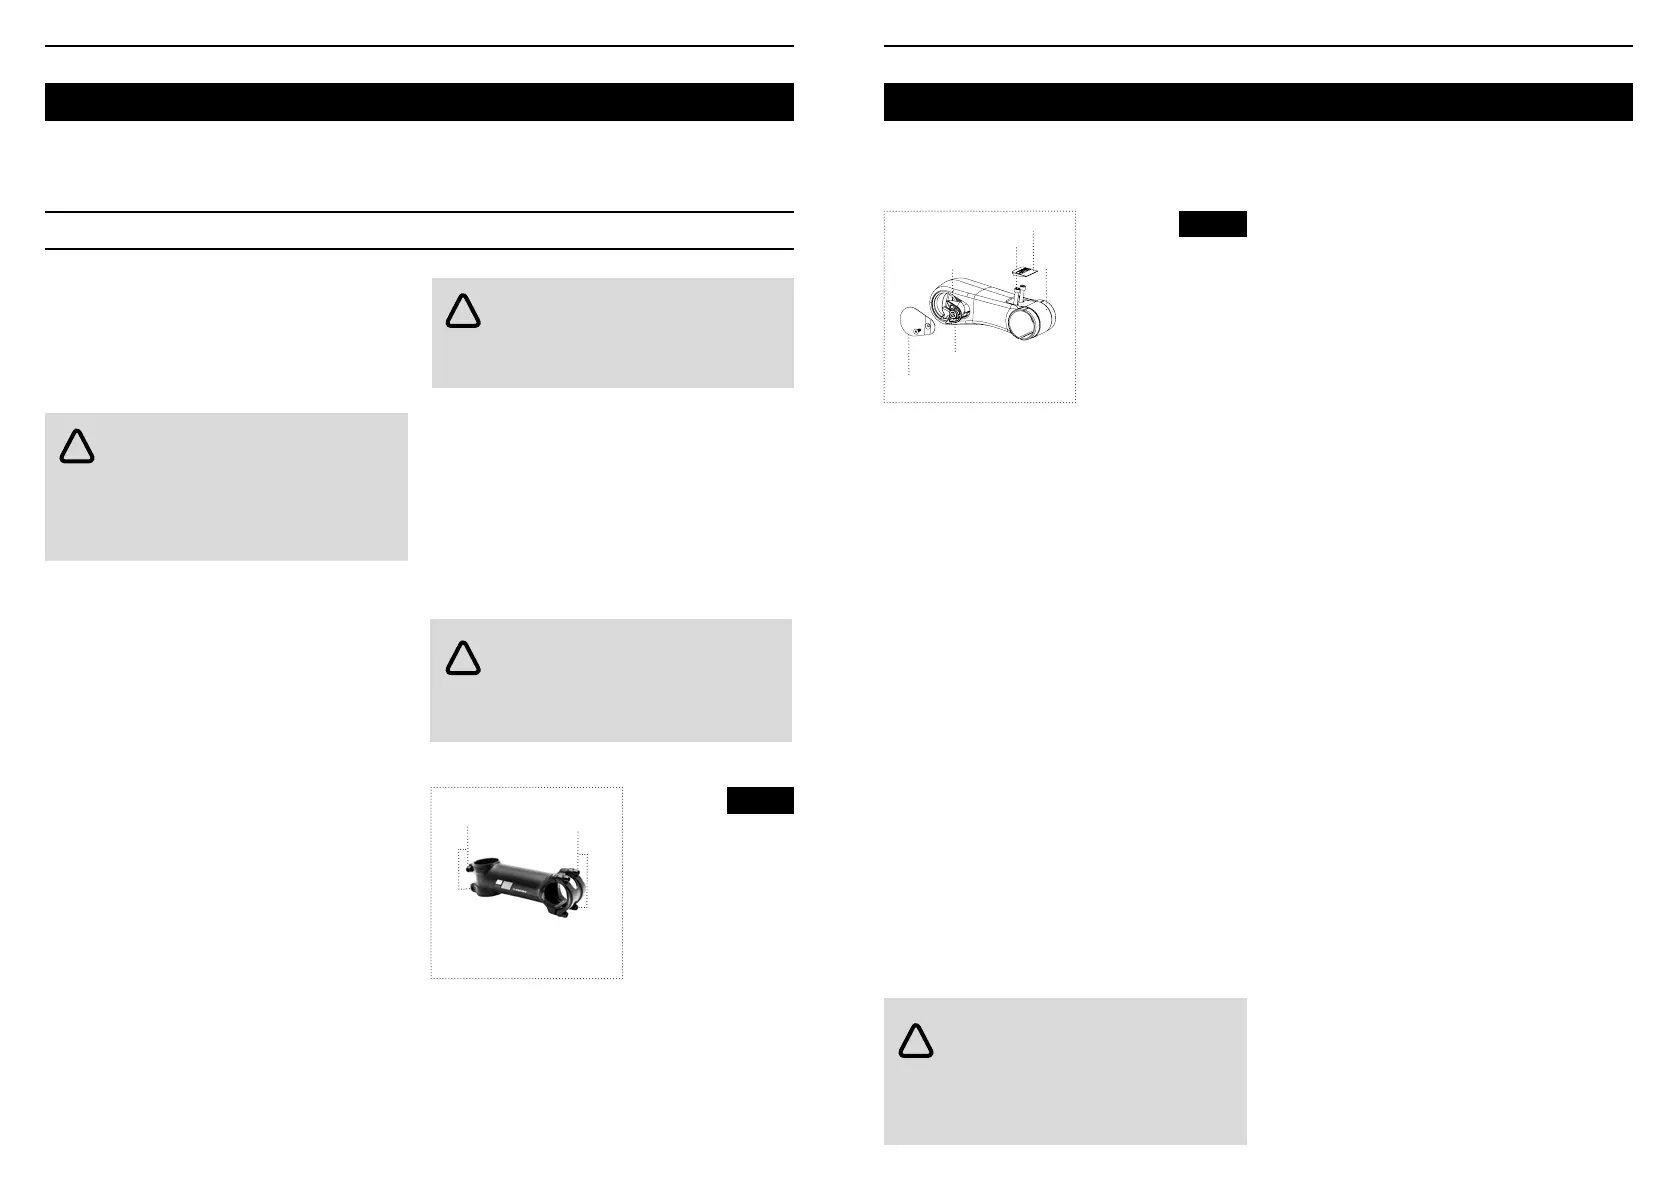
Fig. 11
Ahead
(threadless) stem
1.Steerer tube bolt
2.Handlebar bolts
1
2
Adjusting the handlebar angle
1. Loosen the handlebar bolt or bolts on the stem
(Figure 11 or Figure 12).
2. Rotate the handlebar as required. Make sure it is
centered in relation to the stem.
3. Tighten the handlebar bolt or bolts according to
the torque recommendations for the relevant parts.
Adjusting the height of an ahead
(threadless) stem
Adjusting the height of the handlebars with an
ahead stem entails adjusting the headset bearings.
This procedure requires specic tools and training
and therefore should only be performed by your
retailer.
If you choose to move the spacers in the headset,
follow the instructions opposite. Do not add any
spacers as the stem will no longer tighten the
steerer tube properly.
For bicycles with carbon steerer tubes, a 5mm
spacer above the stem is required. If you are unable
to determine which type of steerer tube is on your
bike, consult your retailer for advice.
Aligning an ahead (threadless) stem
1. Loosen the steerer tube bolts by two or three
turns.
2. Align the stem with the front wheel.
3. Tighten the steerer tube bolts according to the
torque recommendations for the relevant parts.
Tightening an ahead (threadless) stem
The expander holds the stem in place on the steerer
tube.
1. Loosen the expander bolt by two or three turns.
2. Using a wooden or plastic mallet, tap the top of
the expander to release it.
3. If required, loosen the stem bolts, remove the
stem and adjust the handlebar height by moving
the spacers. Reinstall the stem and the remaining
spacers.
4. Replace and tighten the expander bolt to
between 6 and 10 N•m, according to the torque
recommendations specied on the relevant parts.
5. Tighten the stem bolts.
If you still have play in the headset which you cannot
adjust, ask your retailer for advice.
Adjusting the angle of a rotating stem
1. Loosen the clamping cone screw.
2. Rotate the stem to the desired angle.
3. Tighten the screw to 15 Nm.
If you have any doubt or are hesitant about
performing the procedure, refer to the product
instruction leaet or contact your retailer.
WARNING : incorrect mounting of the
headset and stem or the absence of one
or more spacers may damage or even break the
steerer tube. A steerer tube that breaks while riding
could result in a fall.
!
Fig. 12
Rotating stem
1.Buffer
2.Bufffer screw
3.Stem bolt
4.Handlebar clamp
5.Carbon cap
6.Screw cap
4
6
5
3
1
2
 Loading...