68 69
ENEN
Pedals
The pedals are the platform your feet rest on to
rotate the cranks, which they screw on to. The right
pedal has a standard right-hand screw thread,
whilst the left pedal has a left-hand screw thread.
Tighten the pedals to 40Nm.
Checking pedal bearings
1. Hold the crank in one hand and try moving the
pedal up and down.
2. Rotate the pedal.
If the pedals move in the cranks or do not spin
freely, do not ride the bike. Servicing the pedal
bearings requires specic tools and training. Visit
your retailer, as a professional mechanic is the best
person to do this.
To adjust the spring tension of clipless pedals,
which changes the force needed to disengage the
foot from the pedal, refer to the instruction leaet
supplied with the pedals or ask your retailer for
advice.
Chain
The chain links the crankset to the rear wheel.
If the bicycle does not have a rear derailleur, it is
important to maintain correct chain tension to avoid
it jumping or dropping. Chain tension is adjusted by
moving the rear wheel or adjusting the dropouts. If
your bicycle has adjustable dropouts or an eccentric
bottom bracket or ask your retailer for advice.
Adjusting chain tension
1. Loosen the rear wheel axle nuts slightly, rst one
side then the other.
• If you completely loosen the nut on one side
before unscrewing the other, you risk interfering with
the adjustment of the bearings.
2. Draw the wheel backward to tauten the chain.
Center the wheel between the seatstays.
3. Finish installing the wheel (refer to Wheel section).
Cables
If your bicycle has gear shifters or brake levers,
these are linked to the derailleurs or brakes via
cables. Once a month, check for any potential
issues : twisting, rust, broken strands or frayed
ends. Also check the cable housing for broken
bers, bent ends, nicks or signs of wear. Do not ride
the bike if you notice any problem with the cables
or housing. Replace the brakes cables according
to instructions provided on page 83 or visit your
retailer for a service.
Gear shifters
The derailleur or internal gearing system is
controlled by a shifter. The position of the shifter
on the handlebar can be adjusted to personal
preference. There are different types of shifters; if
yours is not described here and you are unsure of
any procedure, ask your retailer for advice.
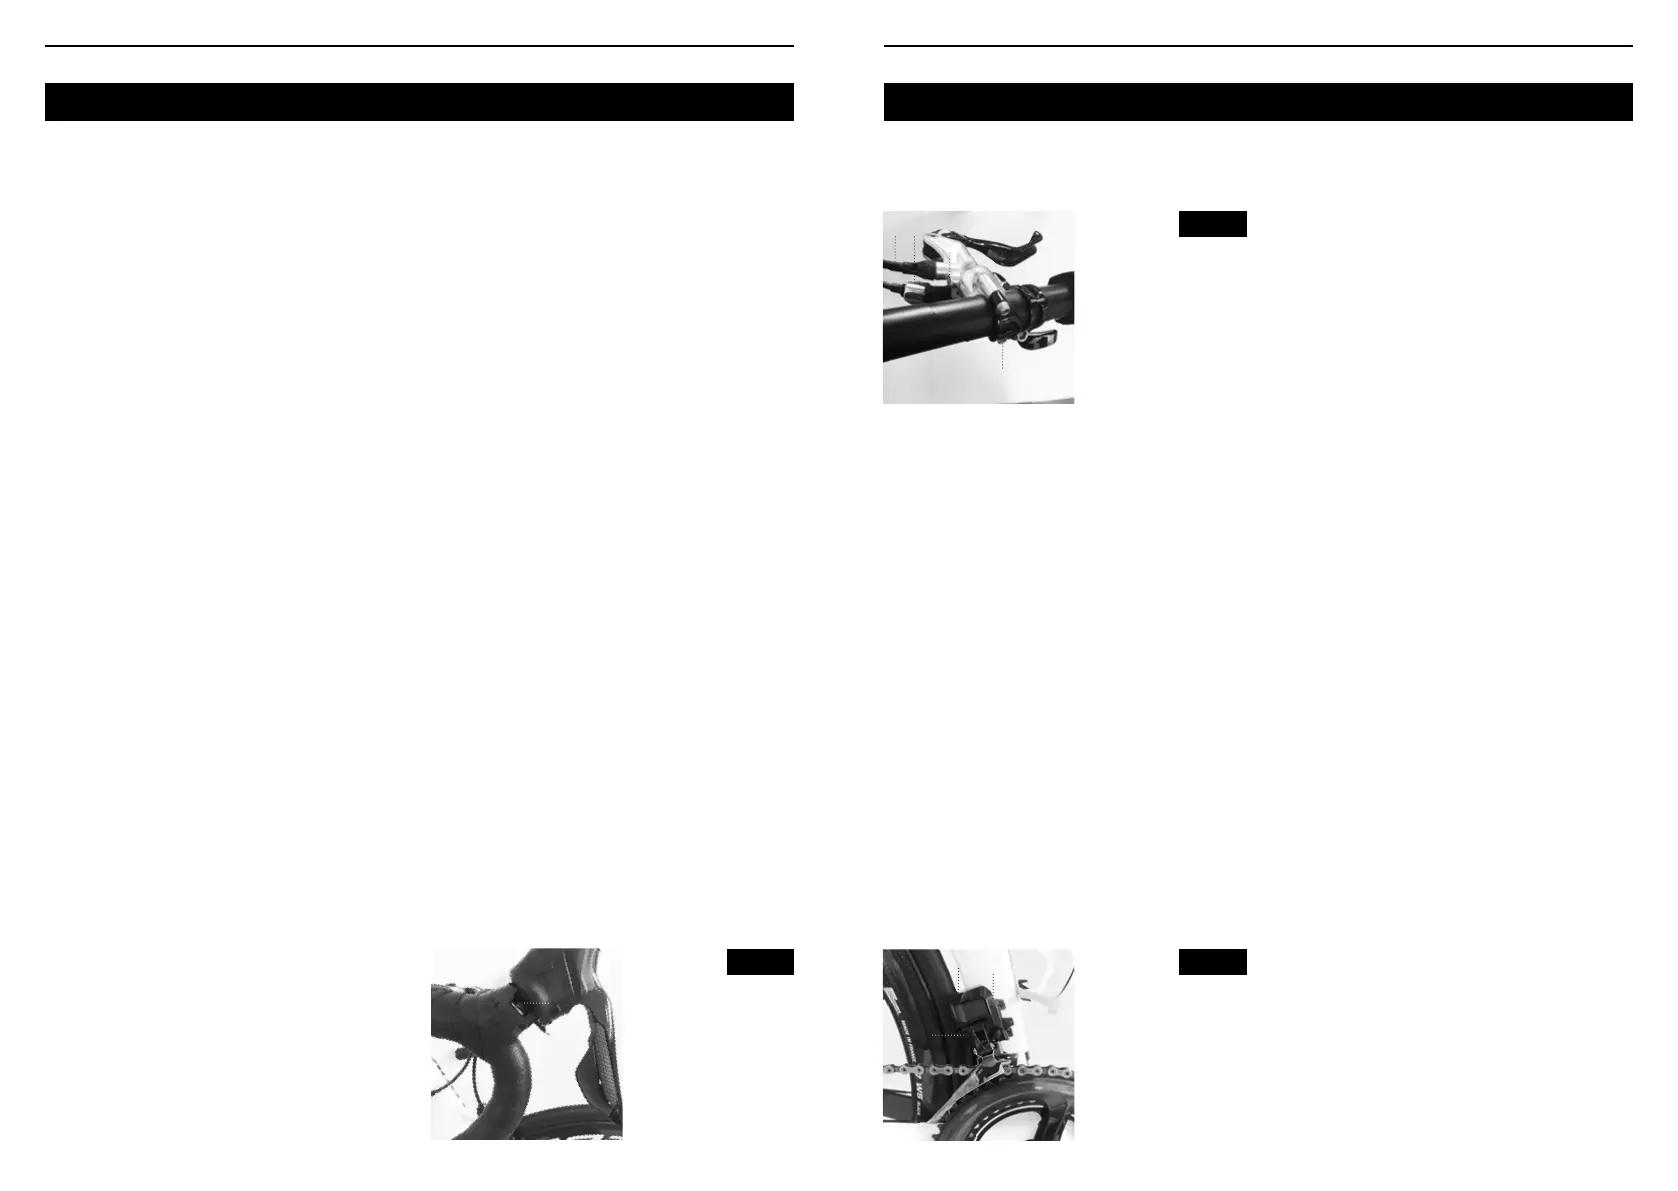
Adjusting lever position
1. Locate the shifter clamping screw (Figure 16 or
17).
2 Loosen the screw by two or three turns.
3 Move the lever to your preferred position.
4 Tighten the lever to between 6 and 8 Nm.
Fig. 16
Shifter clamping
screw, road bike
shifter.
1. Shifter clamping
screw
1
Front derailleur
If your bicycle has more than one chainring, the
front derailleur is responsible for moving the chain
from one to the other.
Adjusting derailleur position
for the small chainring
1. Place the chain on the smallest chainring at the
front and the largest cog at the back.
2. Loosen the cable pinch bolt (Figure 18) until the
cable is slack.
3. Turn the lower limit screw (indicated by the letter
“L”) until the inner cage plate is about 0.5mm from
the chain.
4. If there is barrel adjuster on the gear shifter or
down tube, turn it clockwise as far as it will go.
5. Pull the cable taut and shift the left gear lever into
the small chainring position.
6. Place the cable in the groove near the pinch bolt,
pull it taut and tighten the pinch bolt to between 5
and 7 Nm.
Adjusting derailleur position
for the large chainring
1. Move the rear derailleur to the smallest cog.
2. Turn the higher limit screw (indicated by the letter
“H”) to the left until it no longer stops the derailleur
cage movement.
3. Manually rotate the cranks. Gently pressure the
gear shifter until the chain moved onto the outer
chainring.
4. Position the outer cage plate about 0.5mm from
the chain.
5. Tighten the higher limit screw until it meets
resistance.
• If the screw is too tight, the derailleur cage will
rub against the chain and push it onto the small
chainring.
6. Check the shifting.
• Run through all the gears, making sure the chain
doesn’t jump or drop when shifting.
Adjusting the intermediate derailleur position
with three chainrings
1. Place the chain on the biggest chainring at the
front and the smallest cog at the back.
2. Turn the barrel adjuster (located on the downtube,
cable housing or gear shifter) until the inner cage
plate touches the chain.
3. Check the shifting.
• Run through all the gears, ensuring the chain is
properly aligned on each chainring.
Some gear shifters have a « trim » function, which
acts like a half-shift. Lightly shift to a lower gear and
the derailleur moves slightly inward so that it no
longer touches the chain.
For electronic groupsets, refer to the instructions
provided by the brand or consult your retailer for
advice.
Fig. 17
Fig. 18
Shifter clamping screw,
MTB shifter
1. Shifter clamping
screw
2.Brake travel
adjustment screw
3.Barrel adjuster
4.Cable
Front derailleur
1.Cable
2.Limit screw
3.Cable pinch bolt
4
1
2
3
1
2
3
 Loading...