70 71
ENEN
Rear derailleur
If your bicycle has more than one cog at the rear,
the rear derailleur is responsible for moving the
chain from one to another.
Adjusting derailleur position for the small cog
1. Place the chain on the smallest cog at the back
and the largest chainring at the front.
2. Loosen the cable pinch bolt (Figure 19) until the
cable is slack.
3. Standing behind the bike, visually check that the
small cog, chain and jockey wheels are aligned.
4. If this is not the case, turn the higher limit screw
(usually indicated by the letter “H”) until all elements
are aligned.
5. Pull the cable taut and shift the right gear lever
into the smallest cog position.
6. Turn barrel adjuster on the gear shifter or
down tube clockwise as far as it will go. On the
rear derailleur, turn the barrel adjuster clockwise
as far as it will go, then bring it back one turn
counterclockwise.
7. Place the cable in the groove on the pinch bolt,
pull it taut and tighten the pinch bolt to between 5
and 6 Nm.
Adjusting derailleur position for the large cog
1. Turn the lower limit screw (usually indicated by
the letter “L”) of the rear derailleur counterclockwise
until you can easily move the derailleur.
2. Carefully move the chain to the smallest chainring
at the front and the largest cog at the back.
3. Do not move the derailleur too far, as the chain
could get caught between the cassette and the
spokes.
4. Align the jockey wheels with the largest cog.
5. Tighten the lower limit screw clockwise until it
meets resistance.
6. If the screw is too tight, the derailleur will move
away from the bike.
7. Check the shifting.
• Run through all the gears, making sure the chain
doesn’t jump or drop when shifting.
Indexing gears
1. Place the chain on the biggest chainring at the
front and the smallest cog at the back.
2. Using the rear gear shifter, shift down one gear.
3. Ensure the chain shifts smoothly onto the next
cog.
4. If the chain rubs, makes a noise or refuses to
shift, turn the barrel adjuster slightly. Shift into
another gear and check for smoothness.
• If the chain jumps straight to the third cog, turn
the barrel adjuster clockwise until the jockey wheels
are aligned with the second cog.
5. Check the shifting.
• Run through all the gears, ensuring the chain is
aligned on each cog.
If you are unable to adjust the derailleur, it may be
cause by a bent, twisted or broken derailleur hanger.
Visit your retailer to straighten or replace the hanger.
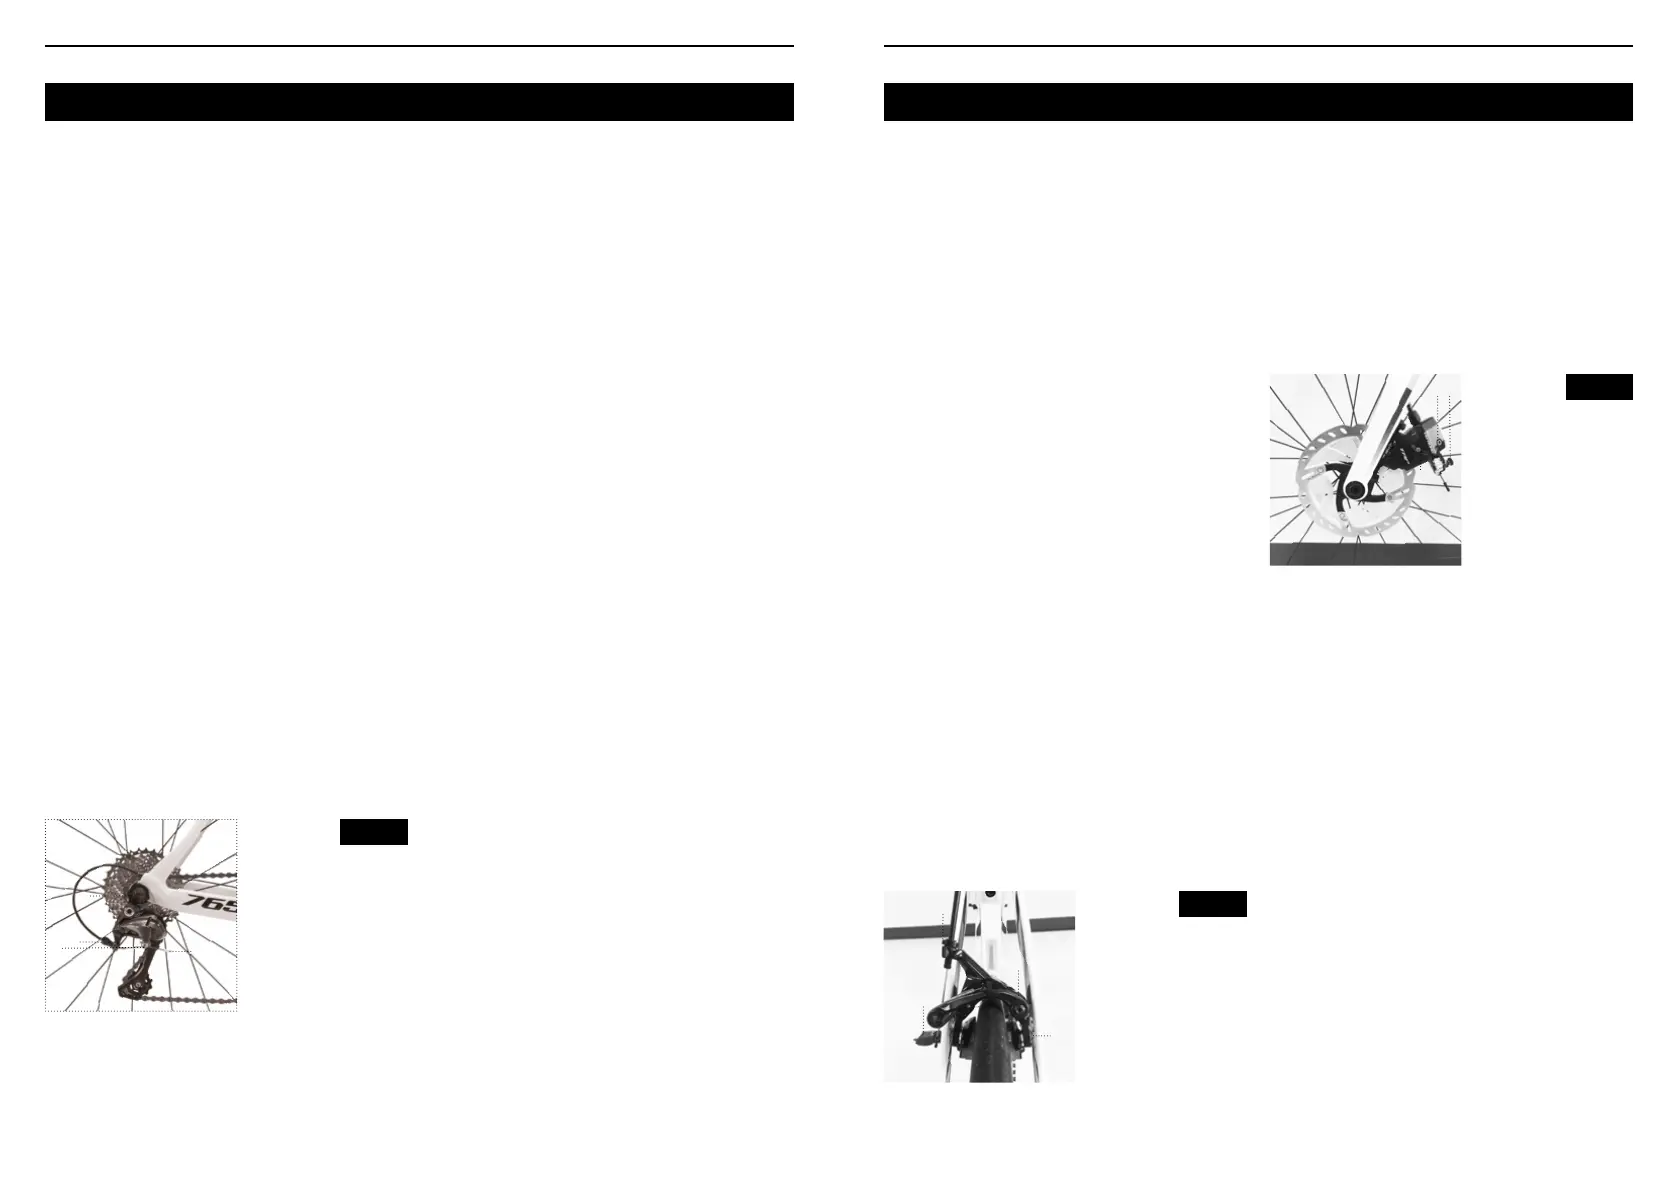
Fig. 19
Rear derailleur
1.Limit screw
2.Barrel adjuster
3.Cable pinch bolt
4.Cable
1
2
3
4
Brakes
Brakes enable you to slow or stop your bicycle, and
are absolutely critical for your safety. Only use brake
pads designed for your brakes. It is difficult to adjust
brake systems without proper tools and training,
which is why it is strongly recommended you entrust
your retailer with this procedure, or ask them for
advice should you need additional help.
Brake systems
Brake systems vary depending on the type and
model of bicycle. There are two types of brake
systems : rim brakes and disc brakes.
• Rim brakes : two brake pads clamp around the
wheel rim. The intensity of pressure applied is
controlled with a brake lever, which is connected to
the brake caliper via a cable (Figure 20).
A caliper brake (or V-brake) system consists of the
following parts :
• Brake
• Rim
• Brake pad
• Brake lever
• Brake cable and housing
• Disc brakes : brake pads put pressure on a disc
attached to the wheel hub (Figure 21). The intensity
of pressure applied is controlled with a brake lever
connected to the brake via a cable or hydraulic
hose. Do not pull the brake lever when the wheel is
removed from the bike.
Checking your brakes
• Disc brakes : replace the pads when they are
worn down to less than 1mm.
To adjust the distance between the pads and the
rim.
1. Turn the barrel adjuster located on the brake
itself.
• To increase the space between the pad and the
rim, turn the barrel adjuster clockwise. To reduce the
distance, turn the barrel adjuster counterclockwise.
2. If twisting the barrel adjuster isn’t sufficient to
properly adjust the brake, you will need to tauten or
slacken the cable :
• Loosen the cable pinch bolt, slacken or tauten
the cable, and tighten the bolt again.
Ask your retailer to adjust the brakes for you if
necessary.
Fig. 20
Fig. 21
Caliper brake (or
V-brake)
1. Barrel adjuster
2. Centering
adjustment screw
Quick release lever
4.Brake shoe
alignment bolt
Disc brake
1.Mounting bolts
2. Fixed pad adaptor
(on some models)
3.Cable pinch bolt
1
2
3
4
31
2
 Loading...