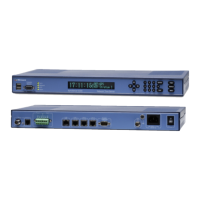
S300, S350 and S350i Quick Start Guide
n Consult Warnings and Cautions (on page 131) for safety information regarding
grounding and power.
n Connect the power and turn the power switch on.
3. Using the front panel keypad:
n
Configure LAN1 with a static IP address using the MENU button and 1) LAN1.
n
View the LAN1 IP address by pressing the STATUS button repeatedly until the
LAN1 STATUS screen is shown.
4.
Go to the SyncServer Login page by entering the LAN1 IP address as the URL in Internet
Explorer.
5. Log in. The user name is "admin". The password is "symmetricom".
6.
Configure the SyncServer using WIZARDS - 1st Setup. Select the following options:
n "Configure Password Recovery" (Ask the IT department for the IP address of the
SMTP server).
n "Send test mail when finished"
n "Set Local Time Zone"
7.
Configure the remaining network ports using NETWORK - Ethernet.
n Assign static IP addresses.
n Protect LAN1 and the other ports from unauthorized IP addresses or address
ranges using the Allowed Access feature.
8. Configure the NTP clients on your network with the IP address(es) of the SyncServer's
network ports.
The SyncServer is providing synchronized time to the network when the SYNC LED (front
panel) is orange or green.
Optional Tasks
In the web interface:
n Connect any other Input References to the rear panel and configure them using the
pages under the REFERENCES section.
n
Use the NTP – Config page to synchronize the SyncServer with any other NTP servers.
n
Use WIZARDS - SNMP to set up alarm notification by SNMP.
n
Use SERVICES - Email to set up alarm notification by email.
n
When the SyncServer is completely configured, use WIZARDS - Backup to save a backup
file of the configuration to a safe location. Write the location of the backup file on this prin-
ted document and store it in a location that is easy to find.
Page 14..........................................................................997-01520-02 Rev. F1