74
D26 Camera Manual: Operating the Camera
3.2 First Images and the Most Important Settings
Once the MOBOTIX camera has been connected to the network, you need to set up the cam-
era’s network interface accordingly. This step involves setting up and checking the network
parameters of the camera. If your network has an active DHCP server or is already using an
IP address in the 10.x.x.x range with a 255.0.0.0 network mask, you do not need to
change the camera’s network parameters. You can access the camera directly (see Section 3.2.2,
«First Images and the Most Important Settings in the Browser»). If your network or computer
does not use an IP address in the 10.x.x.x range (for example, in the 192 or 172 ranges), you
should follow one of the following methods for changing the camera’s network parameters:
• Manual Setup (see Section 3.2.1, «Manually Setting Up the Network Parameters in a
Browser»)
• Automatic setup using MxManagementCenter (see Section 3.2.3, «First Images and
Network Parameter Conguration in MxMC»)
Note
We will use a camera with the factory address 10.8.0.99 in the following examples.
Replace this IP address with the IP address of your camera. You will nd the IP address
of your camera on a small sticker on the camera. Make sure that the IP addresses used
in the following examples are not already being used by other devices in the network.
3.2.1 Manually Setting Up the Network Parameters in a Browser
You need a computer that is using a 10.x.x.x IP address in order to manually set up the
network parameters of the MOBOTIX camera. The computer’s network parameters usually
have to be changed for this purpose.
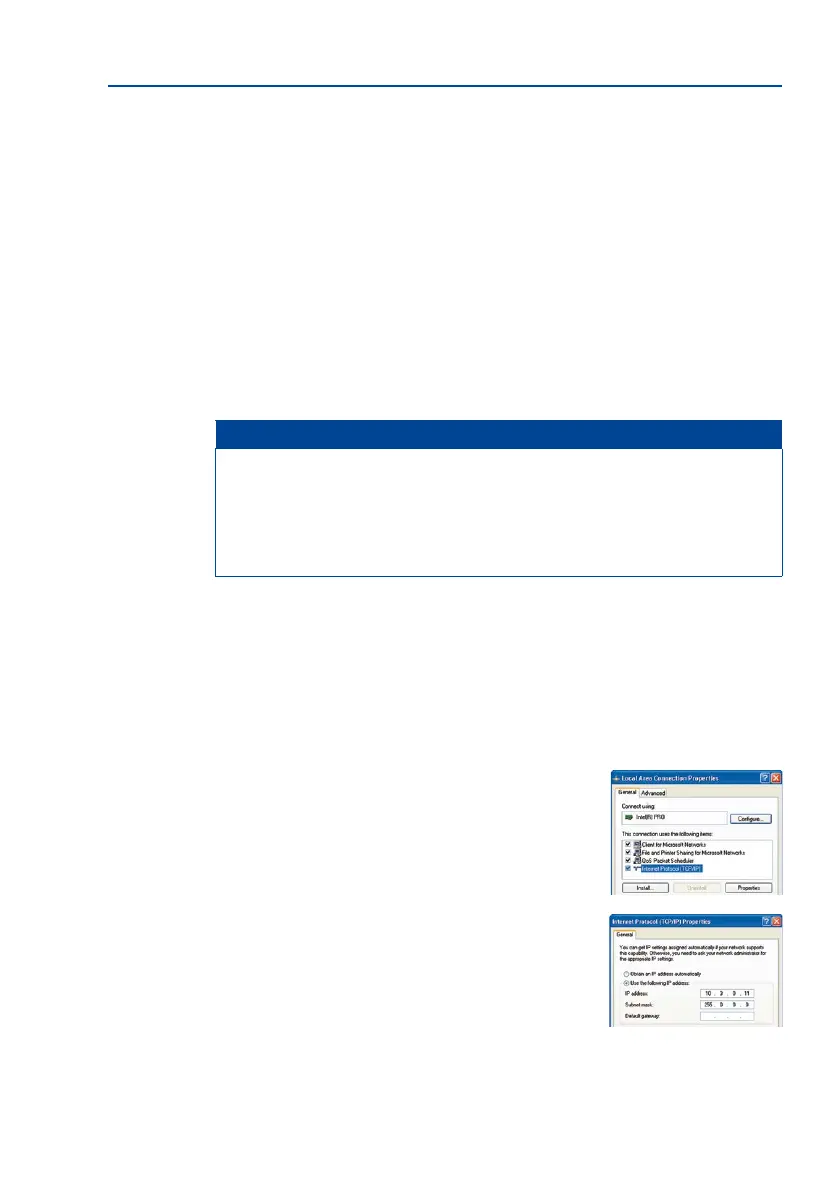
1. Change the Network Parameters of Your Computer:
Windows (XP, Vista and 7):
1. Open Start > Settings > Control Panel > Network
Connections. Clicking on Properties opens the dialog
box shown.
2. Double-click on Internet Protocol (TCP/IP). On the
General tab, activate the Use the following IP address
option. Enter an IP address in the 10.x.x.x range in this
eld (for example, 10.8.0.11).
3. Once all dialog boxes have been closed, the computer
will have the IP address 10.8.0.11.
Pressing the key (see
Section 1.4.1, «The D26
Camera») will prompt
the camera to announce
its current IP address on
the camera speaker
Entry in “Subnet mask”
eld: 255.0.0.0