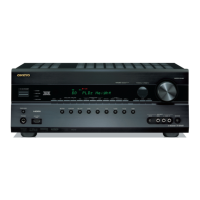
Do you have a question about the Onkyo TX-SR701 and is the answer not in the manual?
All safety and operating instructions should be read before the appliance is operated.
All warnings on the appliance and in the operating instructions should be adhered to.
Do not use the appliance near water, in a wet basement, or near a swimming pool.
Ensure proper ventilation to prevent overheating. Do not block openings.
Instructions for polarized or grounding-type plugs for safety.
Refer servicing to qualified personnel. Do not attempt to service yourself.
Do not push objects into openings. Avoid exposure to liquids.
Recording copyrighted material for other than personal use is illegal.
The fuse is internal and not user-serviceable. Contact service.
Instructions for cleaning the appliance using a soft cloth.
Ensure the power supply voltage matches the unit's requirement.
Compliance information and precautions for digital devices.
Detailed specifications of the TX-SR701/701E model's amplifier, tuner, and other features.
Detailed specifications of the TX-SR601/601E model's amplifier, tuner, and other features.
List of accessories supplied with the unit, including antennas and remote.
List of accessories that may be available depending on the area of purchase.
Instructions for setting the voltage selector for worldwide models.
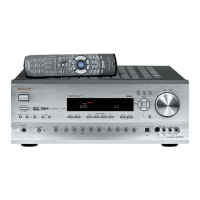
Step-by-step guide for inserting batteries into the remote controller.
Guidelines for pointing the remote controller towards the sensor.
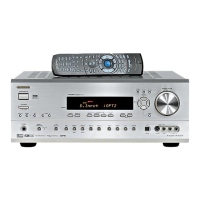
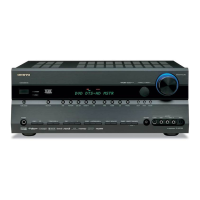
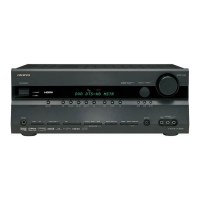
Diagram and explanation of the TX-SR701E front panel controls.
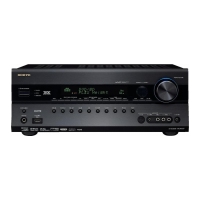
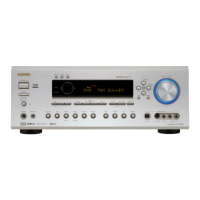
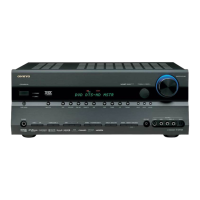
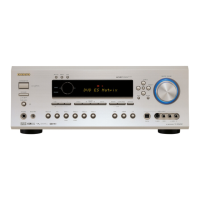
Diagram and explanation of the TX-SR601E front panel controls.
Turns the main power supply on and off.
Turns the unit on or returns it to standby mode.
Displays information about the current input source signal.
For European models, tunes into RDS for FM broadcasting.
Adjusts the brightness of the front display.
Selects a listening mode for the current input source.
Assigns or deletes radio stations to preset channels.
Changes the stereo mode from AUTO to MONO.
Receives signals from the remote controller.
Adjusts sound quality and listening mode.
Enters the Setup Menu for configuring various settings.
Returns to the previous menu or exits the Setup Menu.
Used for tuning radio stations and navigating menus.
Confirms selections and displays menu items.
Controls the main volume level.
Front panel terminals for connecting video cameras or game devices.
Selects the input source for the main zone or remote zone.
Selects the type of audio input signal (Auto, Multich, Analog).
Selects Direct or Pure Audio listening modes.
Standard stereo jack for connecting headphones.
Controls output to a remote zone or for recording.
Flashes when the mute function is turned on.
Lights to show the current listening mode or input format.
Indicates TUNED, AUTO, RDS, MEMORY, FM STEREO status.
Shows current input source, volume, frequency, and listening mode.
Lights when the sleep timer is turned on.
Lights when the remote zone (Zone 2) is active.
Lights when recording input source to another component.
Indicates signal transmission and low battery status.
Turns the unit on or places it in standby mode.
Sets the sleep timer to automatically turn off the unit.
Used to program or execute macro functions.
Selects the component to be operated by the remote controller.
Enters selected setting and returns to previous menu.
Selects preset channels or discs.
Selects speaker channel or displays DVD player menu.
Selects audio input signal or TV/VCR input.
Adjusts speaker volume, camera angle, or subtitle language.
Operates connected Onkyo components via RI terminals.
Selects the input source on the front panel.
Numeric keys for track selection, mode buttons for various functions.
Turns on and off the remote controller's button lights.
Displays the Setup Menu on the TV screen and front display.
Arrow buttons for selection, ENTER to confirm.
Adjusts the volume level.
Sets speaker output levels or displays DVD menus.
Temporarily turns off the sound.
Adjusts sound quality and listening mode.
Controls Zone 2 operations, searches DVDs, or enters settings.
Illustrations of various audio and video cable connection types.
Diagram showing various input and output terminals for the TX-SR701/701E.
Diagram showing various input and output terminals for the TX-SR601/601E.
Explanation of analog audio and digital input/output jacks.
Guide for connecting CD players via analog or digital outputs.
Instructions for connecting turntables (TX-SR701/701E only).
Guide for connecting tape decks, MD, DAT, or CD recorders.
Explanation of component, composite, and S-video inputs/outputs.
Guide for connecting DVD players with 5.1-channel audio.
Guide for connecting DVD players with 2-channel audio.
Guide for connecting VCRs to VIDEO 1 input/output.
Guide for connecting satellite tuners or TVs to VIDEO 3 input.
Guide for connecting DVD recorders or other devices to VIDEO 2 input/output.
Guide for connecting TVs or projectors to monitor outputs.
Guide for connecting video cameras to VIDEO 4 input.
Jacks for connecting an auxiliary power amplifier.
Outputs 12V/100mA when the unit is in ZONE 2 mode.
Troubleshooting when the remote signal does not reach the unit's sensor.
Using IR IN to control the unit from a remote zone.
Connecting speakers to ZONE 2 terminals for remote zone listening.
Connecting an amplifier for the remote zone (TX-SR701/701E only).
Connecting ZONE 2 LINE OUT to an amplifier for remote zone audio.
Description of AC outlets for powering other devices.
Synchronizes display brightness with connected devices via RI.
Functions of RI connection: power, direct change, and power off.
Describes the roles of front, center, surround, and back speakers.
Minimum speaker requirements for surround playback.
Guidelines for optimal placement of front, surround, and back speakers.
Color coding and labeling for connecting speaker cables.
Instructions for connecting a subwoofer via PRE OUT jack.
Instructions for connecting surround back speakers (TX-SR701/701E only).
Important precautions for connecting speakers properly.
Step-by-step guide for preparing and connecting speaker cables.
Illustrations showing power connection for different models.
Instructions for powering on the unit via the power switch.
Instructions for powering on the unit using the remote.
Explanation of how memory settings are preserved.
Instructions for connecting FM indoor and AM loop antennas.
Steps for connecting the AM loop antenna cable.
Guidelines for connecting an FM outdoor antenna.
Using a splitter for common FM/TV antennas.
Instructions for connecting an AM outdoor antenna.
Instructions for connecting antenna cables using adapters.
Setting speaker sizes (Large/Small) for optimal sound.
How to display the main setup menu.
Steps to select and enter the speaker configuration menu.
Setting to 'Yes' if a subwoofer is connected, 'No' otherwise.
Selects 'Large' or 'Small' for front speakers.
Selects 'None', 'Large', or 'Small' for the center speaker.
Selects 'None', 'Large', or 'Small' for surround speakers.
Selects 'None', 'Large', or 'Small' for surround back speakers.
Sets the crossover frequency for bass management.
Steps to access and navigate the speaker distance settings.
Option to set speaker distances in feet or meters.
Instructions for setting distances for Left, Center, Right, Surr Right, Surr Left speakers.
Instructions for setting distances for Surround Back R and Surround Back speakers.
Instructions for setting the distance for the subwoofer.
Notes on subwoofer distance value constraints relative to front speakers.
Guide to setting speaker volumes for balanced sound.
Detailed steps for calibrating speaker levels using pink noise.
Initiates the speaker level calibration test tone.
How to use the remote controller to navigate setup menus.
Mapping of front panel and remote controller buttons for menu navigation.
Instructions for selecting FM or AM input and tuning stations.
Guide to tuning FM stations and managing stereo/mono modes.
How to store and assign radio stations to preset numbers.
How to recall a stored radio station using preset buttons.
Procedure to delete a stored radio station from memory.
Explanation of Radio Data System and its features.
Details on RT (Radio Text), PTY (Program Type), and TP (Traffic Program).
List of program type categories displayed by RDS.
Shows text information broadcast by RDS stations.
Scans for stations based on selected program type.
Scans for stations broadcasting traffic program information.
How to select input sources and play them.
Follow operating instructions for the source device.
How to adjust the main volume using the dial or remote.
Changes audio mode between Auto, Multich, and Analog.
Adjusting Auto mode for DTS, PCM, or normal playback.
Important information regarding DTS playback and settings.
Adjusting individual speaker volumes temporarily.
Renaming TAPE input to MD for Onkyo MD recorder RI function.
Setting the unit to turn off automatically after a specified time.
Connecting headphones and available listening modes.
Guide for playing back DVD multichannel audio.
Instructions for turning on/off and adjusting bass/treble.
Displaying input source, format, and frequency information.
Muting the audio output.
For monaural audio sources or movies.
Delivers pure sound with minimal processing.
Pure audio playback with display and video circuitry off.
Outputs all sound from the left and right front speakers.
Reproduces multi-speaker setup for theater-like sound.
Matrix processing for 5.1-channel surround audio.
For playing Dolby Digital sources, supports up to 5.1 channels.
Enabled for sources encoded with Surround EX technology.
Automatically adjusts dialogue volume for clarity.
For 6.1-channel playback of 2-channel sources.
For playing DTS sources, supports up to 5.1 channels.
Provides discrete 6.1-channel surround playback.
Matrix-encoded surround back channel for 6.1 playback.
For sources encoded with DTS 96/24 technology.
For playing back sources recorded in the THX format.
Conventional 5.1-channel THX format for movie theaters.
Adds a Surround Back channel for enhanced spatial imaging.
For playing monaural soundtracks with theater atmosphere.
Provides active surround effect, especially with surround back speakers.
For classical/opera music, widens stereo image.
For acoustic instrumental sounds, simulating front stage acoustics.
For rock/popular music, enhances acoustic image.
Provides realistic acoustics for TV programs.
For background music, creates stereo image across all channels.
Instructions for selecting an input source.
Configuring digital input jacks (OPT1, OPT2, COAX) for each source.
Setting component video input jacks (INPUT 1, INPUT 2) for each source.
Adjusts volume differences between input sources.
Sets listening modes for analog, PCM, and 2ch digital sources.
Sets listening modes for 96kHz PCM sources.
Sets listening modes for Dolby Digital or DTS sources.
Sets listening modes for digital mono sources.
Table showing recommended listening modes for various input sources.
Accessing and navigating the Hardware Config menu.
Setting for Zone 2 speaker output or main room 6.1 playback.
Specifies use of one or two surround back speakers.
Sets IR IN sensor usage for main or remote zone.
Adjusts headphone volume to match speaker output level.
Selects background color for OSD menus.
Turns off or selects display position for operations.
Choose between Absolute or Relative volume display.
Separately adjusts bass and treble for front speakers.
Boosts bass by outputting to subwoofer.
Narrows dynamic range for low-volume listening.
Controls center channel signal subtraction from left/right channels.
Extends stereo image for wraparound effect.
Adjusts soundfield forward or backward.
Adjusts center sound image heard from center or phantom speakers.
Sets the low-frequency effects level.
Compensates for overly bright sound from older film mixes.
Selects input channel for monaural sound.
Selects center channel output to center or phantom speaker.
Spreads stereo image for a wider sound space.
Adjusts the level of the virtual surround signal.
Improves clarity of center channel dialogue.
Controls reverb effects for live recordings.
Adjusts the depth of acoustic reverberation.
Adjusts the reverb time to match source and room acoustics.
Steps to select input source for the remote zone.
Operating Zone 2 functions using the remote controller.
How to adjust volume for Zone 2 speakers or amplifier.
Notes on recording digital signals and source limitations.
Procedure to record from one source while listening to another.
Selecting which source to output from TAPE OUT jacks.
Recording audio and video signals from VIDEO OUT 1 and 2 jacks.
General description of the remote controller's capabilities.
Steps to select a preset radio station using the remote.
Using the remote to control connected Onkyo cassette tape decks.
Using the remote to control connected Onkyo DVD players.
Using the remote to control connected Onkyo CD players.
Using the remote to control connected Onkyo MD recorders.
Procedure to program codes for other manufacturers' remotes.
Specific setting numbers for controlling Onkyo DVD players.
Operations for controlling a DVD player.
Operations for controlling a satellite tuner.
Operations for controlling a cable TV unit.
Operations for controlling a VCR.
Operations for controlling a television.
Steps to transfer commands from another remote to this one.
Procedure to erase a single programmed command.
Procedure to erase all commands for a specific mode.
Explanation of how macros allow single-button operation series.
Steps to program a sequence of operations into a macro button.
How to run a programmed macro sequence.
Procedure to erase a specific macro sequence.
Resets the remote controller to factory defaults.
Troubleshooting for no power, no sound, or immediate power off.
Troubleshooting for no sound from center speaker or subwoofer.
Troubleshooting for humming and poor high-range sound.
Troubleshooting for AM station reception and noise.
Troubleshooting for distorted stereo sound and reception flicker.
Troubleshooting for memory loss and preset recall failures.
Troubleshooting for no picture, no OSD menu, or audio/video mismatch.
Troubleshooting for remote controller not functioning.
Troubleshooting for LATE NIGHT function, parameter settings, multichannel audio, and Zone 2.
Explanation of messages like 'Not available with headphones use' or 'Not available in Zone 2 mode'.
Power output, distortion, damping factor, input sensitivity, and impedance details.
FM and AM tuner frequency ranges, sensitivity, and performance metrics.
Details on AM tuner range, sensitivity, and distortion.
Power supply, power consumption, dimensions, and weight.
Details on transmitter type, signal range, and power supply.