48
Viewing Live Video
(continued)
RETURN
MENU
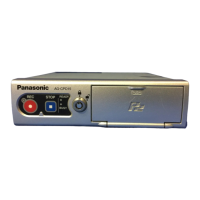
CONTROL PANEL
ON/
OFF
Cursor button
MENU button
LOCK lamp
Setting LPR mode
When the camera for the LPR mode is connected to the
[CAMERA 3] connector (see “Example” on page 5), use the
signal output from the [VIDEO OUT 1] connector, and set
[VIDEO OUT 1] on the Audio/Video screen to “CAM3”.
Use of license plate recognition requires the following setup.
This menu is available only when [Init LPR Mode] in
administrator setup is set to “ENABLE” (see “Camera1” on
page 88).
Note:
This menu is available only when the [CAMERA 1] connector
input is selected.
1. Press the [MENU] button.
The Menu appears.
2. Confirm that [Camera1] is selected, and press
the [
] button.
Confirm
3. Press the [
,
] buttons to select [LPR Mode].
The appears.
Select
4. Press the [
,
] buttons to select the
recognition mode.
Select
LPR: Engages the License Plate Recognition mode and
the [LOCK] lamp blinks. [LPR Shutter Speed] and
[LPR Zoom] now become available.
PATROL: Engages the normal mode. [Patrol Shutter
Speed] and [Patrol Zoom] now become
available.
Note:
Changing [Init LPR Mode] to “DISABLE” in administrator
setup while setting “LPR” engages “PATROL” and [LPR
Mode] is no longer available.
 Loading...