ViewControl
ViewControl integrates the MultiViewer output of the
switcher with a graphical overlay from DashBoard to
provide live video in the ViewControl windows.
Keep the following in mind when working with
ViewControl:
• ViewControl requires DashBoard 5.1, or later.
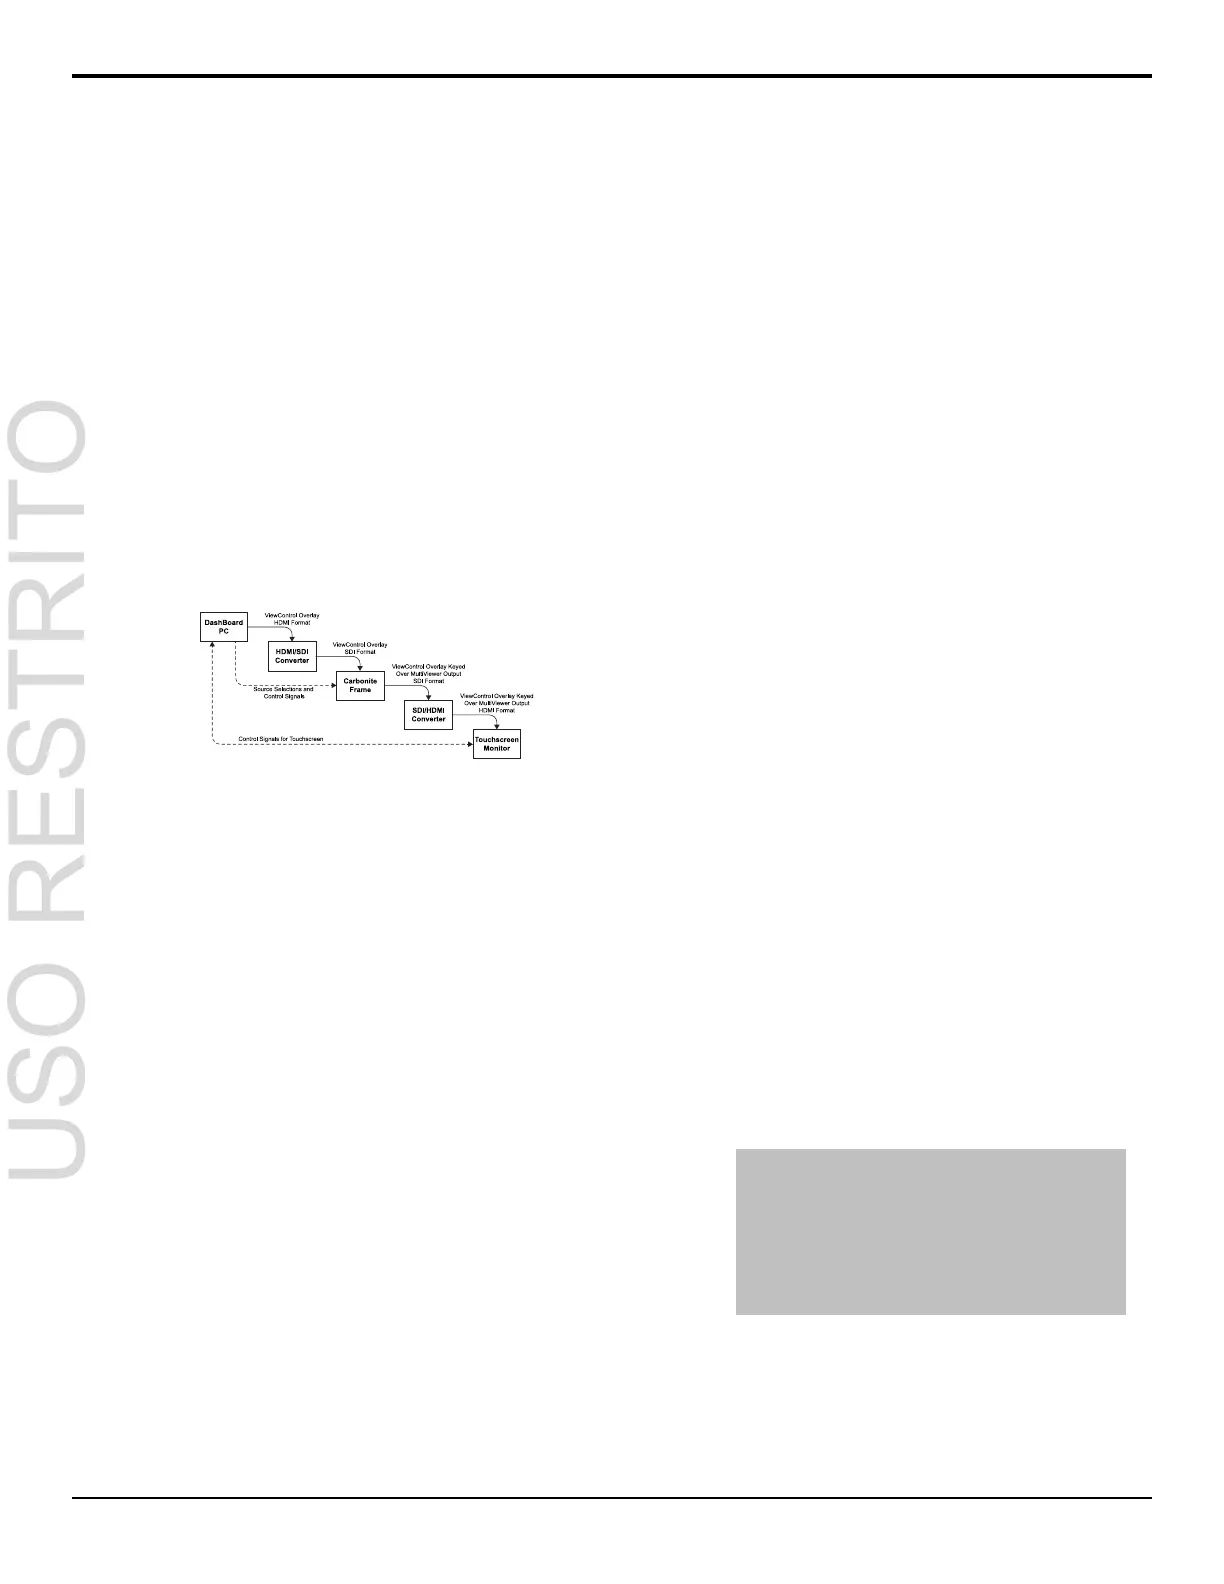
Connecting ViewControl
ViewControl combines an overlay image from
DashBoard with a custom MultiViewer output from the
switcher to generate the interface. This requires some
external SDI/HDMI video conversion equipment, as well
as a touchscreen display.
Figure 12: ViewControl Setup
The following connections are required for ViewControl:
• Set the output resolution of the DashBoard
computer to either 1920×1080 or 1280×720.
• Use an HDMI to SDI converter to take the output
of the DashBoard and put it into a resolution that
the switcher can use. Ensure that the resolution is
not changed.
• Apply a FSFC to the input that is coming from the
DashBoard computer.
• Set up a MultiViewer to use the ViewControl
layout.
• Use an SDI to HDMI converter to take the output
of the switcher and put it into a resolution that the
touchscreen monitor can use. Ensure that the
resolution is not changed.
• Connect the USB cable for the touchscreen to the
DashBoard computer.
To Set Up The Video Input for ViewControl
Carbonite+ and Carbonite MultiMedia
1.
Press MENU > CONFIG > Input > NEXT >
NEXT > NEXT > NEXT.
2.
Use the Input knob to select video input that
you want to apply a FSFC to.
3.
Turn on FSFC for the selected video input.
•
Standard Inputs — use the FSFC knob to
select On.
•
MultiMedia Inputs — use the Type knob
to select SDI-FC.
4.
Use the Frming knob to select Full.
5.
Press the Frming knob.
6.
Press the Confrm knob to assign the FSFC
channel.
Carbonite
1.
Press MENU > REF > NEXT.
2.
Use the FSFC knob to select the frame
converter/synchronizer channel that you want to
assign to a video input.
3.
Press the FSFC knob.
4.
Use the FSFCx knob to select Input.
5.
Use the Input knob to select video input that
you want to apply a FSFC to.
6.
Use the Frming knob to select Full.
7.
Press the Frming knob.
8.
Press the Confrm knob to assign the FSFC
channel.
To Set Up the MultiViewer for ViewControl
1.
Press MENU > SYSTEM > MultiView.
2.
Use the MView knob to select MV1.
3.
Use the Layout knob to select one of the
ViewControl layouts.
•
VCtrlT — (ViewControl Top) places the
boxes at the top of the screen.
•
VCtrlB — (ViewControl Bottom) places
the boxes at the top of the screen.
Tip: If you want to create a custom ViewControl
layout, you can use one of the other MultiViewer
layouts (except the 16-box layout in the SD-HD
MultiViewer) to create the look you want, and use
PanelBuilder in DashBoard to assign functionality to
the layout. Sources can be hidden from a layout by
assigning black to the box. For more information on
PanelBuilder, refer to the DashBoard documentation.
4.
Press NEXT.
5.
Use the Ovrlay knob to select the source BNC
that the ViewControl output from the DashBoard
computer is connected to.
32 • ViewControl — Carbonite Setup Manual (v10.0)

 Loading...


