Do you have a question about the Siemens MAMMOMAT 300 and is the answer not in the manual?
Lists required meters, appliances, tools, and important notes for setup.
Details the standard installation tool kit and optional tools needed.
Notes on initial start-up and requirements for DHHS and X-ray decree.
Procedures for checking and recording data for X-ray decree compliance.
Steps for maintenance measurements and checks according to DHHS regulations.
Information on the device's state upon delivery and after installation.
Critical safety instructions, including disconnecting power and handling sensitive components.
Overview of the preparation phase, including general handling instructions.
Details the contents of the crates and boxes for the MAMMOMAT 300.
Step-by-step guide for safely unpacking the main stand unit.
Instructions for removing all transport safeguards from the system components.
Specific instructions for removing the transport safeguard on the lifting carriage.
Procedure to remove the transport safeguard enabling rotary motion.
Guidance on handling protective strips on the metal curtain.
Steps for unpacking the generator and installing the radiation shield.
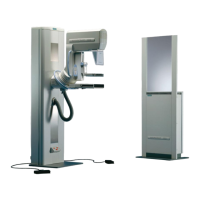
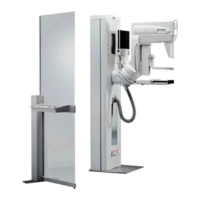
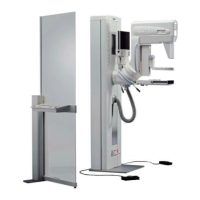
Positioning the stand and generator according to the installation plan.
Detailed steps for removing the front cover of the generator unit.
Instructions for positioning and fixing the cable ducts.
Guidance on routing and securing the main cable harness.
Procedure for vertically aligning the stand using levelling screws.
Measures to ensure electromagnetic compatibility of the equipment.
Specific EMC measures for the cable entry, including hose clamps.
Instructions for fitting ferrite sleeves and hose clamps to cables.
EMC measures for connecting specific cables (X1, X8, X9) on the bottom plate.
Detailed steps for securing cables X1, X8, and X9 to the bottom plate.
Information on connecting the stand cable harness, including connector types.
Description of alternative types of high-voltage connectors.
Procedure for connecting the high-voltage connector for different types.
Instructions for connecting various cables to the generator.
Specific instructions for connecting the rotating anode cable X9.
Information on mains connection voltage and necessary reconnections.
Procedure for connecting the 400V, 2-phase incoming mains cable.
Diagram and steps for the 400V, 2-phase mains connection.
Steps for connecting the mains supply to the generator unit.
Instructions for converting the mains connection from 2-phase to 1-phase.
Instructions for modifying the 18x24 cm object table for thick cassettes.
Instructions for modifying the 24x30 cm object table for thick cassettes.
Pre-powering checks on PC board D702, including switch settings.
Procedure for measuring the line resistance using specific meters.
Steps to check the incoming line voltage at fuse holders F10 and F20.
Visual check of supply voltages (+5V, +15V, +24V) via orange diodes.
Steps to arrange the swivel-arm system before attaching covers.
Instructions for connecting cables to control boards and patient handles.
Procedure for mounting the side and front covers onto the system.
Checking LED displays on processor boards (D702, D701, D711) for correct operation.
Procedure to test system functions and rotating anode without high voltage.
Pre-checks for radiographic voltage, tube current, and mAs values.
Testing kV, tube current, and mAs accuracy using an oscilloscope.
Information on factory-set tube current reduction for avoiding grid lines.
Reference diagrams for oscilloscope readings in various modes.
Using the service PC to check and program the IONTOMAT.
Setting the IONTOMAT sensitivity based on film/screen combinations.
Programming sensitivity correction values for different object tables.
Programming the IONTOMAT correction curve based on film/screen data.
Adjusting correction curves for film/screen combinations not in the standard table.
Graphical representations of various correction curves for different settings.
Determining and setting the correct film density using test exposures.
Verifying automatic transparency adaption with specific plexiglass thicknesses.
Tests for cut-off dose and resolution required by German X-ray decree.
Determining output values for constancy testing as per German regulations.
Instructions for setting the real time clock in the MAMMOMAT.
Procedure to enable or disable tube current reduction (TCR).
Steps to reduce generator power based on line impedance.
Checking the proper functioning of the swivel-arm system's rotary motion.
Procedure for checking the vertical movement and end stop functions.
Testing the emergency stop button functionality and reset.
Instructions for checking and adjusting the field light illumination time.
How to activate and verify the automatic switch-off of the field light.
Procedure to adjust the field light illumination time via the service PC.
Steps to check the compression plate, knobs, and foot switch functionality.
Procedure to test the OPCOMP function for interrupting compression.
Verifying that exposure release is blocked under specific conditions.
Defines maximum tolerances for radiation field edges.
Steps to measure and mark the radiation field using film.
How to evaluate the measured radiation field against tolerances.
Instructions for using the service PC and managing measuring instruments.
Saving programmed configuration values using the service PC.
Procedures to read exposure counts and clear error logs.
Steps to safely remove all connected measuring instruments.
Measuring protective ground resistance to ensure safety compliance.
Instructions for fitting the covers for the cable ducts.
Guidance on attaching the various covers to the MAMMOMAT stand.
Specific steps for mounting covers on stands with separate rear covers.
Specific steps for mounting covers on stands with a single rear cover.
Procedure for attaching the cover for the cable outlet.
Instructions for securing the front cover to the generator unit.
Performing a final check of protective ground resistance.
Instructions for mounting the face shield onto its holder.
Guidance on selecting and affixing the appropriate warning label.
Instructions for permanently securing the stand/generator to the floor.
Overview of the service PC interface and general usage instructions.
Explanation of symbols, formatting, and commands used in the manual.
Detailed steps for connecting and starting up the service PC program.
Template for recording measured values during installation and testing.
| X-ray Generator | High-frequency generator |
|---|---|
| Image Acquisition | Analog film-based |
| Power Supply | 220-240 VAC, 50/60 Hz |
| mA Range | 25-100 mA |
| Type | Mammography System |
| Detector Type | Film-screen cassette |
| Compression | Motorized compression |
| Operating Modes | Standard mammography |
| Tube Voltage | 24-35 kV |
| Focal Spot Size | 0.3 mm / 0.1 mm (dual focal spot) |
| Target Material | Molybdenum or Rhodium |
| Compression Device | Motorized compression |
| Image Receptor | Film-screen cassette |
| Detector Size | 18×24 cm and 24×30 cm |
| Pixel Size | Not applicable (analog film system) |
| X-ray Tube Anode Material | Molybdenum or Rhodium |
| kV Range | 24-35 kV |
| Compression Force | Up to 200 N |
| Compression Paddle Sizes | 18×24 cm and 24×30 cm |
| Image Display Resolution | Not applicable (analog film system) |
| Workstation Compatibility | N/A (analog system) |