41
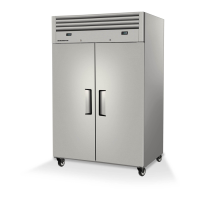
SKOPE Reflex Upright Fridge, Freezer, Combo
Replacement Procedures
Service Manual
Removing the
Cartridge
Follow the steps below and image over the page to remove the refrigeration
cartridge from the cabinet. Ensure the cabinet is disconnected from the
power supply before removing the cartridge. Note: The electronic controller
and electrics panel (including light power supply) is matched to the cabinet,
and must be left with the cabinet when exchanging the cartridge.
Replacement spare part cartridges are not supplied with controller and
electrics panel.
To remove the refrigeration cartridge
IMPORTANT
Some connector colours vary depending on date of manufacture.
After unplugging connectors, ALWAYS ensure reconnection has
been undertaken correctly as operational faults may occur if
incorrect. It is recommended to photograph wiring setup before
unplugging for future reference.
1. Unplug the cabinet from the power supply, and if necessary, cut the cable tie
from the back grille to release the power cord.
Note: On Combo models (2 × cartridges), unplug the cabinet from the mains
supply, then after step 2 unplug the cartridge supply from the junction box
between the two cartridges.
2. Open the door/s and unscrew the front panel - (Phillips head screwdriver):
Two screws on the bottom edge of the panel.
3.
Swing the front panel up and tape/restrain safely in place.
4. Photograph wiring setup for future reference when refitting the cartridge.
5. Unplug the electrical cables from the cabinet as detailed.
Note:
It may be necessary to cut cable ties to access and release cables:
4-Way plugs from the bottom of the electrics box
(condenser fan,
evaporator fan, compressor and defrost element).
6-Way plug (probes/door switch) behind controller.
2-Way plug (door switch) on wiring loom.
The controller and electrics box stay with the cabinet, therefore the
controller 4-way plugs (connected to the back of the electrics box), and
the controller to lights 4-way plug do not need to be unplugged.
6.
Move to the back of the cabinet, unscrew and
remove the rear grille.
7. 1-door cabinets: Unscrew and remove the electrics box. Note: The electrics
box does not need to be removed on 2-door cabinets.
8. Unscrew the cartridge from the top of the cabinet: One screw at the back and
one on each side.
9.
The cartridge may now be removed from the cabinet
.
10. Reverse the steps above to refit the cartridge. When refitting, ensure:
IMPORTANT: Ensure plug reconnection is undertaken correctly as
operational faults may occur if incorrect. Refer to relevant image on
page 42 and page 43, wiring diagram on page 18, and previous
recommended photograph for reference.
The evaporator box gasket is in good condition.
Wires and cables are clear of the cartridge when moving it.
All plugs and cables are re-connected to the correct socket and cable tied
back into place.
The cartridge is screwed in place.
The front cover is screwed into place and rear grille refitted.