— 15 —
KP-43T85T / 53SV85T / 61SV85T
* Every time 6 is pressed, the test signal changes to: “crosshatch+video
signal” → “dots+video signal” → “crosshatch only” → “dots only” → black
screen → “crosshatch+video signal” → ….etc.
6. Rotate the green lens assembly to adjust to the optimum focus point
with the test signal being displayed
7. Tighten the lens wing nut.
8. Cover the green and blue CRT lenses with the lens caps to allow
only red to show (or use the method shown in the note below for
turning off the CRTs individually without using lens caps).
9. Make sure the cross-hatch is still being displayed; if not, follow step
5 above.
10. Adjust the red CRT lens the same way as the green CRT lens.
11. Cover the green and red CRT lenses with the lens caps to allow only
blue to show (or use the method shown in the note below for turning
off the CRTs individually without using lens caps).
Test Signal
12. Make sure the cross-hatch is still being displayed; if not, follow step
# 5 above.
13. Adjust the blue CRT lens the same way as the green and red CRT
lenses.
14. After adjusting the items 2-5 “Focus VR Adjustment”, 2-6 “2-Pole
Magnet Adjustment” and 2-7 “4-Pole Magnet Adjustment”, reconfi rm
the optimum focus point and adjust again if necessary.
Note: If lens caps are unavailable, you can cut off the unnecessary color
beams in the service mode by individually changing the data from “1”
to “0” in category VPNT, item 28 RON (red), item 29 GON (green), or
item 30 BON (blue).
2-5. FOCUS CONTROL ADJUSTMENT
1. Enter the service mode.
2. Display a white raster.
3. Cover the red and blue CRT lenses with lens caps to allow only
green to show (or use the method shown in the note below for
turning off the CRTs individually without using lens caps).
4. Select adjustment category “PJE”, then press 6 to display the test
signal (crosshatch)*.
* Every time 6 is pressed, the test signal changes to: “crosshatch+video
signal” → “dots+video signal” → “crosshatch only” → “dots only” → black
screen → “crosshatch+video signal” → ….etc.
5. Adjust the green focus control on the focus block to achieve the
optimum focus point with the test signal being displayed.
6. Cover the green and blue picture lenses with lens caps to allow only
red to show (or use the method shown in the note below for turning
off the CRTs individually without using lens caps).
7. Make sure the cross-hatch is still being displayed; if not, follow step
4 above.
8. Adjust the red focus control on the focus block to achieve the
optimum focus point with the test signal being displayed.
9. Cover the green and red picture lenses with lens caps to allow only
blue to show (or use the method shown in the note below for turning
off the CRTs individually without using lens caps).
10. Make sure the cross-hatch is still being displayed; if not, follow step
# 4 above.
11. Adjust the blue focus control on the focus block to achieve the
optimum focus point with the test signal being displayed.
12. Repeat steps 1 through 11 after adjusting items 2-4. “Focus Lens
Adjustment”, 2-6 “2-pole Magnet Adjustment”, 2-7 “ 4-Pole Magnet
Adjustment”
Note: If lens caps are unavailable, you can cut off the unnecessary color
beams in the service mode by individually changing the data from “`”
to “0” in category VPNT, item 28 RON (red), item 29 GON (green), or
item 30 BON (blue).
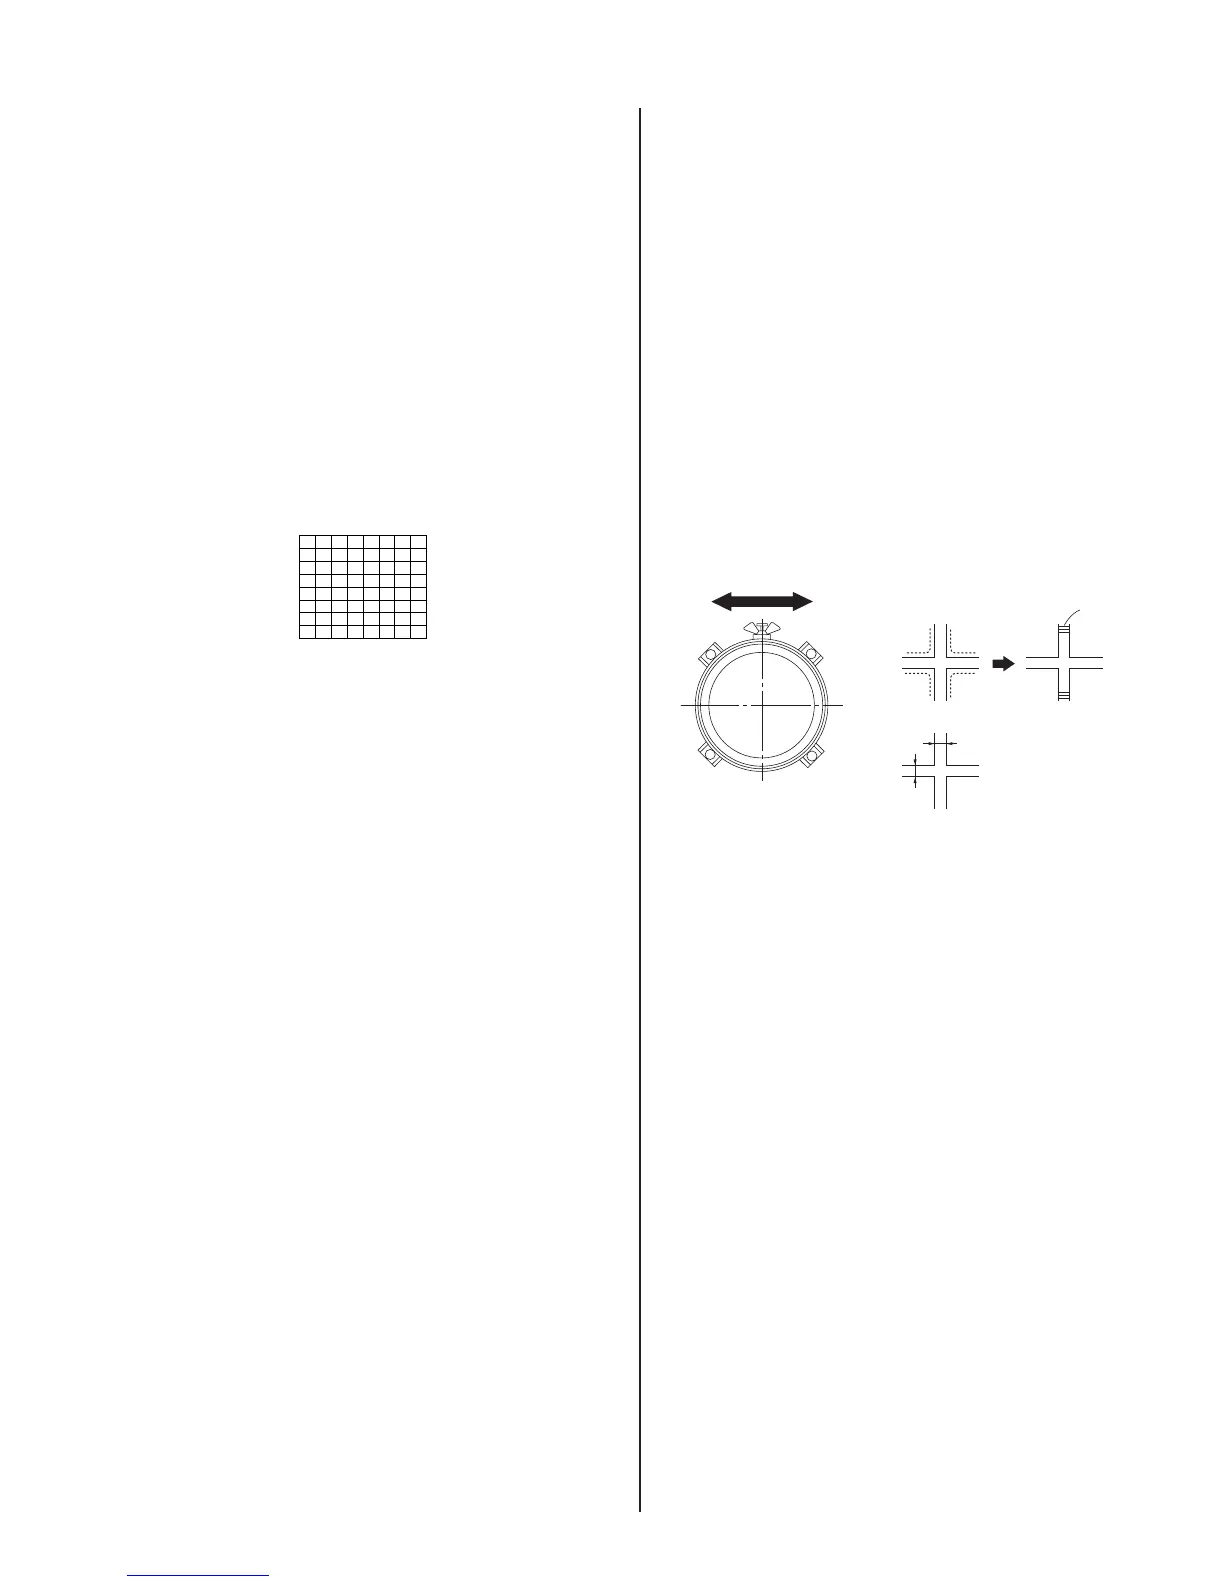
A
B
Lens
Minimize both A and B.
Center of crosshatch
Scanning line visible.
2-6. 2-POLE MAGNET ADJUSTMENT
(GREEN, RED)
1. Display a dot pattern (see the details of using the internal test
patterns at the end of the previous section).
2. Enter the service mode.
3. Cover the red and blue CRT lenses with lens caps to allow only
green to show (or use the method shown in the note below for
turning off the CRTs individually without using lens caps).
4. Turn the green focus control on the focus block to the right and set
it to overfocus to enlarge the spot (the dot). See fi gure at the end of
Section 2-3 for the location of the 2-pole magnet adjusting tabs.
5. Adjust the green CRT’s 2-pole magnet so that the small bright spot
is in the center of the large defocused spot.
6. Adjust the green focus control on the focus block and set it for the
best focus.
7. Repeat steps 1 through 6 for the red CRT, except now you will
cover the green and blue CRT lenses with lens caps to allow
only red to show (or use the method shown in the note below
for turning off the CRTs individually without using lens caps) and
you will adjust the red focus control on the focus block.
Note: If lens caps are unavailable, you can cut off the unnecessary color
beams in the service mode by individually changing the data from “1”
to “0” in category VPNT, item 28 RON (red), item 29 GON (green), or
item 30 BON (blue).
 Loading...