1-26
108
Editing
Example C
How to connect to a stereo system
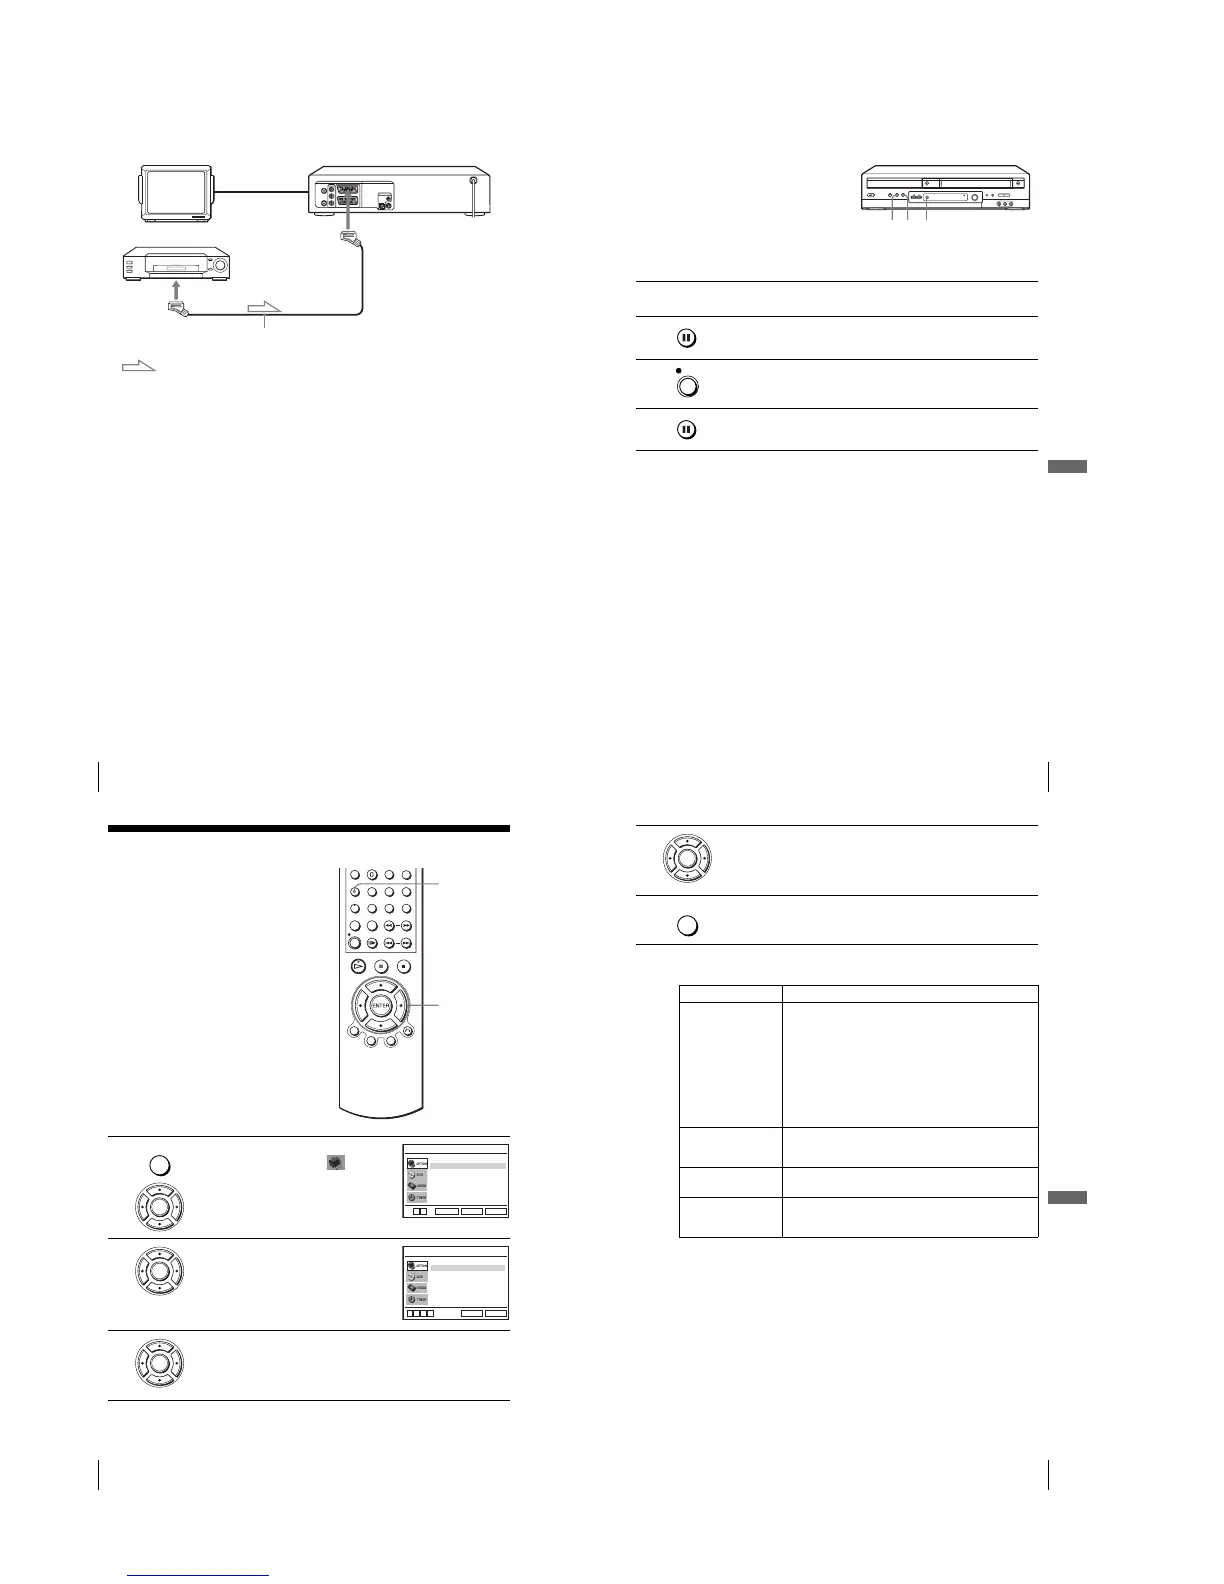
Connect the LINE-2 IN t/o L/R jacks on this DVD-VCR to the audio output jacks on the
stereo system, using an audio cable (not supplied).
Notes
•Make sure you connect the plugs to jacks of the same colour.
• If the other VCR is a monaural type, leave the red plugs unconnected.
• If you connect this VCR to both the LINE IN and LINE OUT jacks of the other VCR, select
the input correctly to prevent a humming noise.
•When you connect another VCR to the LINE-3 or LINE-2 connector, press INPUT SELECT
to display “L3” or “L2” in the display window.
TV
LINE-3
PERITEL cable (not supplied)
PERITEL
: Signal flow
Your VCR (Recorder)
Other VCR (Player)
109
Editing
VCR Additional Operations
Operation (when recording on this VCR)
To stop editing
Press the x (stop) buttons on both VCRs.
Tip
•To cut out unwanted scenes while editing, press X on this VCR when an unwanted scene
begins. When it ends, press X again to resume recording.
Before you start editing
•Turn on your TV and set it to the video
channel.
•Press INPUT SELECT to display the
connected line in the display window.
•Press SP/LP to select the tape speed, SP or
LP.
•Press SELECT VIDEO to control the
VCR.
1
Insert a source tape with its safety tab removed into the other (playback)
VCR. Search for the point to start playback and set it to playback pause.
2
Insert a tape with its safety tab in place into this (recording) VCR. Search
for the point to start recording and press X to set it to playback pause.
3
Press z REC on this VCR to set it to recording pause.
4
To start editing, press the X (pause) buttons on both VCRs at the same time.
z RECXx
REC
110
General setup information
Additional Information
General setup information
Changing setup options
1
Press SET UP when the DVD player is in stop
mode, then press V/v to select
(OPTION) and press ENTER.
2
Press V/v to select “Réglages Utilisateur”,
then press ENTER.
The “REGLAGES UTILISATEUR” menu
appears.
3
Press V/v to select the option to change.
V/v/B/b
ENTER
SET UP
SET UP
ENTER
Langue
Installation
Veille Auto
Messages Ecran
Réglages Utilisateur
L’horloge
:Français
[ Non ]
[ Oui ]
RETURN
OPTION
SET UP
ENTER
v
V
ENTER
NICAM
Syst. Couleur
Etendre ShowView
Smart Trilogic
[ Non ]
RETURN
REGLAGES UTILISATEUR
SET UP
v
V
b
B
[ Oui ]
[ Oui ]
[ Auto ]
ENTER
111
General setup information
Additional Information
Menu choices
Initial settings are indicated in bold print.
4
Press B/b to change the setting.
5
Press SET UP to exit the menu.
Menu option Set this option to
Syst. Couleur • “Auto” to select the colour system automatically.
•“PAL” to use the tape recorded in the PAL colour system.
•“SECAM” to use the tape recorded in the SECAM colour
system.
•“MESECAM” to use the tape recorded in the MESECAM
colour system.
•“B/W” to use the tape recorded in black and white.
When using the tape recorded NTSC colour signals:
•“NTPB” to play back an NTSC-recorded tape on PAL TV.
•“NT4.43” to play back an NTSC-recorded tape on Multi TV.
NICAM • “Oui” to record NICAM broadcasts on the hi-fi audio track.
•“Non” to record standard sound on the hi-fi audio track.
For details, see page 98.
Smart Trilogic • “Oui” to automatically adjust the sharpness of the picture.
•“Non” to manually adjust the sharpness of the picture.
Etendre ShowView • “Non” to deactivate the ShowView Extend function.
• 10/20/30/.../60 (minutes) to extend the time of the ShowView
setting by the selected amount of time.
ENTER
SET UP




 To Next Page