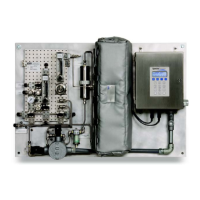
Installation
2–4 H
2
S in Natural Gas
requirements. All work must be performed by technicians qualified in electrical
conduit installation.
Depending on your configuration, the electrical wiring can typically be
connected to the analyzer through conduit hubs located at the bottom right of
the control box.
Units with an optional enclosure heater will have an additional power
connection through a conduit hub located at the bottom right of the enclosure
(see “Connecting Electrical Power to the Optional Enclosure Heater” on
page 2-6).
Units with an optional Type X purge will have one power connection via a 3/4”
NPT conduit opening on the purge controls (see “Connecting Electrical
Power to an Analyzer with an Optional Type X Purge” on page 2-8).
To connect electrical power to the analyzer:
1. Open the control box door. Take care not to disturb the electrical
assembly inside.
2. Run conduit from the power source panel to the conduit hub nearest
the power terminal block. For analyzers in an explosion-proof
aluminum enclosure, thread the conduit directly into the enclosure
and use the supplied conduit seals as required by code.
Before attaching the wiring to the analyzer, make sure all power
to the wires is off.
Careful consideration should be taken when grounding. Properly
ground the unit by connecting ground leads to the grounding
studs provided throughout the system that are labeled with the
ground symbol .
Failure to properly ground the analyzer can create a high-voltage
shock hazard.
Because the breaker or switch in the power panel will be the
primary means of disconnecting the power from the analyzer, the
power panel should be located in close proximity to the equipment
and within easy reach of the operator, or within 10 feet of the
analyzer.
 Loading...