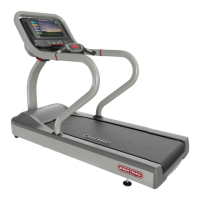
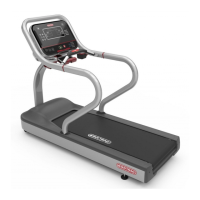
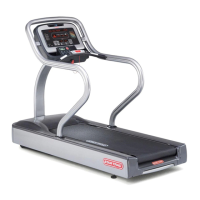
Speed Window: Shows the speed at which the user is walking/running, from 0.5 mph (0.8 kph) to 10.0 mph (16.0 kph) for 110-
volt units, or 0.5 mph (0.8 kph) to 12.0 mph (19.3 kph) for 220-volt units.
Incline Keys: Adjust treadmill incline in 0.5% increments from 0% through 15% in manual operation. These
keys repeat when pressed and held.
Incline Window: Shows the incline that the user is ascending, from 0% (easiest) to 15% (most difficult).
Numeric Keypad: Allow you to enter specific values for program parameters during program setup. The numer-
ic keypad can also be used to adjust treadmill speed while the treadmill is operating.
Time Window: Shows the duration of your workout thus far in minutes and seconds.
Distance Window: Shows the total number of miles or kilometers you have walked or run thus far.
Calorie Window: Shows your aggregate caloric expenditure thus far in your workout.
Goal Adjust Keys : Allow you to increase or decrease your time / distance goal during a workout.
Heart Rate Indicator: Pulsates to indicate your heart rate has been acquired through the use of the heart rate
strap or heart rate grips.
Fan Keys: Allow you to control the speed of the personal cooling fan, either OFF, Low or HIGH.
Heart Rate Window: Shows your current heart rate in beats per minute (BPM) while wearing the heart rate strap or grasping
the heart rate grips.
WORKOUT PARTNER
TM
Preset Program Keys: Allow you to access a desired preset workout program.
Information Window: Provides informational messages, prompts during program setup, notification when your workout is com-
plete, and scrolling summarized workout data during and after a workout. Depending on the program completed and treadmill
settings as set in Manager or Maintenance Settings mode, workout data may include:
Every 2000 miles (or 3000 km) the Start-Up Display will also scroll REWAX BELT. See Preventive Maintenance, Chapter 7, for
additional information.
HINTS AND TIPS FOR GETTING STARTED
The following hints and tips will assist in training your users to maximize the fitness benefits of your STAR TRAC PRO
TREADMILL.
■
Walk or run at a rate that feels comfortable and most natural, yet is sufficiently vigorous to get a good cardio
workout.
■
Try different walking or running rhythms. In manual operation, adjust your pace from low speed to high speed, then
back to low. As you become more comfortable with your treadmill, try going faster or using the preset programs.
■
Watch the Graphic Display to anticipate terrain changes. When you use the preset programs, the display shows
changes in terrain as tall or short columns. The display also notifies you of incline changes with a series of beeps and a
flashing display element.
■
The total number of segments equals 20.
■
The combined value of the segment goals is equal to the total goal.
To edit a custom program:
1. Press the key; you will be prompted to enter a PIN code.
2. Use the keys to enter your personal PIN code, then press the S
TART or ENTER key.
3. Press the key to enter the “Edit Program” function.
4. Press the desired key to select a program for deletion. Press the S
TART or ENTER key to begin editing the select-
ed program (press the STOP key to leave the program unchanged and return to the top of the “Edit Program” function).
5. The system will display the current values for the program time goal or distance goal, as appropriate, segment goals, seg-
ment times and segment inclines, in sequence. Edit the parameters, as desired, using the same procedures as for adding
a program.
To delete a custom program:
1. Press the key; you will be prompted to enter a PIN code.
2. Use the keys to enter your personal PIN code, then press the S
TART or ENTER key.
3. Press the key to select the “Delete Program” function.
4. Press the desired key to select a program for deletion.
5. Press the S
TART or ENTER button to delete the selected program (press the STOP key to cancel the deletion and return to
the top of the “Delete Program” function). Press the START or ENTER button a second time to confirm the deletion.
6. The Information Window will display a confirmation message indicating that the selected program has been deleted. If
desired, delete additional programs as described in steps 4 through 6, above.
7. When all desired programs have been deleted, press the STOP key to exit the “Delete Program” function.