Do you have a question about the Star Trac Pro and is the answer not in the manual?
Details FCC and international regulations compliance for the treadmill.
Lists international standards the product conforms to.
Steps to add a new CSAFE company name to the treadmill.
Procedure to view previously saved CSAFE company names.
How to choose a saved CSAFE company name for display.
Procedure to remove saved club names or messages from memory.
Steps to add a new club name/message to the treadmill.
Procedure to view previously saved club names/messages.
How to choose a saved club name/message for display.
Procedure to remove saved club names/messages from memory.
Steps to enter the Maintenance Settings mode.
Steps to unpack all parts from the shipping crate.
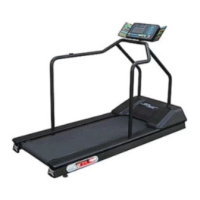
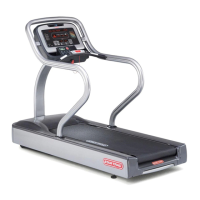
The assembly procedure for the PRO and PRO S Treadmills.
Steps to install the neck assembly onto the frame.
Procedure to remove the motor shroud from the frame.
Steps to install the display console onto the neck assembly.
Daily cleaning and inspection tasks for the treadmill.
Weekly cleaning and inspection tasks for the treadmill.
Bi-weekly maintenance procedures, focusing on the motor.
Monthly inspection and lubrication for the treadmill.
Procedures for adjusting the running belt, drive belt, and other components.
Steps to install the left and right handrails onto the treadmill.
Encourages users on their fitness journey and highlights benefits.
Guidance for developing a walking or running exercise program.
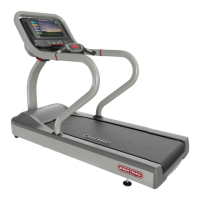
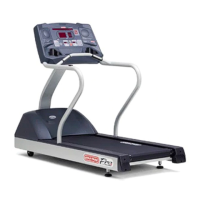
Explains the functions of the display panel and its keys.
Shows the current speed of the treadmill.
Adjusts treadmill incline in 0.5% increments.
Displays the current incline level.
Used for entering program parameters and adjusting speed.
Shows the duration of the workout so far.
Shows total miles or kilometers walked or run.
Shows aggregate caloric expenditure during the workout.
Allows increasing or decreasing time/distance goals.
Displays current heart rate in BPM.
Allows access to desired preset workout programs.
Displays messages, prompts, and workout data.
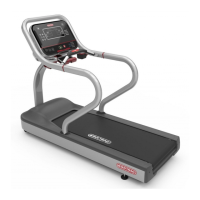
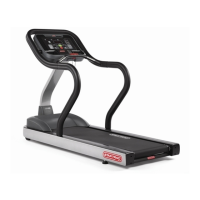
Guide to understanding and using the Personal Trainer Studio feature.
Details on creating and customizing workout programs.
Procedures for managing Personal Trainer PIN codes.
Steps to add a new Personal Trainer PIN code.
Steps to delete an existing Personal Trainer PIN code.
Programs designed for serious and recreational runners.
Instructions for running specific distance-based programs.
Steps to set up and run custom interval workouts.
Steps to add a new custom workout program.
Steps to delete an existing custom workout program.
Procedure to view active Personal Trainer PIN numbers.
Steps to add a new custom workout program.
Explains the functions of the display panel and its keys.
Steps for using contact heart rate grips.
Steps for using the heart rate strap.
Dynamic Heart Rate Control program for cardio training.
Basic manual operation mode for workouts.
User-defined interval training programs.
Treadmill test to assess fitness levels.
Explains the interval training program's design and goals.
Benefits of using interval training with heart rate monitoring.
How to run a personalized workout program.
Programs designed for serious and recreational runners.
Instructions for running specific distance-based programs.
Steps to set up and run custom interval workouts.
Explains the functions of the display panel and its keys.
Steps for using contact heart rate grips.
Steps for using the heart rate strap.
Explains the functions of the display panel and its keys.
Steps for using contact heart rate grips.
Steps for using the heart rate strap.
Steps for using contact heart rate grips.
Steps for using the heart rate strap.
Lists product models and their corresponding kit part numbers.
Lists parts and quantities for the bike, stepper, and cross trainer kit.
Lists parts and quantities for the Pro Treadmill hardware kit.
Step 1: Remove screws from the display.
Step 2: Attach wings to the display using Phillips head screws.
Step 3: Attach the crossbow to the wings.
Step 4: Slide and align the top mounting plate on the neck.
Step 5: Insert rubber pad and attach mounting plates.
Step 5 Continued: Ensure base of neck is flush.
Step 6: Attach the crossbow back plate.
Step 7: Slide and secure the gooseneck.
Photos of recumbent and upright Pro Bikes.
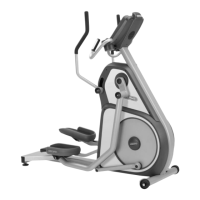
Photo of the Cross Trainer installation.
Photo of the Pro Stepper installation.
Step 1: Remove screws from the tread display.
Step 2: Attach wings to the display using Phillips screws.
Step 3: Attach the crossbow to the wings.
Step 4: Slide and align the top mounting plate on the neck.
Step 5: Attach mounting plates and check alignment.
Step 5 Continued: Ensure base of neck is flush.
Step 6: Attach the crossbow back plate.
Step 7: Slide and secure the gooseneck.
Step 8: Secure the handrails to reduce vibration.
Details daily, weekly, and monthly maintenance tasks.
Role of the cable/satellite operator in TV installation.
Responsibilities of the A/V installer.
Role of the electrical contractor for power outlets.
Role of the construction contractor for wiring management.
Instructions for mounting the TV to the Star Trac bracket.
How to adjust the TV height for optimal viewing.
Information on the TV tilt feature.
Guidance on managing wires for AV installations.
Table showing DC side cord length notes for different products.
Instructions for managing wires on bikes, cross trainers, and steppers.
Instructions for managing wires on treadmills.
Instructions for managing wires on bikes, cross trainers, and steppers.
Instructions for managing wires on treadmills.
| Speed Range | 0.5 - 12.5 mph |
|---|---|
| Incline Range | 0% to 15% |
| Running Surface | 20" x 60" |
| Heart Rate Monitoring | Contact |
| Programs | Multiple built-in programs |