34 BA_KA-ED_A22_190313_en.doc
- Check the setting of the light barrier along the entire length of the carriage
movement. Move the carriage slowly in doing so, because even slight
interruptions of the light barrier can influence the function of the machine. The
mirror/reflex foil is to be inspected for damage and dirt and the light barrier set
at a right angle to the mirror/reflex foil. In case the light barrier is interrupted,
turn the adjustment knurl a little to the right and then check the entire length of
the carriage route again. Also make sure that the rear Differential feed does not
interrupt the light barrier when it is swivelled out.
- Switch toggle switch S6 on the switch box to “ ” position
(“1” position).
- Switch off solenoid 1V2 with the manual switch
(clamping device opens).
- Switch off “Sewing stop” with button 1 on the operating control V810.
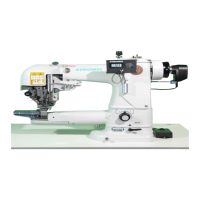
Adjusting the edge distances at stitch start and at the stitch end (Fig. 16a + b)
- Loosen the threaded pins (6) in the block of S8-1 or S10.
- Now shift the light barrier to the new position. Tighten the threaded pin again,
making sure to maintain a right angle.
Correcting the angle to the reflection surfaces of S8-1 or S10 (Fig. 16a)
- Loosen the half rod for the respective light barrier.
- In block (7) loosen the respective cylinder head screws.
- Turn light barrier with the half rod to fitting angle.
- After angle has been newly found, retighten the cylinder head screw.
Fig. 17