18 6082-209-001 REV A www.stryker.com
Return To Table of Contents
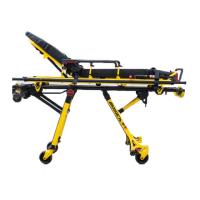
Vehicle Safety Hook Installation
SIDE TO SIDE POSITIONING OF THE SAFETY HOOK
1. Remove the cot from the fastener and unload it from the vehicle.
2. While the cot is being removed, note the position of the load wheels and the safety bar.
3. Mark the center of the cot safety bar on the vehicle floor.
4. Verify that the position marked in Step 3 is where the safety bar engages the safety hook every time when
unloading the cot in a variety of positions (all the way to the left and all the way to the right), regardless of cot
position.
• If the cot safety bar does not engage the safety hook in any of these positions (left, center, or right), modify
the vehicle, not the cot or safety hook.
• If the cot safety bar engages the safety hook every time, install the safety hook.
INSTALLING THE SAFETY HOOK
1. Determine the correct safety hook front to back and side to side positioning, so the cot safety bar engages the
safety hook every time.
2. Drill the holes for the socket head cap screws.
3. Fasten the safety hook to the patient compartment floor and verify that the safety hook always engages the cot
safety bar regardless of how the cot is unloaded from the vehicle.
WARNING
Verify that the safety hook always engages the cot safety bar regardless of how the cot is unloaded from the vehicle or
injury to the patient or operator and/or damage to the cot may occur.
WARNING
The cot must have at least 5/8” of clearance between the vehicle bumper and the cot to disengage the safety bar when
unloading the cot from the vehicle. Verify that the cot legs lock into the load position before disengaging the safety bar
from the safety hook. Failure to properly lock the cot into position can cause injury to the patient or operator and/or
damage to the cot.
Safety Hook Placement
(For Reference Only)
Safety Bar Engaging Safety Hook
Top View of Vehicle
Bumper
Door Frame
Safety Hook
Squad Bench
Floor Edge
Safety Hook
Safety Bar