EasyManua.ls Logo

Tascam 388 Studio 8 - Ping-Pongíng, Collapsing, or Bouncing Tracks

Tascam 388 Studio 8
139 pages
Print Icon
To Next Page IconTo Next Page
To Previous Page IconTo Previous Page
Loading...
PING-PONGING,
COLLAPSING,or
BOUNCING
TRACKS
The
recording
capability
of-your
Studio
8
is
not
limitad
to
eight
tracks.
As
you
progress
with
your
recording,
you
may
reach
a
where
you
need
more
than
eight
tracks.
At
this
pomt,
the
recording
technique
variously
callad
Ping-
pong,
Collapsing,
or
Bouncing
can
expand
the
capability
of
your
recording
equipment.
The
technique
allows
you
to
connbine
up
to
seven
tracks
onto
the
remaining
blank
track.
You
may
even
record
additional
new
material
while
bouncing
tracks.
For
the
sake
of
an
example,
we'll
collapse
material
recordad
on
tracks
1
through
4
to
track
8
of
the
Studio
8.
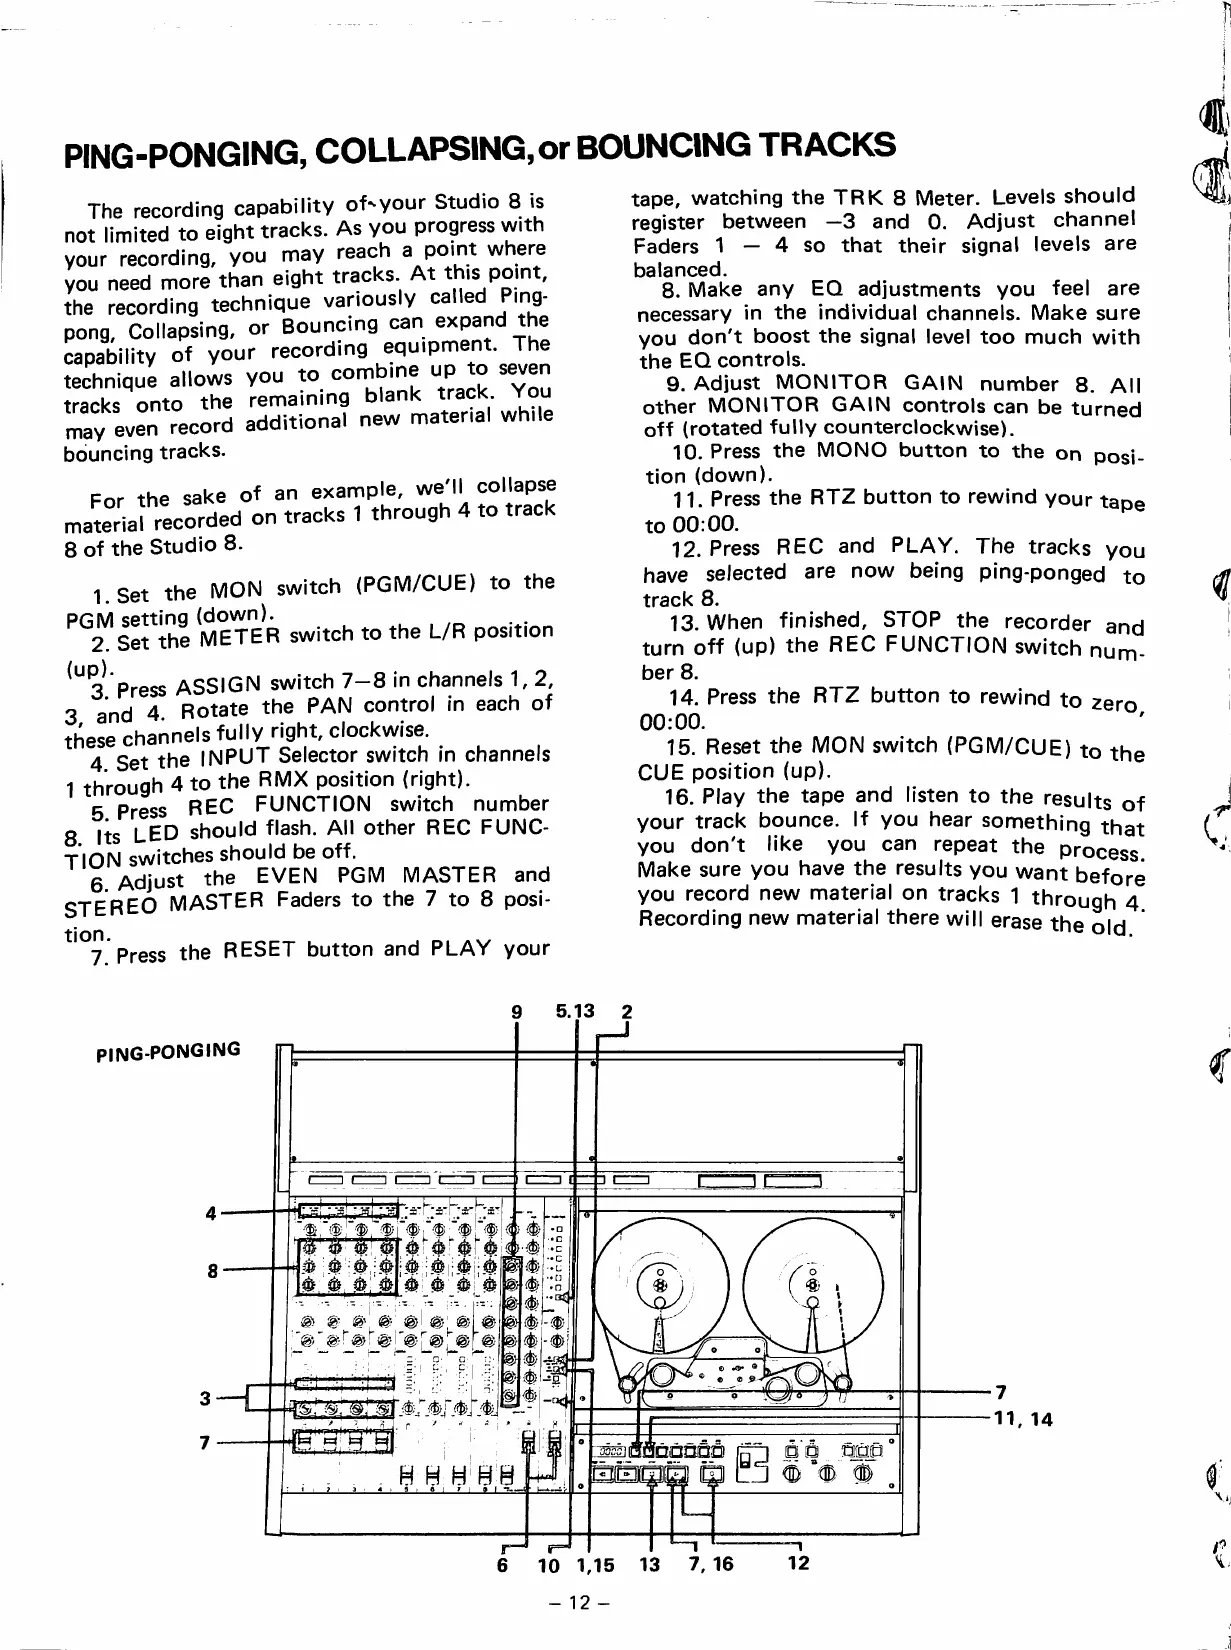
1
Set
the
MON
switch
(PGM/CUE)
to
the
PfiM
setting
(down).
. .
Z
Set
the
METER
switch
to
the
L/R
position
3^
Press
ASSIGN
switch
7-8
in
channeis
1,
2,
3
and
4
Rotate
the
PAN
control
in
each
of
these
channels
fully
right,
clockwise.
4
Set
the
INPUT
Selector
switch
in
channels
1
through
4
to
the
RMX
position
(right).
5
Press
REC
FUNCTION
switch
number
8
Its
LED
should
flash.
All
other
REC
FUNC
TION
switches
should
be
off.
6
Adjust
the
EVEN
PGM
MASTER
and
STEREO
MASTER
Faders
to
the
7
to
8
posi-
^'°7
Press
the
RESET
button
and
PLAY
your
tape,
watching
the
TRK
8
Meter.
Lavéis
should
register
between
—3
and
O.
Adjust
channel
Faders
1
—
4
so
that
their
signal
lavéis
ara
balancad.
8.
Maka
any
EQ
adjustments
you
fael
are
necassary
in
the
individual
channels.
Maka
sure
you
don't
boost
the
signal
laval
too
much
with
the
EQ
controls.
9.
Adjust
MONITOR
GAIN
number
8.
All
other
MONITOR
GAIN
controls
can
be
turned
off
(rotated
fully
counterclockwise).
10.
Press
the
MONO
button
to
the
on
posi
tion
(down).
11.
Press
the
RTZ
button
to
rewind
your
tape
to
00:00.
12.
Press
REC
and
PLAY.
The
tracks
you
have
selected
are
now
being
ping-ponged
to
track
8.
13.
When
finished,
STOP
the
recorder
and
turn
off
(up)
the
REC
FUNCTION
switch
num
ber
8.
14.
Press
the
RTZ
button
to
rewind
to
zero
00:00.
15.
Reset
the
MON
switch
(PGM/CUE)
to
the
CUE
position
(up).
16.
Play
the
tape
and
listen
to
the
results
of
your
track
bounce.
If
you
hear
something
that
you
don't
like
you
can
repeat
the
process
Maka
sure
you
have
the
results
you
want
beforé
you
record
new
material
on
tracks
1
through
4
Recording
new
material
there
will
erase
the
oíd
5.13
PING-PONGING
m
w
»•
!
m
m
m\
m
'i/i
Tr
I
híi^l
11,
14
D
a
nop
ODOOD
H
N
[=1
£-1
6
10
1,15
13
7,
16

Table of Contents