Do you have a question about the Tascam 388 Studio 8 and is the answer not in the manual?
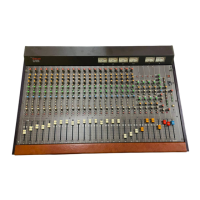
Number of Channels | 8 |
---|---|
Tracks | 8 |
Built-in Effects | No |
Phantom Power | Yes |
EQ Bands per Channel | 3 |
Aux Sends | 2 |
Built-in Tape Machine | Yes |
Type | Analog |
Track Format | 1/4 inch |
Heads | Erase, Record, Playback |
EQ | 3-band |
Inputs | 8 |
Output Channels | 2 |
Power Requirements | 120V AC |
Tape Speed | 7.5 and 15 ips |
Explains the mixer's function and system principles.
Step-by-step guide to setting up the recorder and mixer.
Explains how to add new tracks to existing recordings.
Procedure for practicing punch-ins before actual recording.
Using a footpedal for hands-free punch-ins.
Necessity of planning recording sessions and track usage.
Explains the functions and frequency ranges of the equalizer controls.
Instructions for cleaning heads, capstan, and pinch roller.
Explains the process and importance of demagnetizing heads.
Setup and usage guide for electronic music production.
How the Studio 8 meets audio needs for video/film production.
Details the main mixer section and its connectors.
Describes the three input settings for each channel.
Function of the TRIM control and OL indicator.
Details the three-band parametric equalizer system.
Access points for adding signal processing to channels.
Function of the linear slide fader for signal level adjustment.
Control for creating stereo mixes by adjusting signal pan.
Switches for routing signals to PGM Busses and recorder tracks.
Dual purpose switches for stereo master or solo-in-place.
Connects line-level outputs from other devices to the mixer.
Faders for adjusting the level of PGM Busses.
Line-level outputs for recording or submixing.
RCA connectors for input to the stereo buss system.
Adjusts the level of the stereo buss signal.
Combines stereo buss signals into a mono mix.
Provides balanced and unbalanced stereo outputs.
Selects balanced or unbalanced line-level output signal.
Details the AUX submix system and its controls.
Determines if AUX submix signal is before or after channel fader.
Rotary control for adjusting AUX signal level to master.
Adjusts the summed AUX signal level for the AUX OUT.
Provides O dBu and line-level AUX outputs.
Allows line-level signal input to the mixer's AUX master.
Rotary control for admitting signal into the effect submix.
Determines the level of the summed effect signals.
Outputs for signal processors, with O dBu and line-level.
Input points for returning effect signals to the mixer.
Controls for effect submix signal placement and level.
Input for effect outputs from a submixer.
Controls level and placement for monitor signals.
Adjusts signal level to headphones and monitor outputs.
Provides line-level outputs for stereo amplifiers and speakers.
Selects the signal source for headphones and monitor outputs.
Stereo headphone jacks on the front panel.
Switches stereo meters between AUX/EFF or L/R.
Meters register program level and peak indicator lights.
Meters register program level of PGM Busses or recorder tracks.
Rewinds tape at high speed to a load position.
Starts tape playback or initiates record mode with REC button.
Initiates recording process when used with REC FUNCTION buttons.
Winds tape forward at high speed, stopping before reel end.
Stops tape motion regardless of transport mode.
Switches to prepare specific tracks for recording.
Allows automatic switching between tape and source during punch-ins.
Selects monitor signal source (PGM Busses or CUE).
Retracts tape lifters to monitor sound during F.FWD or REW.
Controls the status of the PITCH control function.
Overrides dbx for track 8, useful for time code recording.
Displays tape location and allows resetting the counter.
Returns tape to zero position and stops, or plays if PLAY is engaged.
Searches for and stops at a pre-entered cue point.
Establishes a cue point in memory for transport automation.
Displays the cue position in minutes and seconds on the counter.
Creates a continuous playback loop from zero to cue.
Prevents tape from running off reels at ends of tape.
Outputs signals directly from the recorder without mixer processing.
Front panel jack for the RC-30P Remote Punch-in footpedal.
Connector for the RC-71 Remote Control Unit for transport functions.
Accepts input from auto locators and synchronizers.
Programmable multipoint locator for transport control.
Durable footswitch for hands-free punch-in/out.
Unit for remote control of transport functions.
Essential for eliminating residual magnetism on heads.
8-in, 2-out mic/line mixer useful as a submixer.
Headphone distribution amplifier for multiple cue headphones.
4-channel, 4-band parametric equalizer for precise frequency control.
2-channel, 10-band graphic equalizer for tonal balance.
Simplifies wiring and signal routing.
8-in, 2-out line mixer for cue or monitor mixes.
Details tape format, reel size, motors, and tape speed.
Lists input/output impedances, levels, and power ratings.
Provides key performance metrics like frequency response and S/N ratio.
Physical dimensions of the unit.
Safety instructions for service personnel before returning appliances.
Notes on resistor values, capacitors, safety components, and dB reference.
Lists required test equipment for checks and adjustments.
Steps for disassembling the main parts of the unit.
Steps to remove the top panel of the deck section.
Instructions for removing the reel motor assembly.
Instructions for removing the capstan motor assembly.
Adjustment for clearance between capstan shaft and thrust plate.
Adjustment procedure for the brake mechanism.
Procedure for measuring and adjusting brake torque.
Procedure for measuring and adjusting pinch roller pressure.
Adjusting reel table height for smooth tape travel.
Procedures for head mounting and azimuth adjustment.
Adjustments for tape tension in various modes.
Adjusting fast wind speed using an oscilloscope.
Checking wow and flutter using a test tape.
Adjusting tape speed using a frequency counter and test tape.
Checking and adjusting signal level from MIC IN to ACCESS SEND.
Checking and adjusting signal level from LINE IN to ACCESS SEND.
Checking and adjusting signal flow from STEREO BUSS IN to STEREO OUT.
Checking and adjusting signal flow from EFFECT RTN to STEREO OUT.
Checking and adjusting signal flow from BUSS IN AUX to AUX OUT.
Checking and adjusting signal flow from PGM BUSS IN to PGM OUT.
Checking and adjusting signal flow from LINE IN to PGM OUT.
Checking and adjusting signal flow from LINE IN to AUX/EFFECT OUT.
Measuring frequency response of various signal paths.
Measuring Total Harmonic Distortion.
Measuring Signal-to-Noise Ratio.
Adjusting the reproduce level for each track.
Checking and adjusting frequency response for reproduction.
Procedures for bias tuning and trap adjustment.
Adjusting bias levels for recording.
Setting the recording input and output levels.
Measuring and ensuring overall frequency response.
Measuring and ensuring overall signal-to-noise ratio.
Measuring and ensuring overall distortion levels.
Measuring and ensuring the tape erasing ratio.
Measuring and minimizing crosstalk between channels.
Measuring crosstalk during sync recording.
Identifying locations for electrical adjustments on PCBs.
Table summarizing adjustments, signals, gear, and readings.
Important notes regarding DBX PCB adjustments.
Identifying adjustment points on the DBX PCB.
Diagrams for connecting test equipment for DBX adjustments.
Waveforms for VCA symmetry adjustment.
Procedures for adjusting the decoder section of the DBX system.
Procedures for adjusting the encoder section of the DBX system.
Exploded view of the top section and associated parts.
Exploded view of the front panel and mixer section parts.
Exploded view of the chassis and internal PCBs.
Exploded view of the front panel controls and buttons.
Exploded view of the rear panel and connector sections.
Exploded view of the internal mechanism and motors.
Parts layout and diagram for the REC/PLAY AMP PCB.
Parts layout and diagram for the DBX PCB.
Parts layout and diagram for the MONITOR PCB.
Parts layout and diagram for the INPUT PCB.
Parts layout and diagram for the BUSS A PCB.
Parts layout and diagram for the BUSS B PCB.
Parts layout and diagram for I/O PCB ASSY (1).
Parts layout and diagram for I/O PCB ASSY (12).
Parts layout and diagram for I/O PCB ASSY (13).
Parts layout and diagram for MOTHER PCB ASSY (1).
Parts layout and diagram for M BUSS PCB ASSY.
Parts layout and diagram for MOTHER PCB ASSY (2).
Parts layout and diagram for OPERATION PCB ASSY.
Parts layout and diagram for PWR SPLY PCB ASSY.
Parts layout and diagram for REEL SERVO PCB ASSY.
Parts layout and diagram for METER AMP PCB ASSY.
Parts layout and diagram for CAP SERVO PCB ASSY.
Parts layout and diagram for SENSOR PCB ASSY (L).
Parts layout and diagram for SENSOR PCB ASSY (R).
Parts layout and diagram for LED PCB ASSY (L).
Parts layout and diagram for LED PCB ASSY (R).
Parts layout and diagram for PHONE JACK PCB ASSY.
Parts layout and diagram for MECHANISM JOINT PCB ASSY.
Parts layout and diagram for BAL. PCB ASSY.
Parts layout and diagram for COUNTER PCB ASSY.
Parts layout and diagram for REMOTE PCB ASSY.
Parts layout and diagram for DEFEAT SW PCB ASSY.
Parts layout and diagram for P.G PCB ASSY.
Parts layout and diagram for BALANCE SW PCB ASSY.
Parts layout and diagram for SHUT OFF PCB ASSY.
Parts layout and diagram for CONTROL PCB ASSY.
Parts layout and diagram for MONITOR SW PCB ASSY.
Parts layout and diagram for DBX SW PCB ASSY.
Parts layout and diagram for HEAD CONNECT PCB ASSY.
Parts layout and diagram for BIAS PCB ASSY.
Parts layout and diagram for TR PCB ASS'Y.
Parts layout and diagram for FUSE PCB ASSY (1).
Parts layout and diagram for FUSE PCB ASSY (2).
Parts layout and diagram for PHONE AMP PCB ASSY.
Parts list for the REC/PLAY PCB ASSY.
Parts list for the DBX PCB ASSY.
Parts list for the BUSS A PCB ASSY.
Parts list for the BUSS B PCB ASSY.
Parts list for I/O PCB ASSY(8).
Parts list for I/O PCB ASSY(1).
Parts list for I/O PCB ASSY(9).
Parts list for I/O PCB ASSY(2).
Parts list for I/O PCB ASSY(10).
Parts list for I/O PCB ASSY(3).
Parts list for I/O PCB ASSY(11).
Parts list for I/O PCB ASSY(4).
Parts list for I/O PCB ASSY(12).
Parts list for I/O PCB ASSY(5).
Parts list for I/O PCB ASSY(13).
Parts list for I/O PCB ASSY(6).
Parts list for I/O PCB ASSY(7).
Parts list for MOTHER PCB ASSY(1).
Parts list for M.BUSS PCB ASSY.
Parts list for MOTHER PCB ASSY(2).
Parts list for OPERATION PCB ASSY.
Parts list for PWR SPLY PCB ASSY.
Parts list for REEL SERVO PCB ASSY.
Parts list for METER AMP PCB ASSY.
Parts list for CAP SERVO PCB ASSY.
Parts list for SENSOR PCB ASSY (L).
Parts list for SENSOR PCB ASSY (R).
Parts list for LED PCB ASSY (L).
Parts list for LED PCB ASSY (R).
Parts list for PHONE JACK PCB ASSY.
Parts list for MECHANISM JOINT PCB ASS'Y.
Parts list for BAL.PCB ASSY.
Parts list for COUNTER PCB ASSY.
Parts list for REMOTE PCB ASSY.
Parts list for DEFEAT SW PCB ASSY.
Parts list for P.G PCB ASSY.
Parts list for CONTROL PCB ASSY.
Parts list for MONITOR SW PCB ASSY.
Parts list for DBX SW PCB ASSY.
Parts list for HEAD CONNECT PCB ASS'Y.
Parts list for BIAS PCB ASSY.
Parts list for TR PCB ASS'Y.
Parts list for PHONE AMP PCB ASSY.
Schematic diagram for the REC/PLAY PCB Assembly.
Schematic diagram for the DBX PCB Assembly.
Schematic diagram for the MONITOR PCB Assembly.
Schematic of the mixer's input section and signal routing.
Schematic diagram for the BUSS A PCB.
Schematic diagram for the BUSS B PCB Assembly.
Schematic diagram for the MOTHER (1) PCB Assembly.
Schematics for M Buss, Operation, and Accessory Connector PCBs.
Schematic diagram for the MOTHER (2) PCB Assembly.
Schematic diagram for the power supply section.
Schematic diagram for the REEL SERVO PCB Assembly.
Schematic diagram for the METER AMP PCB Assembly.
Schematic diagram for the CAP SERVO PCB Assembly.
Schematic diagram for the BALANCE AMP PCB Assembly.
Schematic diagram for the CONTROL PCB Assembly.
Schematic diagram for the BIAS PCB Assembly.
Schematics for Head Ass'y and Mecha Joint PCB.
Schematics for Monitor, DBX, Phone Amp, and I/O PCBs.
Schematic diagram for the DEFEAT SW PCB Assembly.
Schematic diagram for the VR PCB Assembly.