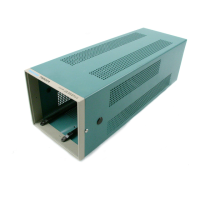
Maintenance
Remove and replace procedures
This section contains procedures for removal and installation of
customer-replaceable modules in the ECO8000. A ny electrical or mechanical
module, assembly, or part listed in the Replaceable parts list section of this manual
is a module.
Preparatio
n
WARNING. To prevent serious injury or death, disconnect the power cord from the
line voltage source before performing any remove or replace procedures.
Before performing this or any other procedure in this manual, read the General
safety summary and the Service safety summary found at the beginning of this
manual.
CAUTION. To prevent possible damage to the instrument components, read the
information on preventing ESD in this section. (See page 3-3, Electrostatic
damage prevention.)
Required equipment
Most disassembly is done using a #2 Phillips (P2) screwdriver tip. Use a P2
tip whenever a procedure step instructs you to remove or install a screw unle ss
a different size screwdriver is specified in that step.
Table 3-3: Required tools
Name Description
Anti-static w rist strap
Screwdriver handle
Accepts driver bits
P1 and P2 driver bit
Driver bit for P 1 and P2 screw heads
T15 TORX bit Driver bit for T15 TORX screw heads
6 mm nut driver
A 7/32 inch may also be used
9/16 inch deep socket Deep socket to fi t over B NC connectors
Needle nose pliers To remove or install light pipes
Cable tie
To replace a removed cable tie
Diagonal cutters To clip cable ties
ECO8000 Series Specifications and
Performance Verifi cation manual (Tektronix
part number 077-0876-XX) and all test
equipment listed within
Available for download from the Tektronix
Web site at www.tektronix.com/manuals
To perform the verification checks after
reassembling
3–6 ECO8000 Series Service Manual

 Loading...