5-35
Digital Edition - TIMECUTTER® HD Service Manual
April 2017
Table of Contents
CHASSIS
Chassis
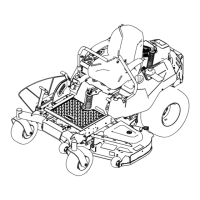
Adjusting the Motion Control Handle Position
NOTE: Ensure proper adjustment of neutral and tracking settings before adjusting the motion control
handles, see “Hydrostatic Drive Transmission,” chapter 7, page 7-12 and/or see “Tracking
Adjustment,” chapter 7, page 7-6.
1. Park the machine on a level surface and disengage the PTO. Stop the engine, wait for all moving parts to stop,
and remove key.
2. Move the levers into the operating position.
3. Loosen the two bolts that secure the motion control handles to the motion control assembly (A) (Figure 42).
4. Align the levers front to back and secure the bolts (Figure 42).
5. Move the levers into the park position.
6. Verify proper function of the unit.
NOTE: Motion control levers may be adjusted up or down as well for operator comfort by utilizing the
additional mounting holes on the motion control assembly. The motion control levers should
always be mounted on the inside of the motion control assembly.
Figure 42
 Loading...