CFW501 | 35
Troubleshooting and Maintenance
English
Table 6.3: Periodic inspection at every 6 months
Component Abnormality Corrective Action
Terminals, connectors
Loose screws
Tighten
Loose connectors
Fans /Cooling systems
(*)
Dirty fans Cleaning
Abnormal acoustic noise Replace fan
Blocked fan
Cleaning or replacementAbnormal vibration
Dust in the air filters
Printed circuit boards
Accumulation of dust, oil, humidity, etc. Cleaning
Odor
Replacement
Power module/ Power
connections
Accumulation of dust, oil, humidity, etc. Cleaning
Loose connection screws
Tightening
DC bus capacitors
(DC link)
Discoloration/ odor / electrolyte leakage
ReplacementSafety valve expanded or broken
Frame expansion
Power resistors
Discoloration
Replacement
Odor
Heatsink
Accumulation of dust
Cleaning
Dirt
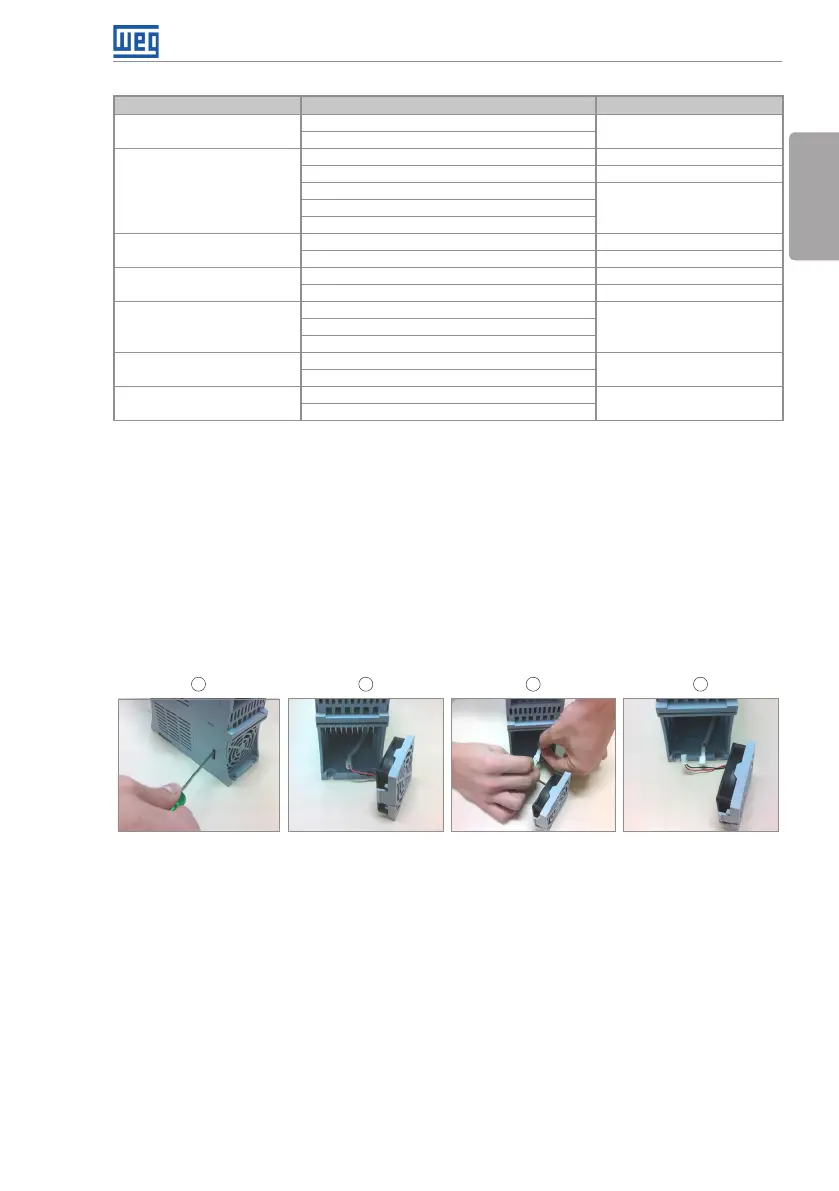
(*) The fan of the CFW501 can be easily replaced as shown in figure 6.1.
6.5 CLEANING INSTRUCTIONS
When it is necessary to clean the inverter, follow the instructions below:
Ventilation system:
Disconnect the power supply of the inverter and wait for 10 minutes.
Remove de dust accumulated in the ventilation opening using a plastic brush or cloth.
Remove the dust accumulated on the fins of the heatsink and fan blades using
compressed air.
1 2 3 4
Re le ase of th e l oc ks o f
the fan cover
Cable disconnectionRemoval of the fan Cable disconnected
Figure 6.1: Removal of the heatsink fan
Cards:
Disconnect the power supply of the inverter and wait for 10 minutes.
Disconnect all the cables of the inverter, identifying all of them in order to reconnect
them correctly.
Remove the plastic cover and the plug-in module (refer to chapter 3 - Installation and
Connection and APPENDIX B).
Remove the dust accumulated on the cards using and anti-static brush using and/or
ion compressed air gun.
Always use grounding strap.