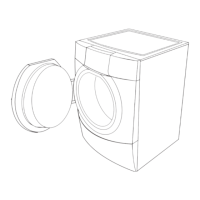
CLEANING THE DOOR SEAL
1. Open the washer door and remove any clothing or items
from the washer.
2. Inspect the gray colored seal between the door opening
and the basket for stained areas. Pull back the seal to
inspect all areas under the seal and to check for foreign
objects.
CLEANING THE DISPENSER
dispenser compartments. To remove residue, follow this
recommended cleaning procedure:
1. Pull dispenser drawer out until it stops.
2. Press down on the release tab and pull straight out to
remove the dispenser.
3. Lift o
cover panel by
pulling straight up.
4. Wash dispenser and
cover panel in warm,
soapy water, using a mild
detergent.
5. Rinse with warm water.
6. Air dry or wipe with a
clean towel, slide cover
panel back onto posts on
dispenser.
7. Align edges of dispenser
with guides in washer,
then slide dispenser
back into slot.
IMPORTANT: Dispenser is
not dishwasher safe.
Seal
3. If stained areas are found, wipe down these areas of the
seal, using the procedure that follows.
a) Mix a dilute solution, using 3/4 cup (177 mL) of liquid
chlorine bleach, and 1 gal. (3.8 L) of warm tap water.
b) Wipe the seal area with the dilute solution, using
a damp cloth.
c) Let stand 5 minutes.
d) Wipe down area thoroughly with a dry cloth and let the
washer interior air dry with door open.
IMPORTANT: Wear rubber gloves when cleaning for
prolonged periods. Refer to the bleach manufacturer’s
instructions for proper use.
WASHER MAINTENANCE
CLEANING YOUR WASHER
Keep your washer as clean and fresh as your clothes.
To keep washer interior odor-free, follow this recommended
cleaning procedure at least once a month:
1. Make sure laundry drum is empty.
2. Using recommended AFFRESH
®
washer cleaner, add
one tablet to washer basket
OR
If using liquid chlorine bleach, add 1 cup (250 mL) to
liquid chlorine bleach dispenser.
IMPORTANT: Do not add detergent to CLEAN WASHER
cycle. Do not use more than recommended amount of
bleach to avoid damaging product over time.
3. Close washer door.
4. Press POWER.
5. Select CLEAN WASHER with Aresh
™
cycle.
6. Press and hold START/PAUSE.
NOTE: The basket will rotate, then the door will unlock,
lock again, and then the cycle will continue. The washer
will add some water, and the basket will rotate while
the washer runs a short sensing cycle. This will take
approximately 3 minutes.
7. The cycle will determine whether clothing or other items
are in the washer. If no items are detected in the washer,
it will proceed to Step 8.
If any items are detected in the washer, “rL” will be
displayed, and the WASH and CONTROL LOCK lights
will light. The door will unlock. Open and remove any
garments in the wash drum. Press POWER to cancel the
error message. Then repeat steps 3–6 to start the cycle
again.
8.
PAUSE or POWER is pressed before the cycle is
complete, “Int” (Interrupted) will appear in the display.
It may take up to 10 minutes for the door to unlock.
9. After the cycle has ended, leave the door open slightly,
to allow for better ventilation and drying of washer
interior.
To clean exterior:
1. Use a soft, damp cloth or sponge to wipe up any spills.
2. Use mild soap and water if needed.
IMPORTANT:
abrasive products.
13. Remove garments promptly
Promptly remove garments after cycle has
completed to avoid odor and rusting of
metal objects on garments. When unloading
garments, pull back the door seal and check
for small items between the tub and the basket.
If you will be unable to remove the load
promptly, use the FanFresh
™
option. If the
FanFresh
™
option is selected, the washer will
automatically activate the fan and tumble
the load periodically for up to 16 hours.
NOTE:
After any wash cycle is completed,
the door must be opened and then
closed before a new cycle can begin.
A small amount of water may remain in the dispensers after
the wash cycle is complete. This is normal.
This washer has a tight seal to avoid water leaks. To avoid
odors, leave the door open to allow the washer to dry
between uses.
after cycle is nished