VX-6E OPERATING MANUAL 71
FRG
(
“FRIENDLY RADIO GROUP”
)
MODE
You may access other Internet Link Systems (including WIRES™ in the “FRG” mode)
that use a DTMF string for access.
Programming the FRG code
1. Load the DTMF tones which you wish to use for Internet-link access into a Internet
Memory register. For purposes of this example, we will use “#(F)1101D” as the ac-
cess code (the “#” key is denoted by the letter “F”).
2 Press the
[
F/W
]
key, then press the
[
0
(
SET
)]
key to enter the
Set mode.
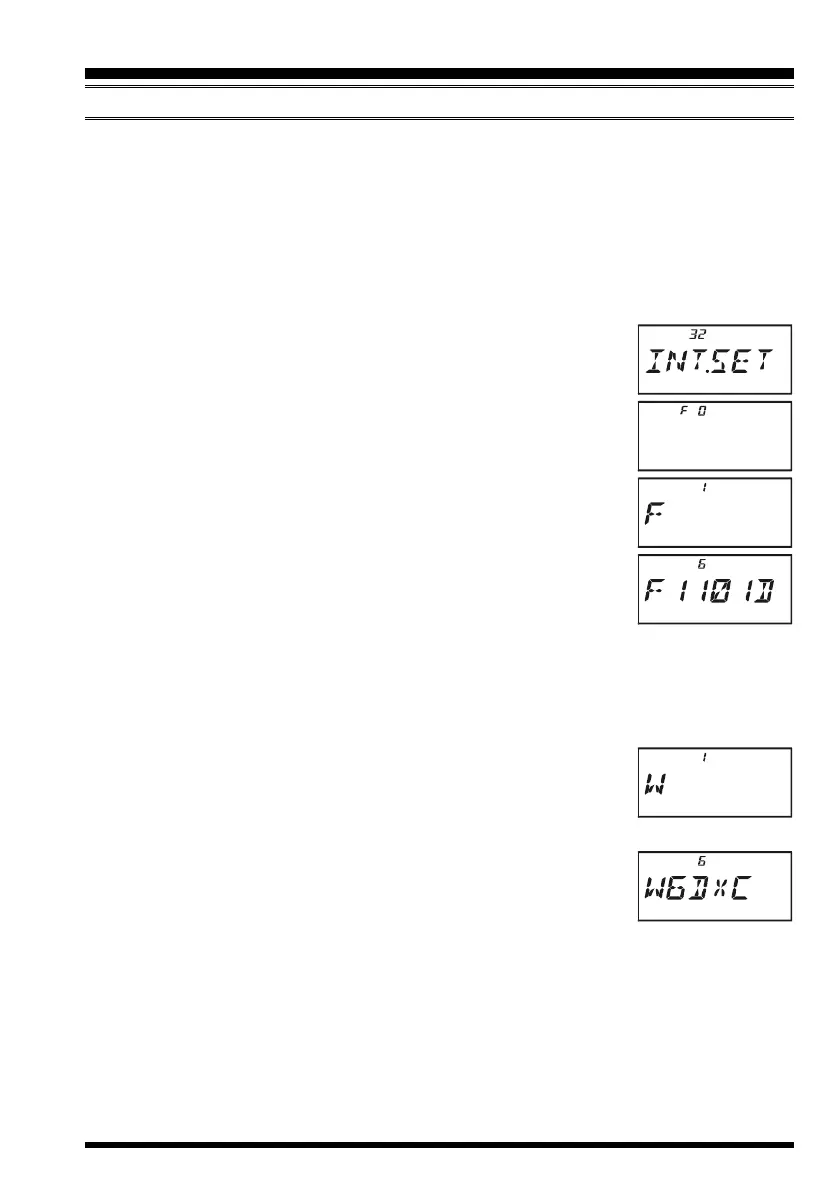
3 Rotate the DIAL knob to select Set Mode Item 32:
INT.SETINT.SET
INT.SETINT.SET
INT.SET.
4 Press the
[
0
(
SET
)]
key to enable adjustment of this Set Mode
Item.
5. Rotate the DIAL knob to select the Internet Memory register
(
F 0F 0
F 0F 0
F 0 ~
F63F63
F63F63
F63) into which you wish to store the access code.
6. Press the
[
MODE
(
SP S
)
SQ TYP
]
key momentarily. The first
digit will blink.
7. Rotate the DIAL knob to select “
FF
FF
F” (representing DTMF “#”:
the first digit of the DTMF string).
8. Press the
[
MODE
(
SP S
)
SQ TYP
]
key momentarily to accept
the first digit and move to the second digit of the DTMF string.
9. Repeat the previous steps until you have completed the access code (“#(F)1101D”).
10. If you attach an alpha/numeric name “Tag” to the Internet Memory, proceed to the
next step; otherwise press and hold in the
[
0
(
SET
)]
key for one second to save the
setting.
11. Press the
[
V/M
(
DW
)
MT
]
key momentarily to enable program-
ming of the name tag.
12. Rotate the DIAL knob to select the first digit of the desired label.
13. Press the
[
MODE
(
SP S
)
SQ TYP
]
key to move to the next char-
acter.
14. If you make a mistake, press the
[
BAND
(
SCN
)
BND DN
]
key
to back-space the cursor, then re-enter the correct letter, number,
or symbol.
15. Repeat steps 12 through 14 to program the remaining letters, numbers, or symbols of
the desired label. A total of six characters may be used in the creation of a label.
16. When you have programmed a label which is under 6 characters, press the
[
0
(
SET
)]
key to confirm the label.
17. Repeat steps 1 through 16 to store other access codes, if so desired.
18. Press the PTT switch to save the setting and exit to normal operation.
INTERNET CONNECTION FEATURE
 Loading...