3-52 Machine Maintenance Procedures
Thermal Assembly Installation 0
Apply approved thermal grease and make sure all heat pads are in place
before replacing module
.
Thermal grease can damage mainboard. Use caution when applying.
The following thermal grease types are approved for use:
PSX-D
1. Remove all traces of thermal grease from CPU using a lint-free cloth or cotton swab and
Isopropyl Alcohol, Acetone, or other approved cleaning agent.
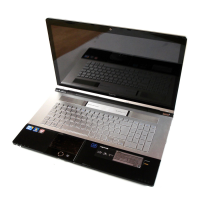
2. Apply small amount of thermal grease to center of CPU (A). (Figure 3-56)
Force used during installation of thermal module is sufficient to spread grease over
CPU top.
Figure 3-56. Applying Grease to CPU
3. Align thermal assembly and heatsink to mainboard screw holes. (Figure 3-55)
4. Install and secure captive screws (C1 - C4) to mainboard, in numerical order from one (1)
to four (4).
5. Install and secure captive screws (C5 - C7) to mainboard.
6. Connect fan cable (B) to mainboard connector.
7. Install mainboard.
 Loading...