Operating Instructions (18-0015) AM-48 Test Set
0015-S077-12
7.8 General Procedure to Set New Parameter Values
Note: Set Switch 7 to <SHIFT> to enable the keys to perform the
auxiliary functions.
See ¶7.36 for instructions to store new parameter values for future
use.
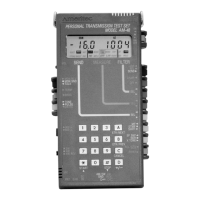
Items 2, 3, 4, 5, 7, and 8 shown in Figure 3-6 are the auxiliary
keyboard functions that are used together with the number keys to set
new parameter values. ¶3.6 explains how these keys are used.
See ¶5.7, Steps N thru HH, for an example of setting new parameter
values. To summarize, there are three (3) procedures used to set new
parameter values (confirm Switch 7 in <SHIFT>).
1.
Scroll Through the Displays . To view the displays without
making any changes in parameter values:
(a) Press [ETR/NEXT] to go to the next display.
(b) Press [ETR/PREV] to go to the previous display.
2. Set a New Parameter Value Using the Number Keys.
(a) Press any number key or the [±] key to clear the
display of the old parameter value and start writing a
new value on the display.
Note: Now the [∆] and [∇] keys will not work.
Finish writing the new value with the number keys.
b) If a mistake is made in Step a), press [CANCEL] to
clear the display and view the old value.
c) After using the number keys to write a new value in
Step a), press either [ETR/NEXT] or [ETR/PREV] to
enter the new value into memory, replacing the old
value.